Nothing says summer like fresh berries. This perfect summer salad is an ideal light lunch, a colorful side dish for dinner, or served in a large bowl at summer BBQs.
Like our Strawberry Spinach Salad, it’s a great way to use up leftover berries!
This post may contain affiliate links. Please see our Affiliate Disclosure Policy for more details.

Ingredients Needed
One of our favorite things about this fresh summer salad is its simple ingredients and its flexibility. So feel free to mix and match your favorite add-ins!
- Mixed Greens – We think spring mix plus arugula is the perfect combination. You could also use fresh baby spinach leaves, romaine lettuce, arugula, or a combination of any/all of these
- Fresh Berries – Choose your favorite summer berries. Any combo of raspberries, blackberries, strawberries, and blueberries works! Look for plump juicy berries
- Poppy Seed Dressing – Or use a classic Lemon Vinaigrette. We have easy recipes for both but store-bought versions work too! Or use a simple olive oil and balsamic dressing
- Candied Pecans – Or candied walnuts. Make your own or use store-bought. Any type of nuts work well with berries
- OPTIONAL: crumbled blue cheese, goat cheese, or feta cheese

How to make Berry Salad with Poppy Seed Dressing
- If you’re making homemade candied pecans make them first and set them aside to cool before using
- If mixing up our Homemade Poppy Seed Dressing or Lemon Vinaigrette gather the dressing ingredients, mix, and set aside (or make ahead and store in the refrigerator in a mason jar)
- Wash berries and gently pat dry. Stem and cut fresh strawberries in half if they are large
- Add lettuce to 4 medium sized shallow bowls
- Top with fresh delicious berries and then scatter the pecans on top
- If using, add a sprinkle of feta cheese, blue cheese, or goat cheese on top of each salad
- Drizzle liberally with dressing. Toss if desired. You can also serve the dressing on the side and let everyone add the amount they want
- If desired, for a crowd, mix everything in one big bowl instead of individual bowls and let everyone serve themselves
- Serve and savor!
Make Ahead Tips
- Make dressing up to 3 days ahead of time and store in an airtight container in the refrigerator. Shake well or whisk before serving.
- Candied or roasted nuts can be made up to 3 days in advance and stored at room temperature.
- Clean and pat dry the berries up to 1 day ahead and store in the refrigerator
- This salad should be assembled right before serving, so if you need to transport it the best way to do this is to bring the ingredients separately and toss everything with the green salad mix just before serving.

Helpful tips for making the best berry fruit salad
- Start with cold ingredients. This will help reduce the chance of your salad wilting.
- Don’t add the dressing to salads until you’re ready to serve.
- If making candied or toasted nuts be sure to allow time for them to cool before adding to the salad.
- If you want to toss the salad before serving we recommend tossing just the lettuce with the dressing and then adding the toppings. Berries are tender and fragile and can get crushed with extra tossing.
Storing Leftovers
- REFRIGERATE: Store in an airtight container for one day.
Variations
Berry Salad is super adaptable so use anything that appeals to you. Here are some ideas:
- Add a Protein – for a heartier main dish salad try adding shredded chicken, shrimp, sliced steak, or salmon
- Add more Veggies – sliced red onions, zucchini, or cucumbers
- Add a Grain – Add cooked brown rice, quinoa, or cous cous for a full meal
- Healthy Add-Ins – avocado, olives, and roasted garbanzo beans
- Salad Dressings – use any type that you love!

What to serve with this Fresh Berry Salad Recipe
Serve as the perfect side dish with any protein! Great for outdoor summer dining. Try it with any of these great recipes.
- Cedar Plank Salmon has a smoky flavor that pairs well with bright berries
- This light salad is a good match for Garlic Steak Bites
- Pairing with Air Fryer Pork Chops or Pan Seared Scallops makes this a true 15-minute meal

Fresh Berry Salad
Ingredients
- 6 ounces mixed greens (or romaine)
- 2 cups fresh berries (blueberries, blackberries, strawberries, raspberries)
- ½ cup candied pecans or walnuts recipe link below, or use a store-bought version
- ½ cup poppy seed dressing or lemon vinaigrette recipe links below, or use a store-bought version
OPTIONAL:
- ¼ cup blue cheese, goat cheese, or feta cheese crumbled
Instructions
- Make the dressing and candied pecans, if making homemade, and set aside½ cup candied pecans or walnuts
- In 4 individual bowls add the mixed greens, top with the mixed berries, scatter the pecans (and optional cheese).6 ounces mixed greens, 2 cups fresh berries, ½ cup poppy seed dressing or lemon vinaigrette, ¼ cup blue cheese, goat cheese, or feta cheese
- Drizzle the dressing over the top of the salad. Or leave the dressing on the side and allow each person to add their own.
Notes
- Candied Pecans are easy to make at home and can be made up to 3 days ahead of time and stored in an airtight container.
- Lemon Vinaigrette or Poppy Seed Dressing pair well and these are the links to our homemade versions.
- Dressing can be made ahead and refrigerated in an airtight container for up to one week. Shake or stir before serving.
- Calorie and nutrient count does not include optional cheese.
Nutrition
This dish looks fancy but it’s a simple recipe to prepare!
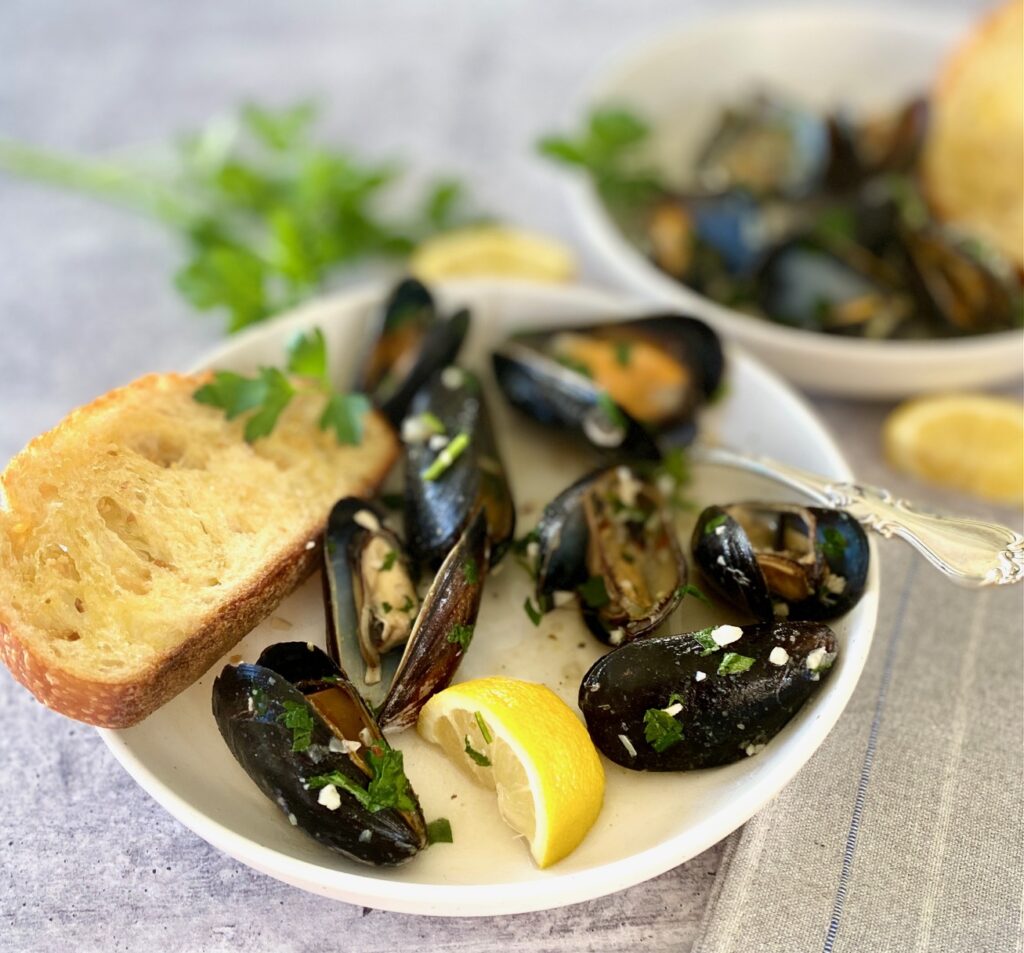
Pair these delicious mussels with plenty of rustic toasted garlic bread for dipping in the delicious white wine garlic sauce. It’s the ideal dinner but also makes a great appetizer.
Ingredients Needed
Plan on 1 pound of mussels per person, for a main course, or 1/2 pound per person for an appetizer portion. See the exact quantities in the recipe card below.

- Mussels – we used 4 pounds for this mussels recipe. See below for choosing the best mussels and how to clean them
- Olive Oil – we chose extra virgin olive oil
- Shallots and Garlic Cloves – Both of these aromatic add traditional flavors
- Salt, Black Pepper, Italian Seasoning, Red Pepper Flakes – we use sea salt
- Dry White Wine – such as Sauvignon Blanc, Pinot Grigio, or a crisp Chardonnay. This is the primary steaming liquid for white wine mussels so pick one you would actually drink, as well.
- Vegetable Stock or Chicken Stock – both work well for additional cooking liquid
- Butter – unsalted is best, but it’s okay to use salted if that’s all you have on hand
- Fresh Parsley – be sure to use flat-leaf fresh parsley for a great pop of color and freshness
- Rustic Bread – crusty bread with garlic, for dunking, is a must for getting every last drop of all the garlicky white wine broth!
Make the Garlic Bread First
- Preheat the oven to 375˚F.
- Prep the garlic bread by brushing with olive oil and topping with chopped garlic.
- Cook bread while steaming the mussels so that everything is ready to serve at the same time.


How to make Steamed Mussels in White Wine Sauce
Prep the mussels and other ingredients
- Clean and scrub the mussels under very cold water in a colander and drain.
- If any mussels are open tap the open shells lightly and if they do not close discard them. See below for more details about choosing and cleaning mussels.
- Chop the shallots, garlic, and parsley leaves. Cube the 3 tbsp of butter.
Cook the Mussels
- In a deep large pot or Dutch oven (with a lid), heat 2 Tablespoons of olive oil over medium heat until it is shimmering.
- Add the chopped shallots, and sauté for 1 minute, stirring to coat.
- Sprinkle in salt, pepper, Italian seasoning, red pepper flakes, and garlic. Cook for 2 more minutes, until garlic is golden, stirring to prevent burning.
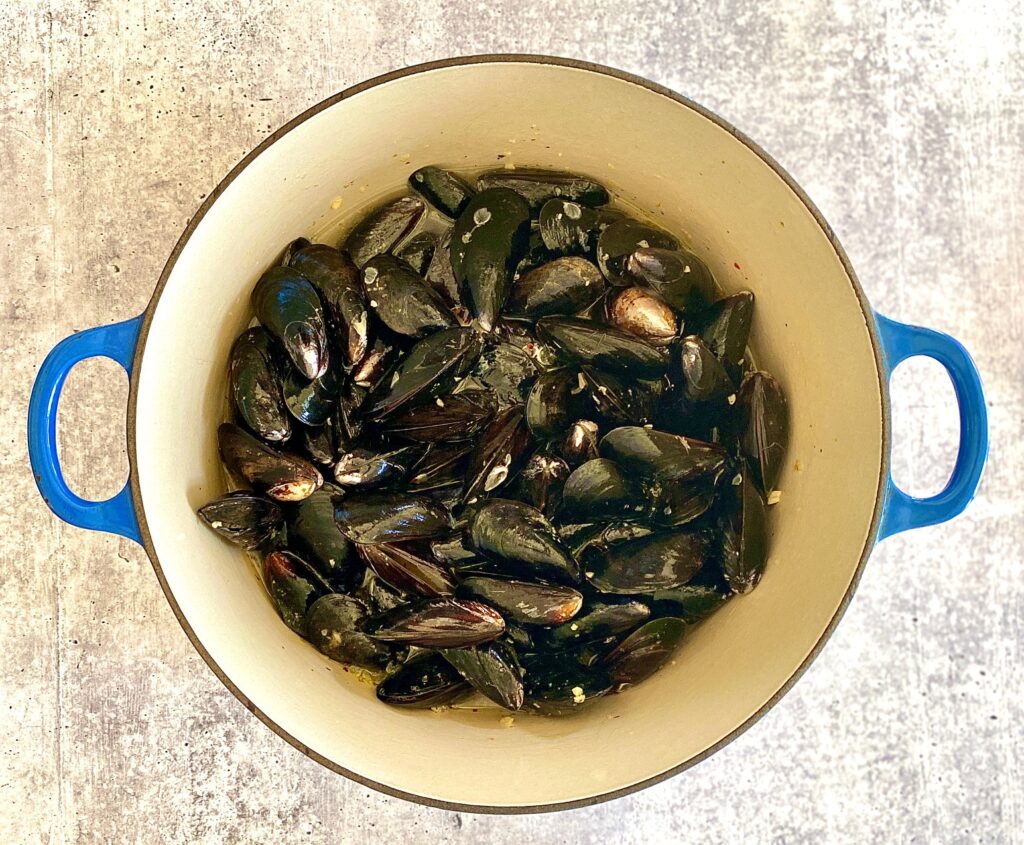
- Add the cleaned mussels and stir gently to coat in the garlic mixture.
- Pour in the broth and white wine, stir again to coat, and then cover with a lid.

- Steam for 5-7 minutes on medium-high heat. Check to make sure the mussels have popped open, and if needed cover and cook another 1-2 minutes.
- Turn heat to medium and scoop mussels out with a slotted spoon, evenly dividing them into 4 wide bowls for serving.
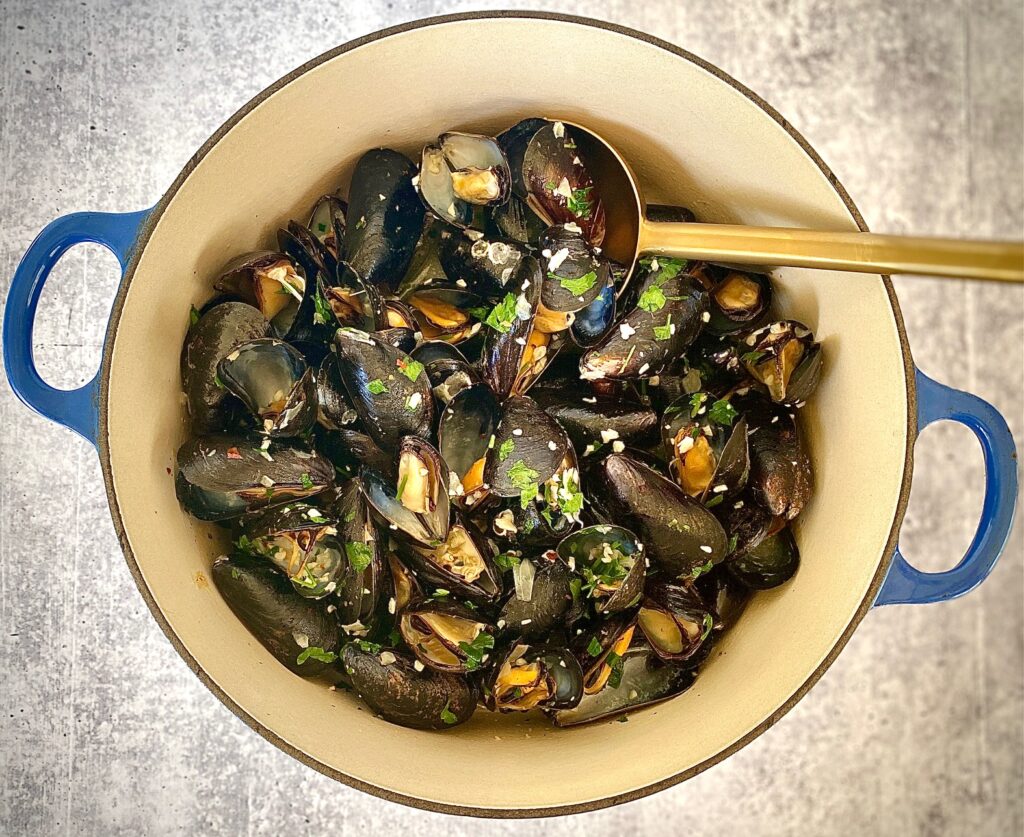
- Stir parsley and butter into the broth. Cook for about 2 minutes to melt butter
- Pour or ladle sauce evenly over the bowls.
- Remove bread from the oven and serve a slice alongside each bowl.
- The other serving option is leaving them in the large pan and serving at the table, or putting all of the mussels in a large bowl for the whole table.

Choosing and Cleaning Mussels
There is so much to love about mussels. They are quick-cooking, versatile, readily available, and one of the least expensive seafood. Also, they are simply delicious!
Grocery Store Bought:
- When buying mussels look for shells that are wet, shiny, and clean, and smell like the sea. The shells should be closed, and not chipped. A good fishmonger should pick over the shells to be sure they are closed.
- Mussels are best stored in mesh bags. If they are in a plastic bag be sure to open it once home so the mussels can “breathe” and store them in the refrigerator for up to 24-hours. Cover with a damp paper towel.
- Most mussels sold at the market are farm-raised mussels and have been cleaned and debearded, but you should always rinse them in cold water to remove any remaining sand or debris.
- If the shell is open tap it lightly with your fingernail, if the hinge of the shell closes it is still alive and okay to use. Otherwise, discard it. If in doubt, always toss it out.
- If they need to be debearded (the fibers from around the shell) simply tug the fibers with your thumb and forefinger and discard them.
Fresh Mussels (Wild Mussels):
- If you are lucky enough to get fresh live mussels you’ll need to soak them in very cold water before using them. Peak season is October through March. Wild mussels are sandy and still bearded!
- If any of the mussel shells are open tap lightly, if the hinge of the shells closes it is still alive. Otherwise, discard open mussels because they are dead and should never be eaten.
- Place mussels gently in a bowl of cold water for 20 minutes. This will help the bivalves filter out some of their sand. Scrape off any barnacles with a firm brush and remove the beard.
- Place cleaned mussels in a bowl of fresh cool water for an additional 10 minutes and then give them a final rinse before cooking.
- For further info check out this detailed step-by-step from Global Seafoods

Leftovers and Storage
- REFRIGERATOR: Store leftovers in an airtight container for one day. Gently reheat.
What is Moules Marinières?
- This is it! The French name translates to “mussels fishermen style” and is popular in the Northern regions of France (and in Belgium).
- This preparation is traditionally mussels steamed with a dry white wine and aromatics, such as onion, shallots, and garlic. Parsley is usually part of the dish as well.
Variations
- Keep it Pescatarian – use vegetable broth (instead of chicken broth) to keep this easy recipe meat-free
- Add french fries for dunking for a moules frites version
- Creamy Mussels – to make a white wine cream sauce whisk in 1 cup of heavy cream with the butter before serving, or try coconut cream
- Mussels over Pasta – Serving these delicious mussels over pasta makes this a full dinner. Boil 3/4 pound of your favorite spaghetti or linguine. Add the mussels sauce into the pan and stir until the pasta is well coated. Transfer to serving bowls and top with the steamed mussels
- Lemon Juice – a squeeze of lemon juice or sprinkling of lemon zest at the end of cooking is always a good idea with seafood recipes
Your Sommelier Recommends
A simple and smart pairing is to use the wine varietal used in making the dish.
- For these savory mussels, a beautiful pairing could include a Sauvignon Blanc, an unoaked Chardonnay, a crisp Chablis, or a Chenin Blanc.
- Looking for an old-world French wine? You can’t miss with a Pouilly-Fuissé or a Sancerre.

Looking for other simple savory seafood ideas?
- Steamed Clams with Garlic Butter and Wine are similar and a simple weeknight dinner
- Miso Glazed Seabass (or use cod) has a delicate flavor but is easy to make
- Step-by-step for Perfect Pan Seared Scallops
- Sheet Pan Asian Salmon with Asparagus ready in just 30-minutes on one pan

Mussels in White Wine Sauce
Equipment
- 1 Large Pot or Dutch Oven with lid
Ingredients
For Mussels
- 2 Tablespoons olive oil
- 4 Tablespoons shallots, roughly chopped
- 4 Tablespoons garlic cloves, chopped
- 1 generous pinch sea salt
- 1 generous pinch black pepper, freshly ground
- 1 teaspoon dried Italian seasonings
- ½ teaspoon red pepper flakes
- 4 pounds mussels, scrubbed
- 8 ounces dry white wine, such as Sauvignon Blanc, Chardonnay, or Chablis
- 4 ounces vegetable broth or chicken broth
- 3 Tablespoons butter, cut into pieces
- ¼ cup flat leaf parsley leaves, coarsely chopped
Garlic Bread
- 4 slices thick rustic bread
- 2 Tablespoons extra virgin olive oil
- 1 Tablespoon garlic, chopped (or 1 tsp garlic powder)
Instructions
Garlic Bread:
- Preheat oven to 375℉.
- Brush the olive oil on the bread slices and spread with garlic. Transfer to a baking sheet and bake for 10 minutes while preparing the mussels. Bread should be toasted and crusty.
Mussels:
- Clean and scrub mussels under very cold running water. If any mussels are open tap them lightly and if they do not close discard them.
- In a large, deep pot, heat 2 Tablespoons of olive oil over medium heat until hot and shimmering.
- Add shallots and sauté for one minute, stirring constantly. Sprinkle in salt, pepper, garlic, Italian seasoning, and red pepper flakes. Cook for about 2 more minutes, until garlic is golden, stirring to prevent burning.
- Add the cleaned mussels, stir gently to coat in the garlic mixture and pour in the broth and white wine, stir again to coat, and then cover the pan.Steam the mussels for about 5-7 minutes over medium-high heat, or until they open up. Check to make sure the mussels have popped open, and if needed cover and cook another 1-2 minutes.Turn the heat down to medium.
- Using a slotted spoon transfer the mussels into 4 serving bowls. Always discard any mussels that don't open.
- Add the butter and chopped parsley to the broth and cook for 2 minutes, stirring to combine, until the butter is completely melted.
- Spoon the broth over the mussels into each of the four bowls.
- Remove the garlic bread from the oven and serve alongside the mussels.
Notes
- VARIATION: If you want creamy mussels whisk in 1 cup of cream along with the butter.
- Always discard mussels that don’t open after cooking.
- Store leftovers for 1 day in the refrigerator.
Nutrition
Why do we love Rice Pilaf? Because it makes the perfect accompaniment to any protein!
This simple and versatile side dish is easy to prepare and we’ll share tips to make it beautifully fluffy. It’s all made in one-pot which is always a bonus!
Jump to RecipeIt’s also much more flavorful than boxed rice pilaf that you’ll never look back. We love to pair it with our Garlic Butter Steak Bites, Baked Salmon, or Jerk Chicken for an easy delicious dinner.
What makes Rice Pilaf a pilaf?
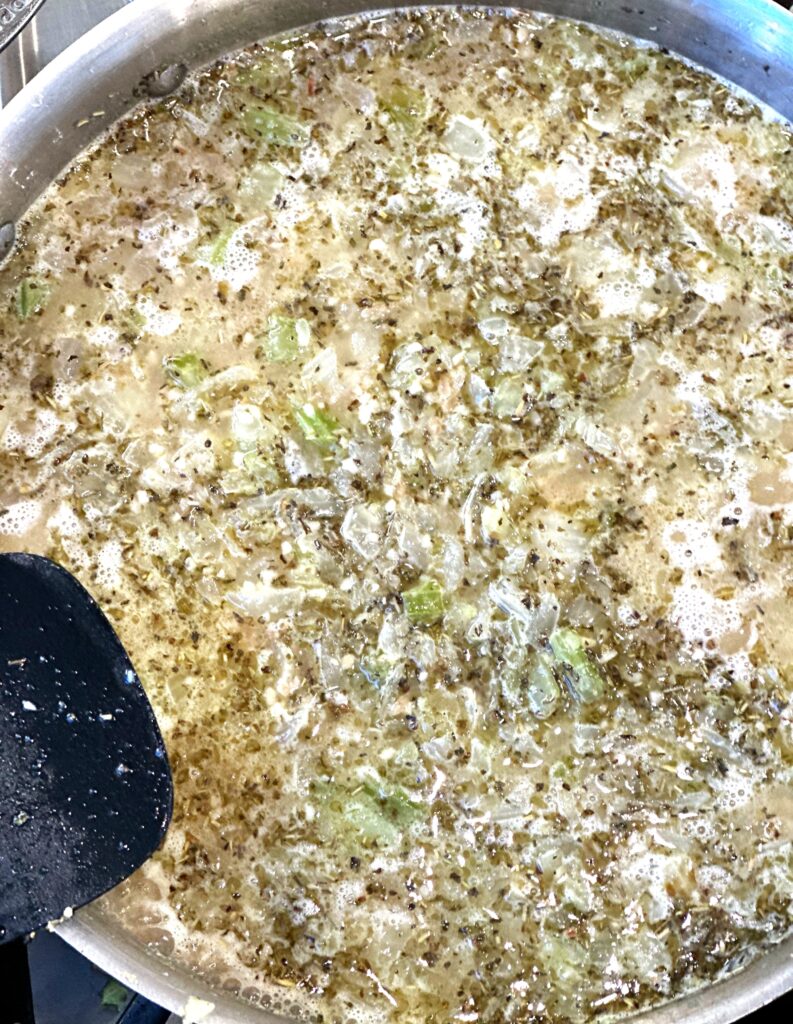
Rice pilaf is actually a “method” for preparing long-grain rice. It includes sautéing a combination of aromatics for flavor (we use celery, onion, and garlic) and long grain rice in oil (we like olive oil best).
In our version, we also include orzo for added flavor and texture. The sauteing occurs prior to adding in liquid and spices. That’s what makes pilaf so very flavorful.

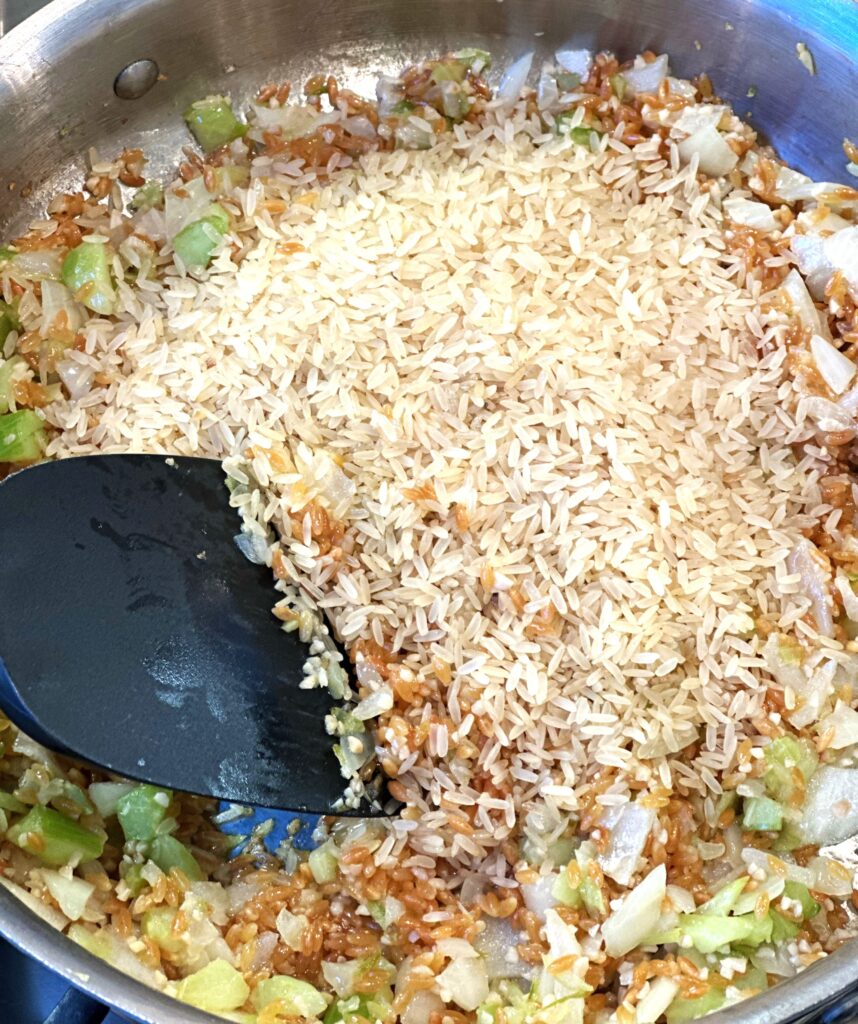
These are the first 2 steps in the pilaf cooking method. The first step is the sauté process. The second step is adding in long-grain rice.
Ingredients for Rice Pilaf:
This is a very easy recipe that will come together quickly. Don’t let the long ingredient list dissuade you from making the dish because it’s mostly basic pantry items and herbs. Easy Peasy!
- Long Grain Rice – long grain white rice is normally the best choice for pilaf due to its unique scent and longer length, but varieties such as basmati or jasmine are great too.
- Orzo Pasta – we love that it adds a gorgeous golden brown color to the rice
- Olive Oil
- Chicken Broth and Chicken Bouillon – so much more flavorful than water!
- Aromatics: Celery, Onions, Garlic
- Butter – we use unsalted butter, but salted works fine too
- Seasonings: dried Italian seasoning, Garlic Powder, Onion Powder, and Salt
- Sliced Almonds: Lightly toasted because that really adds a nice depth of flavor
- Flat Leaf Parsley – for garnish and an added pop of color

How to make Rice Pilaf:
Every version is a little different, and you can easily add or delete the extras. However, the technique of making pilaf will always be the same.
- In a large skillet, over medium heat, melt the butter and then add the olive oil. Heat until lightly sizzling
- Add the orzo and cook, stirring frequently, until the orzo is a golden brown color
- Add the onions and celery and cook until the onions are translucent and the celery is softened. This will take just a few minutes.
- Add the garlic and cook for 1 minute. Stir constantly until the garlic starts to smell fragrant.
- Next, add the long grain rice, stirring to coat it well with oil. Once coated, add the chicken broth and bouillon, add seasonings: dried Italian parsley, garlic powder, onion powder, and salt.
- Stir until well combined, increase heat to high, and bring to a boil.
- Reduce heat to medium-low, cover the pan, and gently cook for about 20-25 minutes. The rice should be tender and the liquid will be absorbed.
- Remove from the heat and let stand, with lid on, for about 5 minutes. Do NOT uncover the pan.
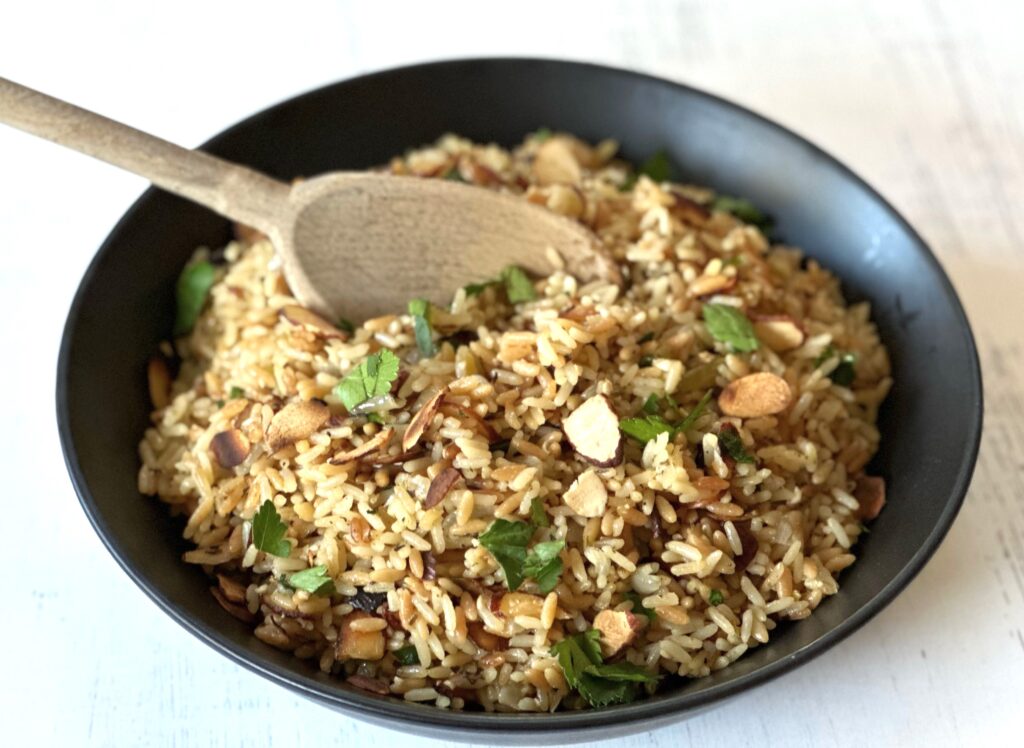
- Remove the lid, stir in chopped parsley and almonds, and then fluff with a fork to separate the grains.
- Taste for flavor and add additional salt if needed.

Above: the final 2 steps in the pilaf cooking process: (3) add in the broth, bouillon, and herbs. Step 4: add in the parsley and almonds and then fluff with a fork.
What is the difference between regular Rice and Rice Pilaf?
What makes pilaf different from regular rice is the actual cooking method. Plain rice is generally boiled in water until it is soft and creamy without any flavorings.
Rice pilaf is textured, with individual ingredients being sauteed, and then cooked with the aromatics in broth to make seasoned rice. It is not creamy but so flavorful.
What foods pair well with Rice Pilaf?
Rice Pilaf pairs especially well with poultry. We like to pair our pilaf with turkey, chicken, and seafood. Here are a few delicious main dishes that will make great pairings.
- Oven roasted turkey breast
- Asian Chicken
- Jerk Chicken
- Seared Halibut with Lemon Caper Sauce
- Pan Seared Scallops
- Garlic Butter Steak Bites
Variations to this recipe:
- Substitute the almonds with toasted pine nuts
- Add carrots or green peas along with the other aromatics
- Substitute shallots or leeks for the onions
Rice Pilaf Recipe
Ingredients
- 2 Tablespoons butter
- 2 Tablespoons extra virgin olive oil
- ½ cup celery, small dice
- ½ yellow onion, small dice
- 4 cloves garlic, minced
- 1 cup Long grain rice
- ½ cup Orzo pasta
- 3 cups Chicken broth
- 2 Tablespoons chicken bouillon
- 1 Tablespoon Italian seasoning, dried
- 1 teaspoon garlic powder
- 1 teaspoon onion powder
- 1 teaspoon salt
- ¼ cup sliced almonds, toasted
- 2 Tablespoons flat-leaf parsley, stems removed, roughly chopped
Instructions
- In a large skillet, over medium heat, melt the butter and then add the olive oil. Heat until lightly sizzling.
- Add the orzo and cook, stirring frequently, until the orzo is a golden brown color
- Add the onions and celery and cook until the onions are translucent and the celery is softened.
- Add the garlic and cook for 1 minute. The garlic will smell fragrant.
- Add the long grain rice, stirring to coat it well with oil. Once coated, add the chicken broth and bouillon, plus add seasonings: dried Italian parsley, garlic powder, onion powder, and salt. Stir until well combined, increase heat to high and bring to a boil.
- Reduce heat to medium-low, cover the pan and gently cook for about 20-25 minutes. The rice should be tender and the liquid will be absorbed.
- Remove from the heat and let stand, with lid on, for about 5 minutes. Do NOT uncover the pan.
- Remove the lid, stir in chopped parsley and almonds, and then fluff with a fork. Taste the seasoning and adjust, if needed.
Nutrition
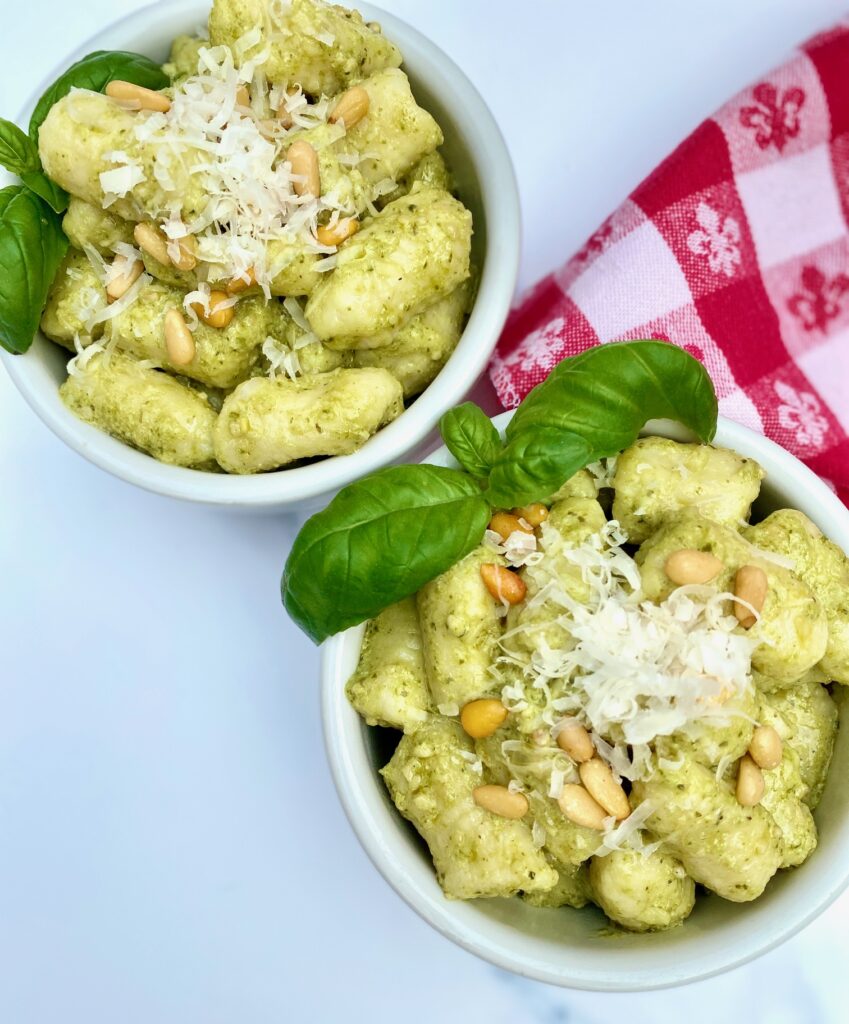
This super creamy pesto dinner is ready in less than 30 minutes and is simple to pull together, which makes it perfect for weeknight dinners or try it for meatless Mondays
Creamy Basil Pesto and tender gnocchi are an ideal pair!
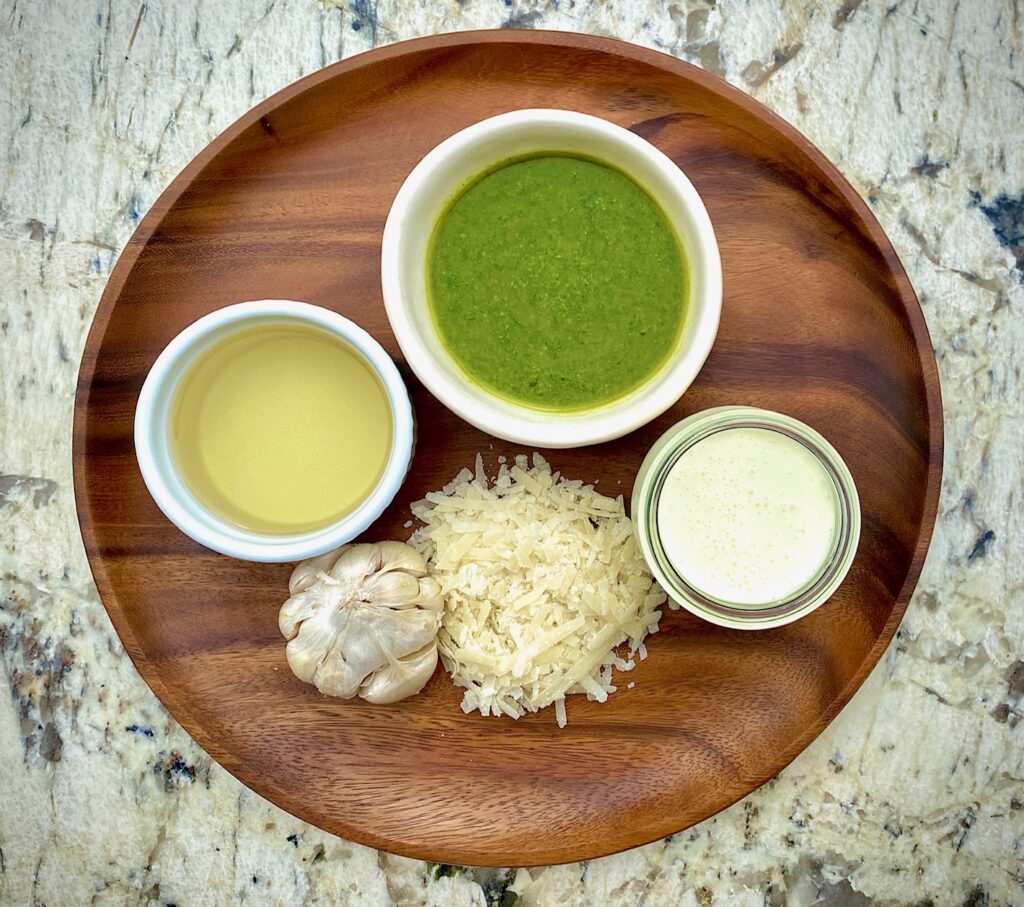
Ingredients needed
- Dry white wine – any variety such as Sauvignon Blanc or Chardonnay
- Fresh Garlic – 2 cloves finely minced
- Heavy Cream – this is a creamy sauce!
- Gnocchi – 16 oz. ready-made, shelf-stable, refrigerated, or fresh homemade gnocchi
- Basil Pesto – we like to make our own but you can use premade pesto, as well
- Parmesan Cheese – buy a wedge and grate your own – it makes a huge difference!
- Pine Nuts – toasted, an optional (but highly recommended) garnish
- Salt and White Pepper – you can also use black pepper
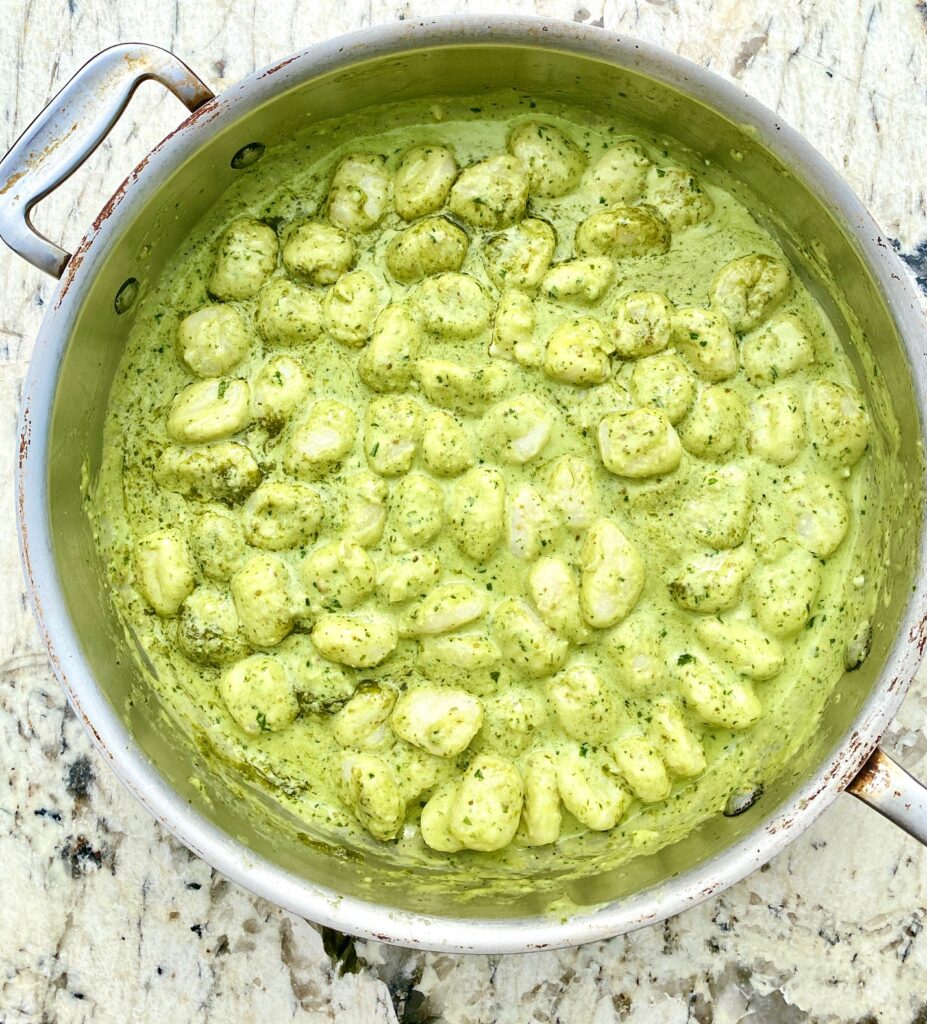
- One-pan gnocchi recipes are super quick when you use shelf-stable gnocchi (look for packages in the dried pasta area of your market). Shelf-stable gnocchi is handy since you don’t need to pre-boil it. As it cooks the gnocchi releases starch which works to thicken the sauce. This makes it a truly one-pan meal.
- You can also use the fresh refrigerated version of gnocchi with the same results.
- If you have time, make your own gnocchi, and cook it ahead of time. It’s actually easier than you think! (See additional directions below for using homemade gnocchi).

How to Make Creamy Pesto with Gnocchi
- Prepare the pesto sauce ahead of time, or use premade pesto
- Toast pine nuts lightly in a dry skillet and set aside
- Mince the garlic
- If making homemade gnocchi prepare, cook, drain, and hold until the sauce is ready
- Heat a large heavy-bottomed saucepan over medium heat
- Add wine and minced garlic. Cook for about 1 minute continually stirring to make sure the garlic doesn’t burn
- Reduce heat to medium-low, whisk in the heavy cream, and cook for about one minute to thicken the sauce
- Turn the heat to low and whisk in the pesto. Stir or whisk to combine
- Add the gnocchi and gently stir to coat. Cover and cook for about 3 minutes
- Sprinkle in Parmesan, salt, and pepper
- Cover the pan for 1 minute and allow the cheese to melt and the gnocchi to finish warming up
- If the sauce is too thick add water one Tablespoon at a time to loosen it up a bit
- Serve with toasted pine nuts. If you love Parmesan add a sprinkle more of that too!
What is Gnocchi?
Often thought of as a type of pasta (it’s not!), gnocchi is a small Italian dumpling made of potatoes and flour, and sometimes additional seasonings and cheese. It is similar in texture to pasta and is often served with the same types of sauces.

Pro Tips for the Best Pesto Gnocchi
Gnocchi is versatile and can be served boiled, baked, steamed, or pan-seared, as an entree or a hearty side dish.
- If using refrigerated gnocchi you may need to cook one additional minute
- If using homemade gnocchi – cook the sauce completely and then toss in your cooked gnocchi
- Gnocchi cooks quickly (unlike pasta) so take care not to overcook it!
- In a time crunch? Purchase premade fresh pesto
- Ready to make your own pesto? It’s easy! We love it on our Pesto Pasta Salad too!
- Store-bought pesto can vary so be sure to taste the sauce before serving. If it’s a little bland add another dash of salt and pepper
What to Serve with Creamy Pesto Gnocchi
Add a protein:
- This creamy dish becomes a complete meal if you add a pre-cooked protein like salmon, shrimp, or chicken.
- It’s a great way to use up any leftovers! Keep in mind that since the dish doesn’t cook for long you’ll need to precook the protein and then add it at the end of cooking just to warm up
Want to keep it vegetarian?
- Add any variety of vegetables! Cooked broccoli, red bell peppers, zucchini, mushrooms, or asparagus are great matches.
- Add fresh spinach or arugula to the pan for one minute just before finishing and it will wilt right in the pan.
- Fresh cherry tomatoes are a gorgeous addition, as are our Italian style Oven Dried Tomatoes
Other Variations:
- Substitute chopped, toasted walnuts in place of the pine nuts
- Skip the wine and use chicken stock instead
- No heavy cream on hand? You can use half & half in a pinch but you will need to cook it a bit longer to thicken it
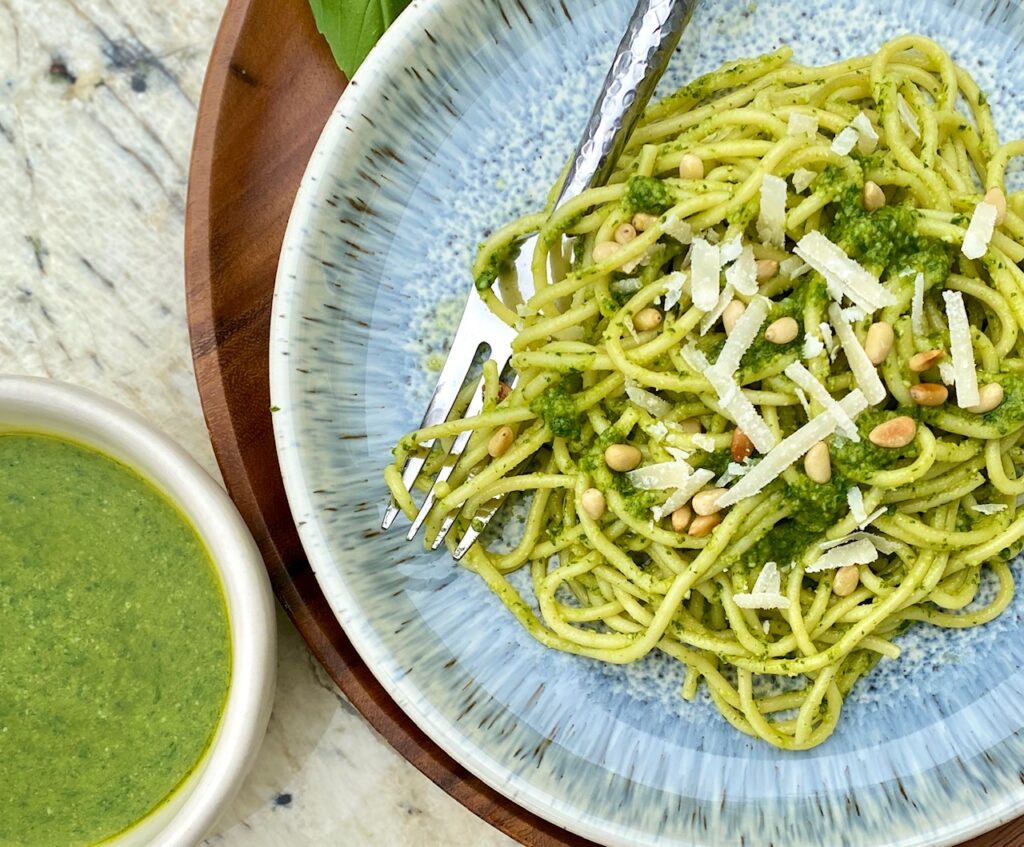
- This amazing creamy pesto sauce will work with pasta too! Try it with cooked spaghetti, like the photo below, or shell pasta
Storing the leftovers
- REFRIGERATOR: You can store any leftovers for up to 3 days in an airtight container. Reheat gently over low heat before serving
- Freezing is not recommended
Main Dishes to serve with gnocchi
This dish makes a gorgeous, easy side dish and pairs perfectly with:
- Tomahawk Steaks
- Oven Roasted Turkey Breast
- Oven Baked Ribs that fall off the bone
- Perfect Pan Seared Scallops

Creamy Pesto Gnocchi
Ingredients
- 2 Tablespoons dry white wine (i.e. Chardonnay, Chablis or Sauvignon Blanc)
- 1 Tablespoon garlic finely minced
- ½ cup heavy cream
- 16 ounces cooked gnocchi Shelf-stable, refrigerated, (or homemade)
- ½ cup basil pesto (Here's our recipe)
- ¼ cup Parmesan cheese freshly grated (optional)
- salt and white pepper to taste
- 1 Tablespoon pine nuts, toasted (optional)
Instructions
- Prepare pesto ahead of time and reserve.**If making homemade gnocchi prep, boil and drain ahead of time. Hold in pan while making sauce
- Heat a large heavy bottom pan over medium heat. Add white wine and minced garlic. Cook for one minute. Reduce heat to medium-low and whisk in 1/2 cup of the heavy cream and stir to fully combine. Cook for one minute to thicken, stirring constantly.
- Reduce heat to low. Whisk in the pesto. Stir to combine. Add in the gnocchi. Gently stir to combine. Cover the pan and let the gnocchi cook for about 3 minutes.
- Add in Parmesan, salt and pepper and mix to combine.
- Cover for about 1 minute to let the cheese melt.
- Add more Parmesan and a sprinkle of pine nuts, if desired, and serve.
Notes
- Want to make Homemade Gnocchi? We’ve got a step-by-step recipe
- Homemade Pesto Sauce is easy to make and takes just 5-minutes
Nutrition
Gremolata is a great topping for veggies, meat, soups, pasta, and seafood. It’s one of the best ways to add a finishing touch of fresh flavor to any meal and it only takes 5 minutes to make!
What is Gremolata?
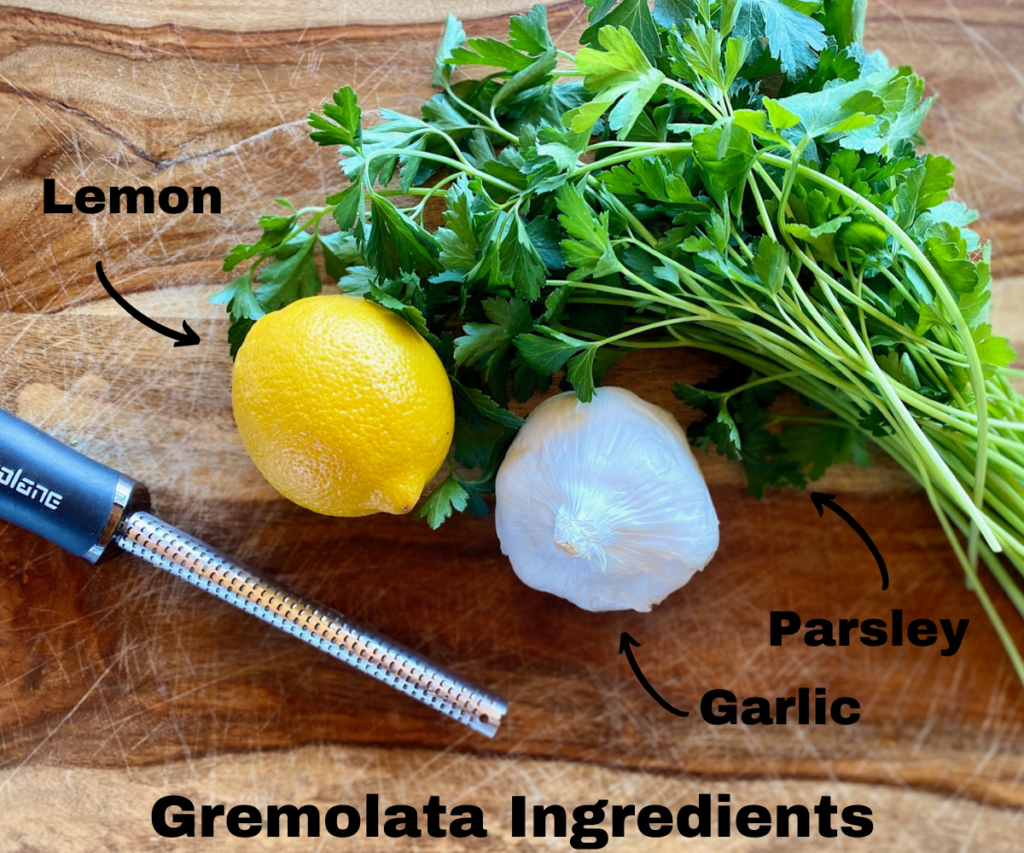
It’s just 3 basic ingredients: Parsley, garlic and lemon zest!
This bright herby condiment originated in Italy and was traditionally served sprinkled on top of Osso Bucco (a braised veal shank to has been slow-cooked for hours) or lamb. The flavor combination really balances out any rich dish.
But, gremolata is also a perfect match for grilled chicken and fish, roasted vegetables, and most any other grilled or roasted meat. It’s nice swirled into soups, sprinkled over eggs, or added into bean or pasta salads.
Jump to RecipeThis post may contain affiliate links. Please see our affiliate disclosure for more details.

Ingredients for our Gremolata Recipe
With just 3 simple ingredients this is a condiment you should have on repeat!
- Fresh Italian Parsley – use flat-leaf parsley for the best flavor. Cut off the thicker stems from the bottom, but the tender part of the stems, toward the leaves, are ok to use
- Garlic Cloves – we use 2 cloves because we just love garlic but you can use 1 clove for a milder taste. Be sure to use fresh garlic, not jarred for this recipe. Since the garlic is raw you will want to use the freshest cloves possible
- Lemon Zest – choose a bright firm lemon for the freshest tasting zest
It’s handy to use a zester or Microplane tool to zest the lemon. If you don’t have one then carefully grate just the yellow part of the peel. Don’t use the white part, called the pith, because it is bitter.
You can also use the Microplaner to grate the garlic if you want it really finely minced.
How to make Gremolata (2 methods)
Gremolata is super easy to make by hand or in a mini food processor. If you are making a larger batch then the food processor is a nice time saver.
- By Hand: Cut off the thicker ends of the parsley stems and discard. Finely chop the parsley, grate the lemon zest, and mince the garlic. Mix everything together in a small bowl until well combined.
- In a mini Food Processor: Remove the stems from the parsley, add to the processor bowl, then add the lemon zest and the garlic cloves (no need to mince the cloves). Process until very well combined. You may need to stop and scrape down the bowl once or twice.
Gremolata works best if the parsley is very dry when you start to prepare it. I like to put mine in a salad spinner after I wash it, if I am in a rush.
If your mixture looks a little wet and clumpy (this happens more commonly if you use a food processor) just spread it out on a baking sheet and let it air dry for about an hour. Give it a fluff every 20 minutes or so to break up any clumps.

How to serve Gremolata
There are so many ways to use this delicious condiment! Like its herby cilantro-based cousin, Chimichurri Sauce, the possibilities are endless.
Here are some of our favorite way to use gremolata:
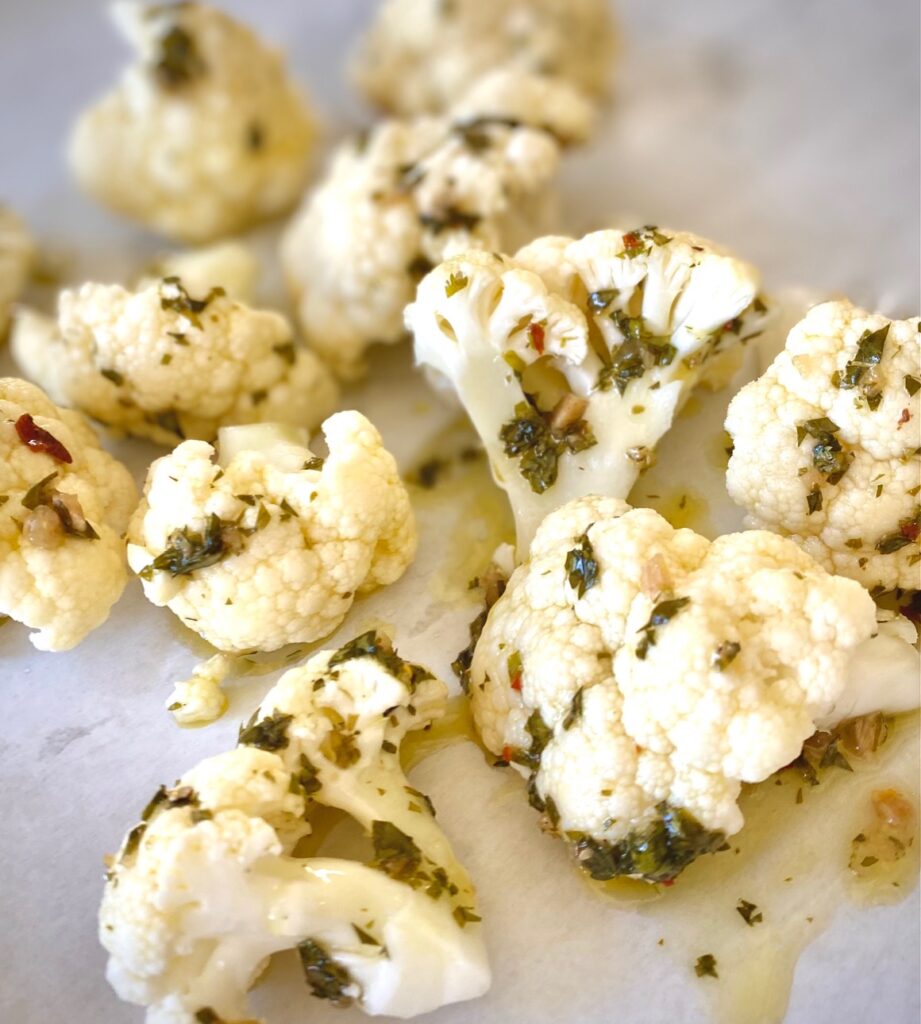
- Perfect for topping vegetables. Roasted Asparagus and cauliflower are perfect with Gremolata sprinkled on top
- Swirl a little gremolata into your soup to give it an extra kick!
- We like to add it to our Oven Roasted Potatoes after they come out of the oven to give them a pop of flavor
- Delicious on top of most red meats, as well as chicken and pork
- Ideal on salmon and most white fish
- A great way to add flavor to pasta with a drizzle of olive oil
- Sprinkle a little on your avocado toast!

Making a Marinade or Dressing:
It’s simple to turn this condiment into a super flavorful marinade to be used on meats or seafood.
We like it drizzled on a sizzling steak or a freshly seared piece of halibut. It’s ideal for marinating shrimp or scallops, as well.
Marinade:
- Add 1/4 cup of extra virgin olive oil to 4 tablespoons of the prepared gremolata and blend (or shake) well
- Use as you would any other marinade
Salad Dressing:
- To make Salad Dressing: Add some of the base gremolata mixture and the juice from the zested lemon together. Then drizzle in olive oil until you achieve the consistency you like, and whisk well to combine
- Store in the refrigerator in a glass jar with a lid. When ready to use allow the dressing to come to room temperature for about 10 minutes. Shake well to combine before serving. Will keep for about 10 days.

How to store:
Gremolata is best used the day it is made. The flavor remains bold and bright on day one but will lose some of those qualities after a day or so. However, you can actually keep it for up to 5 days in the refrigerator in an airtight container.
More Sauces and Condiments to try:
- Pesto Sauce and Chimichurri Sauce can both be used in many of the same ways as gremolata
- Our easy Teriyaki Sauce is great on chicken and fish
- Spicy Peanut Sauce will liven up noodles and Chicken Skewers
- Sweet Asian Chili Sauce is delicious slathered on Grilled Corn on the Cob or used to dip your Coconut Shrimp or egg rolls


Gremolata (Italian Herb Condiment)
Ingredients
- 1 cup Flat-leaf (Italian) parsley (1 bunch)
- 2 garlic cloves, peeled
- 1 lemon, zest only
Instructions
- Wash parsley and spin or pat dry. (Don't skip the drying step. This will help avoid clumps in the sauce).
- Remove stems and finely chop the parsley to equal one cup.
- Peel the garlic cloves and finely mince. Zest the lemon.
- Combine parsley, garlic, and lemon zest in a bowl, stir to mix, and reserve until ready to use.
- If not using immediately store the prepared gremolata, in an airtight container, for up to 5 days, in the refrigerator.
- If preparing in a mini food processor: combine stemmed parsley, whole cloves of garlic, and lemon zest. Pulse to chop and combine completely.
Notes
- This recipe makes 8 ounces and can be doubled
- Store in an airtight container, refrigerated.
Nutrition
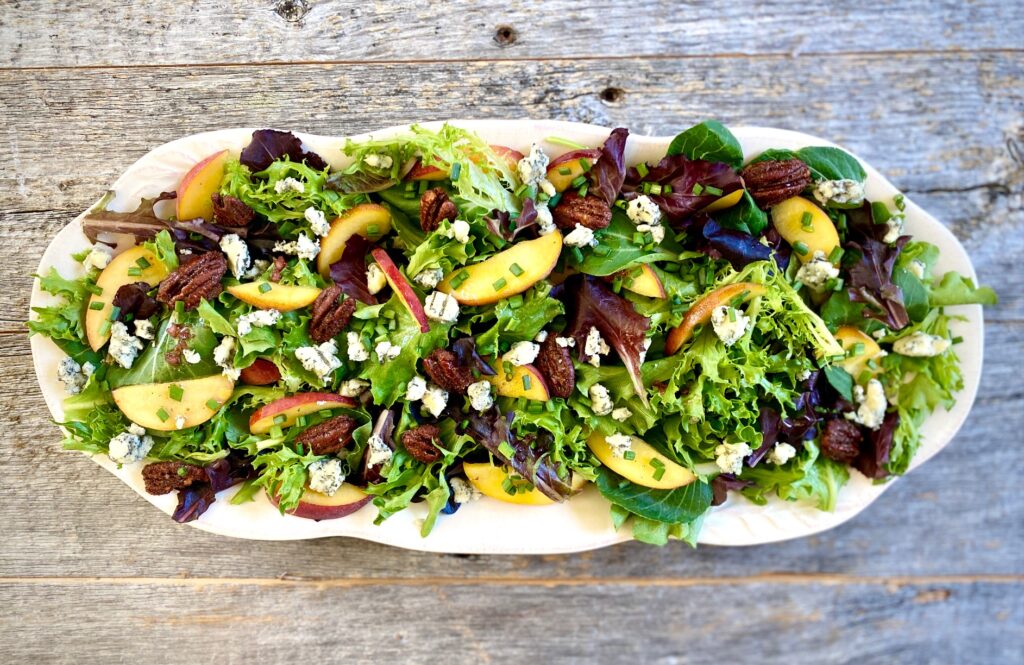
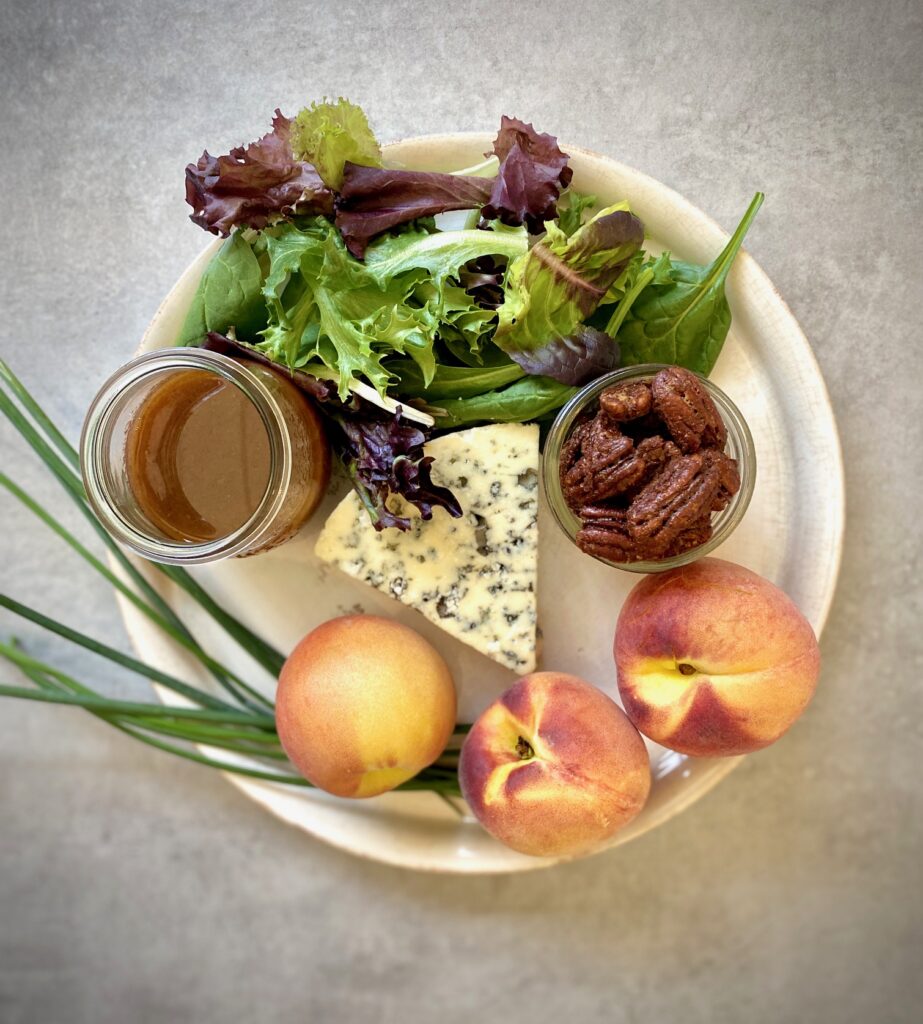
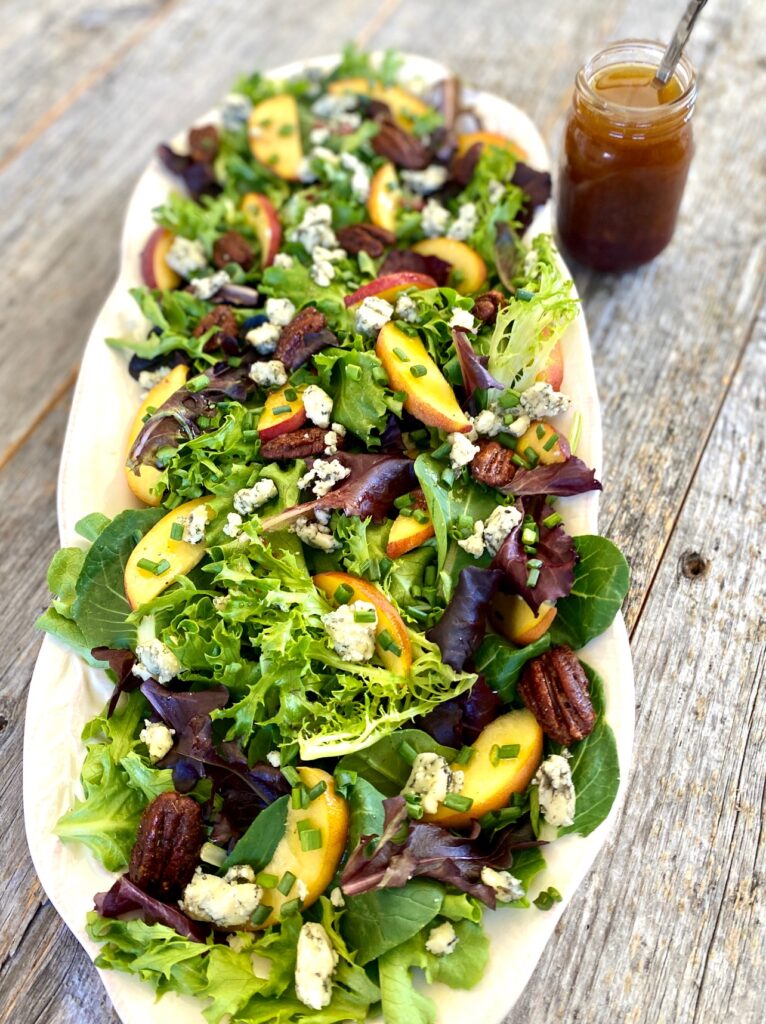
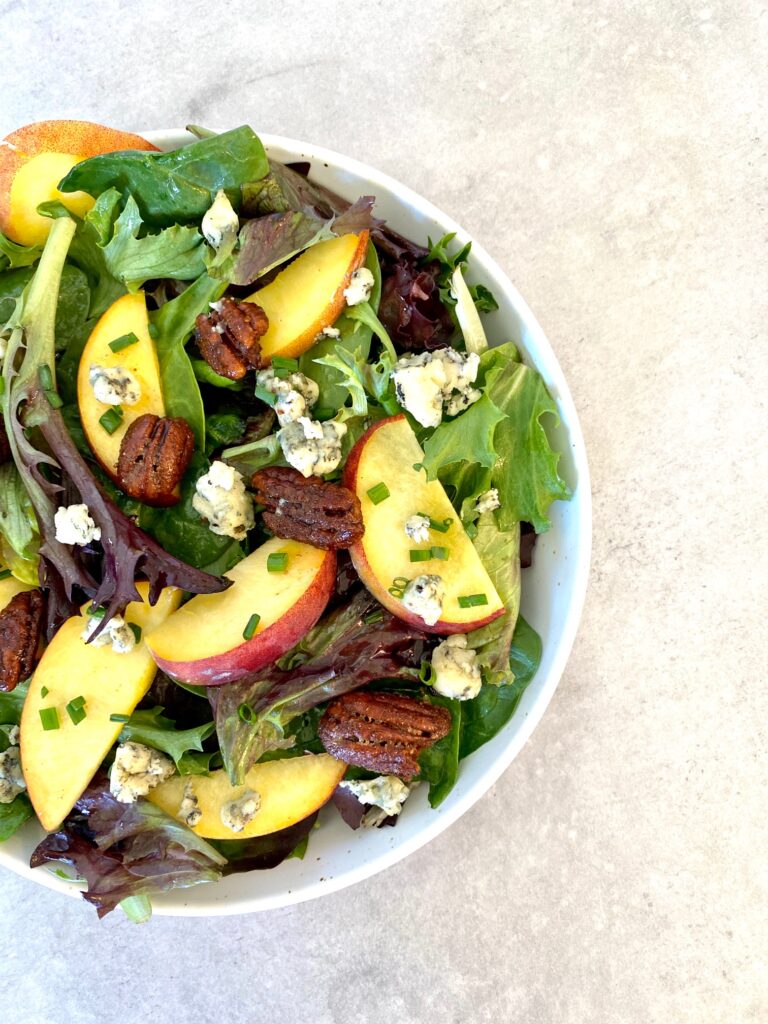
Fresh summer peaches are perfect for salads. They add a sweet touch and are especially delicious when combined with tangy blue cheese and a port wine cumin vinaigrette. This salad has just a few ingredients but all of them are so flavorful!
There are a few steps to making this delicious salad, such as blending the vinaigrette and preparing the candied pecans, and all can be done ahead of time. We will walk you through all the steps below, including how to make port wine syrup for the dressing.
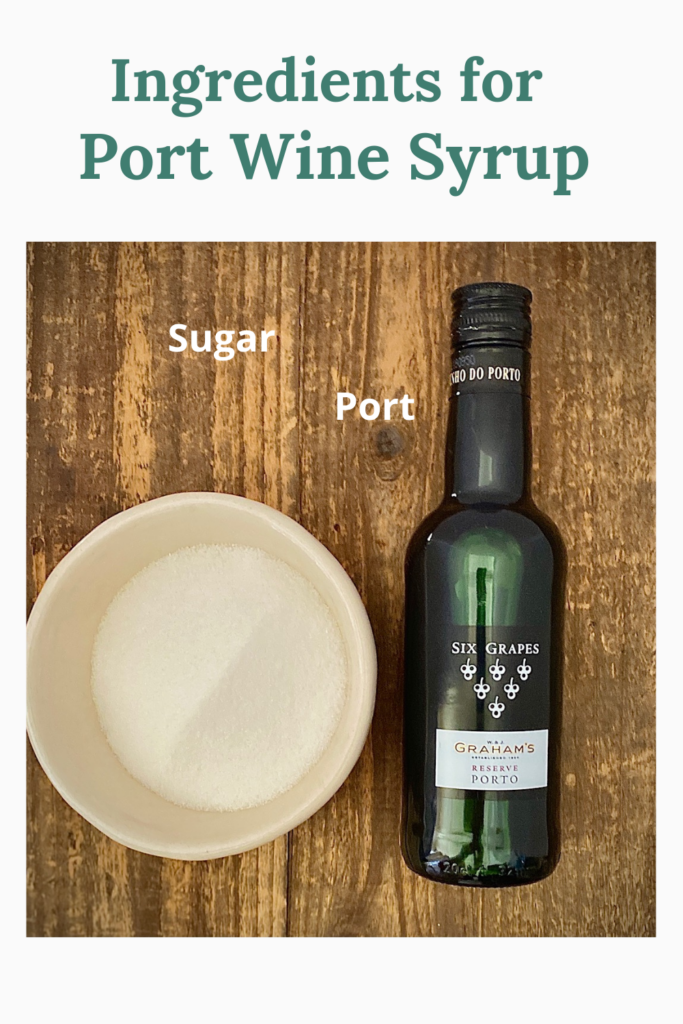
How to make Port Wine Syrup
The first step to making the base of the port wine cumin vinaigrette is making a port wine reduction syrup. It’s simple to make with just 2 ingredients.
- Combine sugar and port wine in a pan, heat to a boil, and reduce to a simmer. Stir occasionally until thickened, about 15 minutes. Cool the syrup before using it.
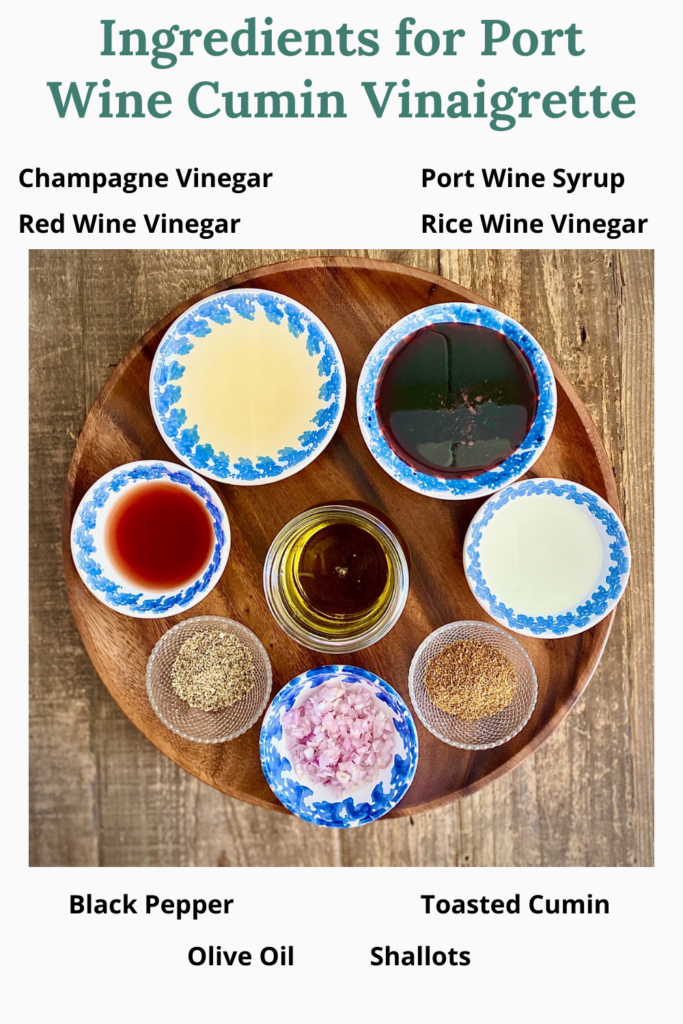
Ingredients for Port Wine Cumin Vinaigrette
- Port Wine Syrup – be sure it’s cooled before using it
- Rice Wine Vinegar – Compared to white vinegar, rice vinegar is less acidic with a delicate, mild, and slightly sweet flavor.
- Red Wine Vinegar – this vinegar is tangy and is a staple for vinaigrettes
- Champagne Vinegar – a mild, floral vinegar typically made from Chardonnay and Pinot Noir grapes. If you don’t have any on hand you can use white wine vinegar
- Minced Shallots – we like the milder taste of shallots (vs. onions) for most vinaigrettes
- Toasted Cumin – to toast cumin just cook in a dry skillet over medium heat for a few minutes to bring out the warm flavors
- Black Pepper – freshly ground
- Extra Virgin Olive Oil – use your best olive oil since this is the base of this vinaigrette
This vinaigrette comes together in just a few minutes. Either hand whisk it in a bowl or quickly blend it in a mini food processor.
To Prepare: blend everything together, except olive oil, and then slowly drizzle in the oil until well combined.
Ingredients for Fresh Peach Salad
- Mixed Greens – we use a mixture of lettuces such as red leaf lettuce, green leaf lettuce, frisee, arugula, spinach, and baby romaine
- Fresh Ripe Peaches – yellow and white peaches are our favorites for this salad. Try using a combination of both for extra visual appeal. Peaches are at their best June through August and as a result, are at their peak during this time.
- Crumbled Blue Cheese – we used Maytag blue for our salad but you can use any variety of blue cheese, or gorgonzola. If you aren’t a fan of blue cheese you could substitute in some tangy goat cheese or feta.
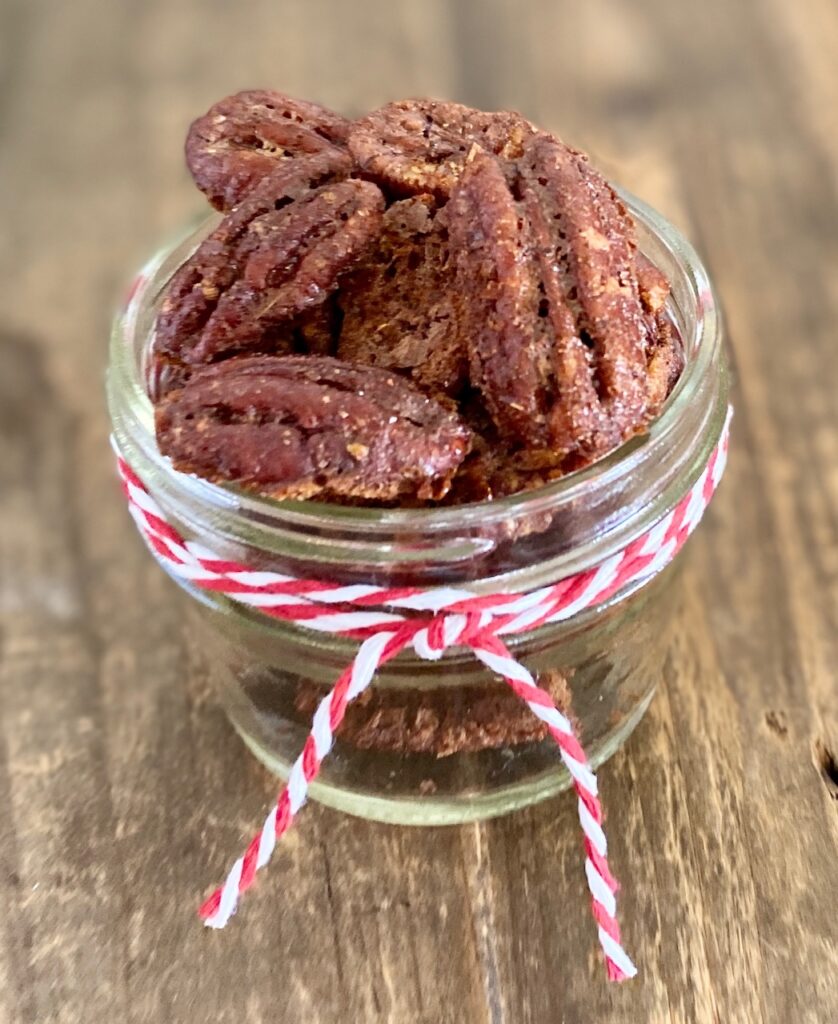
- Candied Pecans – these sweet pecans really add a nice crunchy touch and you can easily swap in walnuts if you prefer. Candied pecans are easy to make so be sure to jump over to our recipe to see how to make your own. (Be warned: these are addicting so you might want to make extra!)
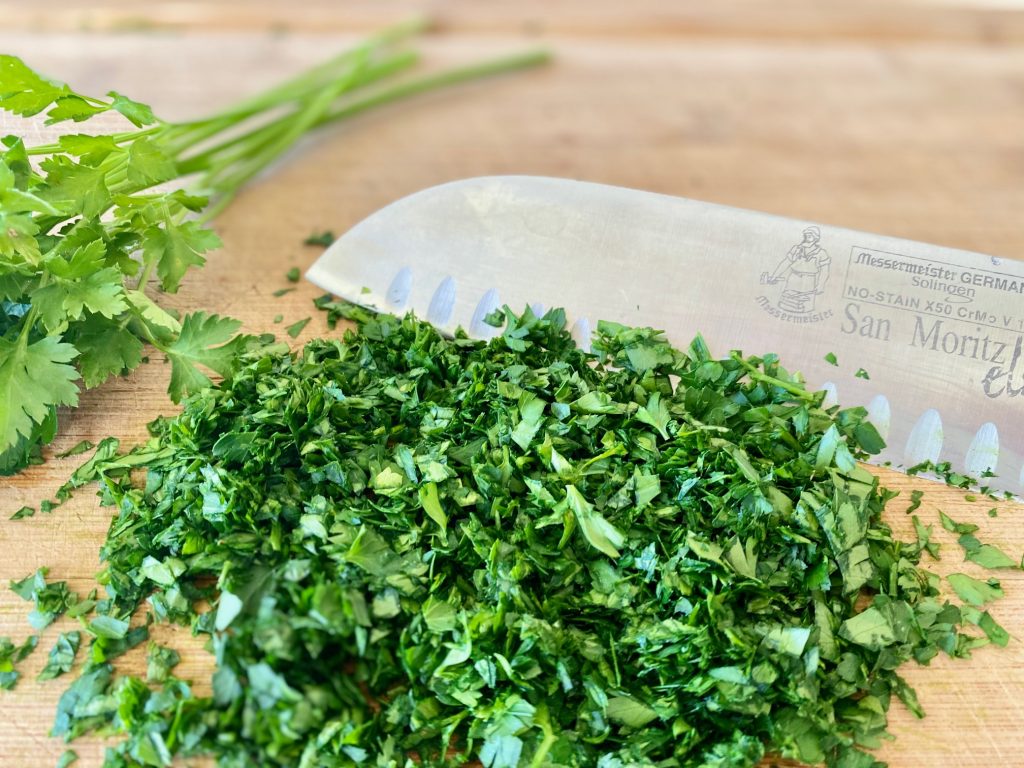
- Chives – adding chopped chives for garnish gives the salad a little bite. Chives are a mellow cousin of the onion and should be added last.
- Port Wine Cumin Vinaigrette – this zesty dressing ties it all together! It has a deep flavor due to the port wine syrup. We are huge fans of cumin so add more if you are too.
- In a time crunch? This salad works perfectly with our Classic Balsamic Vinaigrette, as well.
Assembling Peach Salad:
Once you have the vinaigrette made, and the candied pecans ready, this salad comes together quickly. The salad looks great on either a large platter or in shallow bowls.
- Prepare vinaigrette and pecans
- Thinly slice the peaches with the skin on
- Crumble the blue cheese and chop the chives
- Layer the greens on a platter or in shallow bowls
- Add the peaches, pecans, and blue cheese
- Toss with the vinaigrette and then sprinkle with the chives
- Serve
Make your own Candied Pecans
The great part about making your own sugared nuts is you can adjust the seasonings. This recipe works well with pecans, walnuts, and almonds.
- If you want them spicier add more cayenne or chili powder.
- If you want them sweeter just add a bit less spice and more sugar and cinnamon.
- Grab this amazing recipe, get creative, and share with us what you made!
What to serve with Fresh Peach Salad:
This salad has a sweet touch so works well with main dishes that have a bit of spice. Here are some great matches:
- Chicken Paprikash (paprika) is a one-pot dish with deep rich paprika flavor
- Flavorful marinated Chile Lime Pork Tenderloin is grilled to perfection with a beautiful zesty chili lime glaze
- This 30-minute Shrimp in Chipotle Sauce is sweet, smokey, and lightly spicy! Shrimp is marinated and oven-roasted with a spicy kick of chipotle
- The secret to Perfect Seared Scallops is quickly searing them in a blazing hot cast iron pan and basting them with butter.
Your Sommelier Wine Pairings:
When pairing wine with salads be mindful of the dressing you will be using. This one component will be your guide to selecting the right wine pairing. Match the weight of your dressing with the weight of the wine.
When looking for a great wine pairing for our amazing Peach Salad your dressing component is the Cumin Port Wine Vinaigrette. This dressing is a combination of tart, sweet, and fruity flavors and white acidic wines hold up well to most vinaigrettes.
A Sauvignon Blanc or Pinot Grigio will make an ideal pairing for this peach salad.
Here are our “go-to” wine pairings:
- Sauvignon Blanc – a pick from the Loire Valley of France or Sonoma is a perfect match
- Pinot Grigio – Italy has fine Pinot Grigio from the Friuli and Alto Adige region. Our California favorite comes from Laird Family Estates in the Napa Valley
- Rosé – you can’t go wrong with a Rosé from Provence, France

Fresh Peach Salad with Port Wine Vinaigrette
Ingredients
For Salad:
- 12 cups Organic Mixed Greens
- ½ cup Blue Cheese crumbled
- 2 Fresh Ripe Peaches skin on, thinly sliced
- ½ cup Candied pecans (or walnuts) (see link to recipe in notes)
- 2 Tablespoons Chives chopped
- ¼ cup Port Wine Vinaigrette with Cumin More to taste, (See ingredients and directions below)
Port Wine Vinaigrette with Cumin:
- 6 Tablespoons Port Syrup See directions below
- 4 Tablespoons Rice Wine Vinegar
- 2 Tablespoons Red Vinegar
- 2 Tablespoons Champagne Vinegar
- 2 Tablespoons shallots minced
- 1 Tablespoon Toasted Cumin
- 1 Tablespoon black pepper, freshly ground
- 1 cup extra virgin olive oil
Port Wine Syrup:
- ½ cup Port wine
- 6 Tablespoons sugar
Instructions
How to make Port Wine Syrup:
- In a small heavy bottomed pan combine sugar and port wine.
- Heat to a quick boil, stir, then reduce heat to medium and simmer. Cook until reduced to a lightly thick syrup, about 15-18 minutes, stirring occasionally. Pour into a glass jar and let cool.
How to make Port Wine Vinaigrette with Cumin:
- In a bowl, whisk all vinaigrette ingredients except olive oil. Slowly drizzle in the olive oil while whisking to emulsify.
- Store in a sealed container and refrigerate if not using right away.
How to make Peach Salad with Port Wine Vinaigrette:
- Prepare the candied pecans and let cool. Prepare vinaigrette and set aside.
- Slice fresh peaches into thin slices. Crumble the blue cheese, and chop the chives.
- On a large platter, or in shallow bowls, layer the mixed greens.
- Scatter sliced peaches, blue cheese, and pecans over the lettuce.
- Drizzle on the vinaigrette and toss everything together. Sprinkle with chives and serve.
Notes
Nutrition
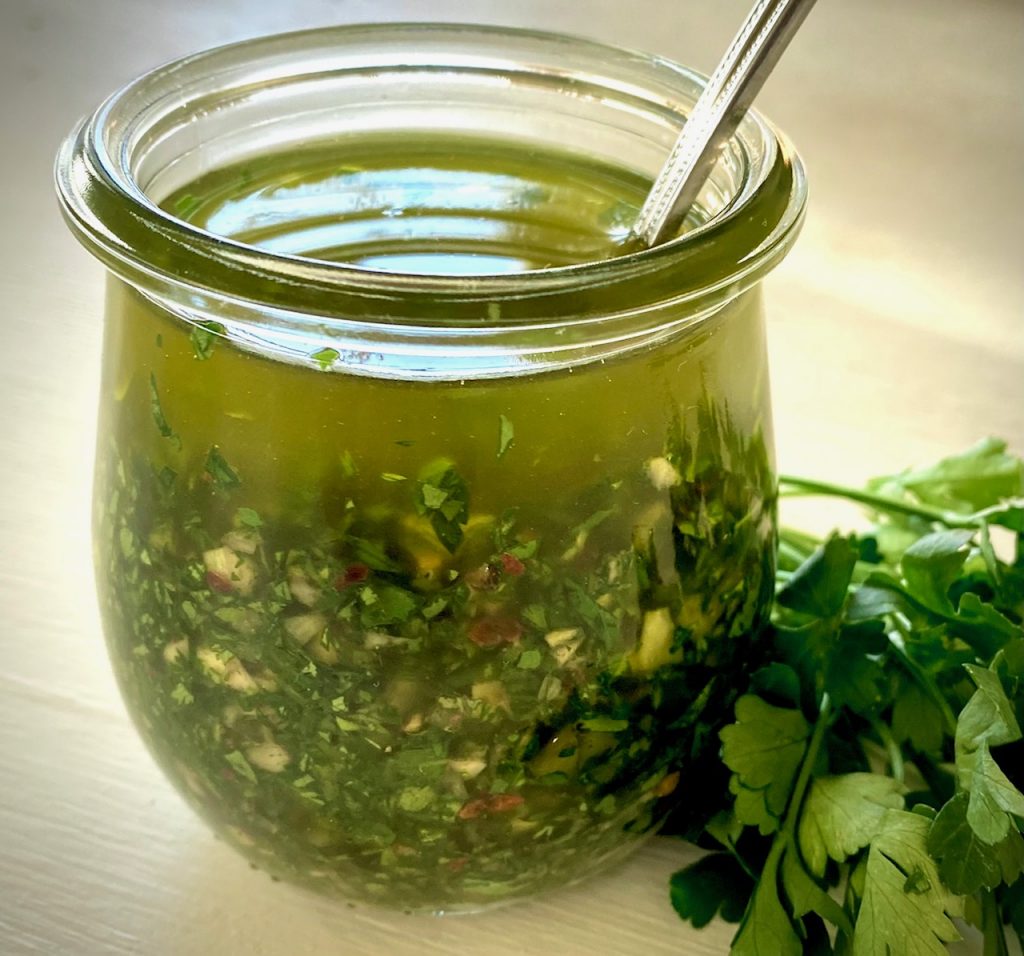
Our Argentinian Chimichurri Sauce recipe is perfect on steak, shrimp, chicken, and vegetables, as well as a marinade and a delicious dipping sauce
What is Chimichurri Sauce?
Chimichurri is an absolute herb lover’s dream. It’s loaded with parsley, cilantro, and oregano, then seasoned with garlic, shallots, red wine vinegar, and red chile flakes and suspended in olive oil.
Chimichurri sauce originated in Argentina and Uruguay and is used as both an ingredient in cooking but also as a condiment to drizzle over grilled meats and more.
This recipe is for green chimichurri (chimichurri verde), which is herby, garlicky, tangy, spicy, and very green. However, there is also a version of red chimichurri (chimichurri rojo) which is spicier and relies on red chilis as its base. Maybe we will feature that version soon!
This post may contain affiliate links. Please see our affiliate disclosure for more details.
Roughly chop the flat-leaf parsley and the cilantro
Keeping it authentic:
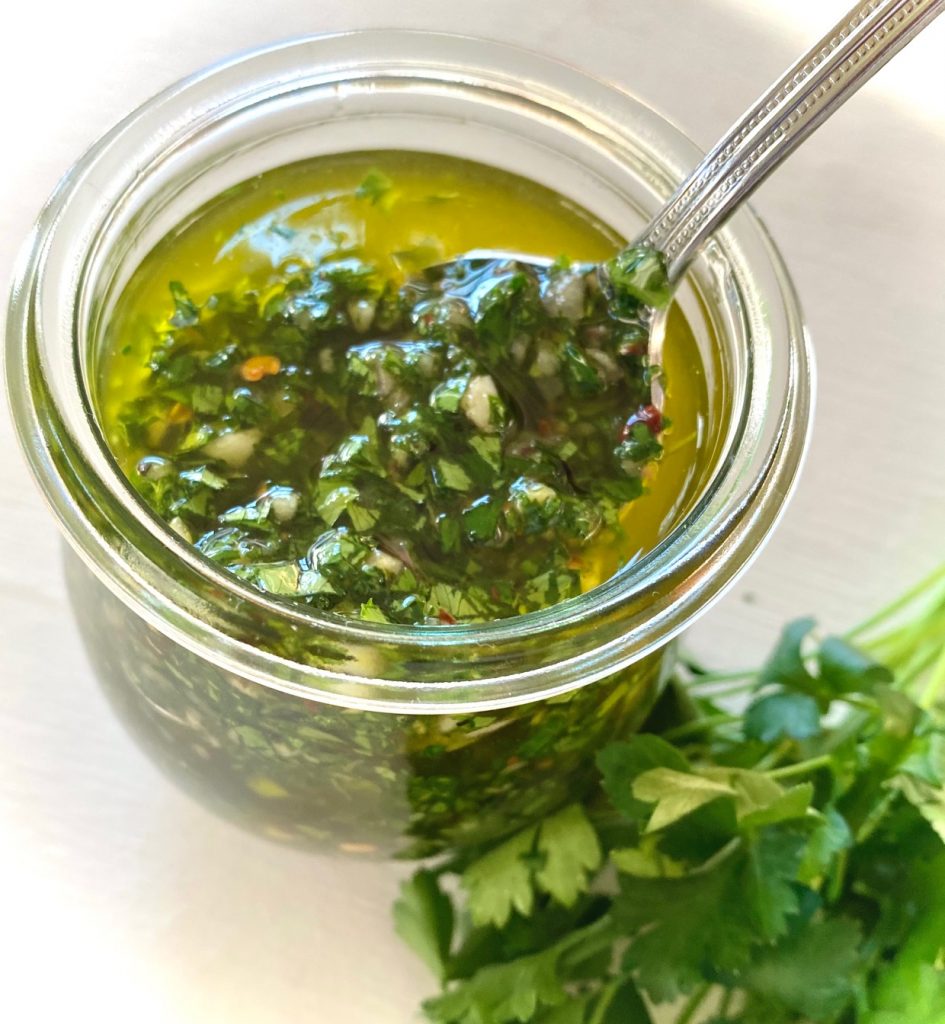
Our easy Chimichurri Sauce is simple to make and in keeping with the authentic Argentinian method we chop everything by hand, which only takes about 5 minutes.
We prefer to make it by hand because this sauce should be a little bit chunky and not smooth like a pesto.
However, you can easily combine everything in a mini chopper, or a blender, taking care to use the pulse feature so it remains chunky with all the beautiful pieces of parsley, chile, and garlic intact. Either method produces a scrumptious sauce!
Not a cilantro fan? Leave it out!
If you are not a fan of cilantro just replace it with all parsley, or replace some of the cilantro with more oregano and parsley.
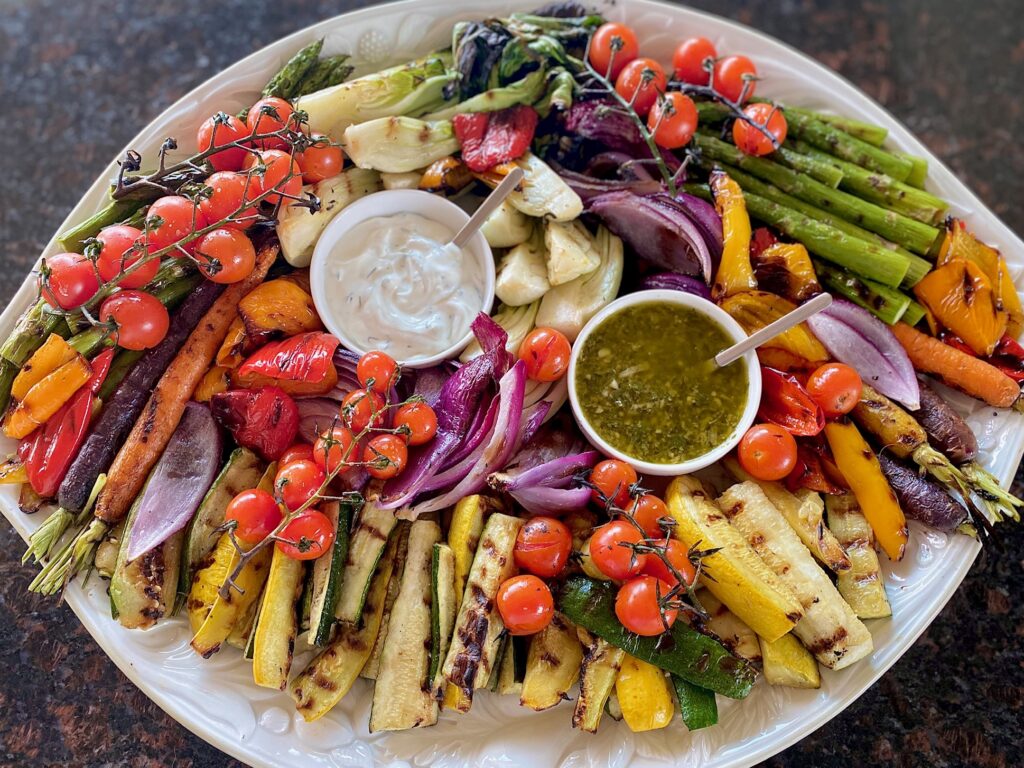
Roasted or raw vegetables are perfect for drizzling this herby sauce
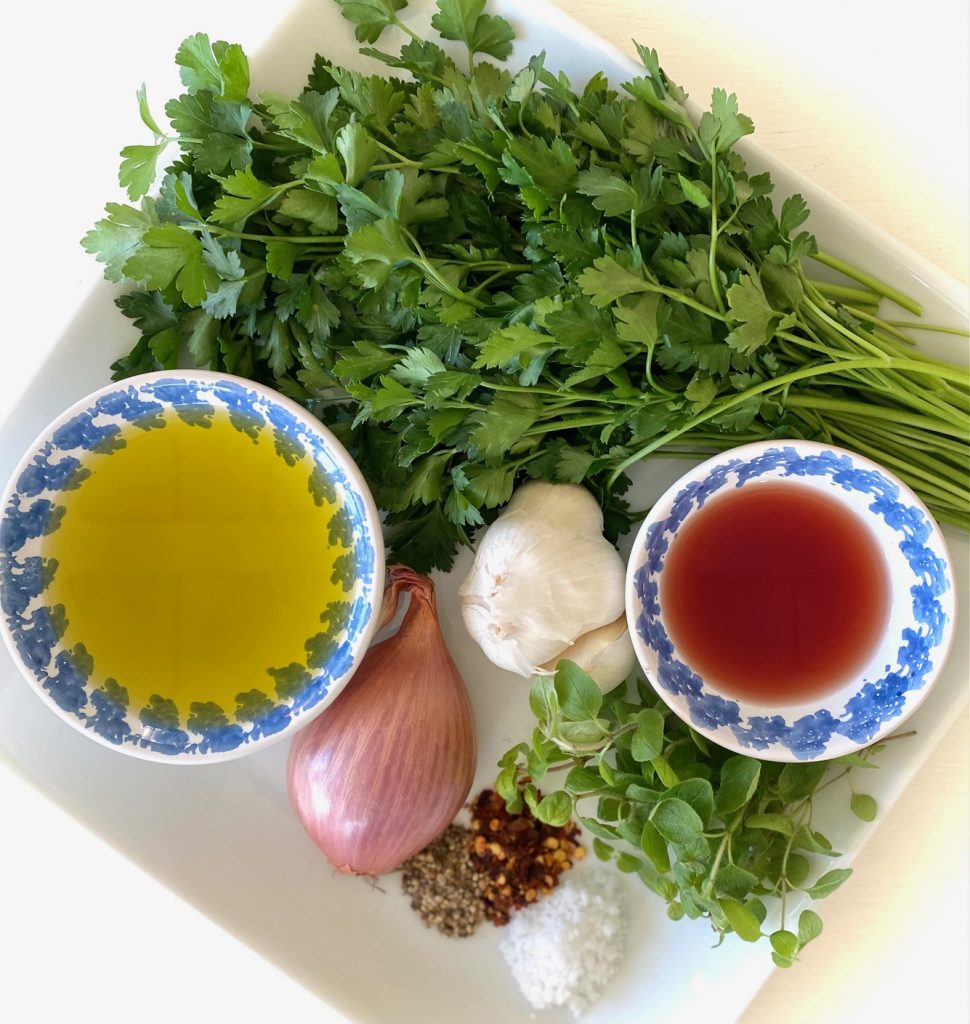
Ingredients for Chimichurri:
Be sure to buy the freshest and best ingredients for this sauce. Every single flavor shines through so it makes a big difference. Now is the time to use your best olive oil.
You can use fresh or dried oregano, but be sure to note that dried is stronger than fresh so adjust according to the recipe card below. We like to use sea salt because it has a brighter flavor, but you can sub in regular salt if needed. Add more red chile flakes and garlic if you want more kick!
- Flat leaf parsley – you could use curly in a pinch but flat has more flavor
- Cilantro – again if you aren’t a fan use all parsley
- Extra Virgin olive oil – this sauce deserves your best oil
- Red wine vinegar – be sure it’s red wine vinegar and not balsamic
- Shallots – onions milder cousin
- Garlic cloves – feel free to add more if you like it really garlicky!
- Red chile flakes – brings a touch of heat
- Fresh or dried oregano – remember dried is twice as strong as fresh
- Black Pepper and Sea Salt – or use kosher salt
How to make Authentic Argentinian Chimichurri Sauce:
This sauce is quick to pull together, so gather everything up and start chopping!
- Wash, dry, and finely chop the flat-leaf parsley, cilantro, and oregano
- Add to a medium bowl
- Finely dice the shallots and garlic and add to the bowl
- Add in the red wine vinegar, red chile flakes, sea salt, and freshly ground pepper. Stir everything to fully combine
- Drizzle in the olive oil and whisk everything to combine it
- If easier, place everything in a large mason jar, seal and shake well
- If using a food processor or blender add everything except the olive oil. Then drizzle in the olive oil and chop in short pulses. Be careful not to over-process. The sauce should be chunky, not smooth.
- Taste and adjust to add more salt, pepper, chile flakes, or garlic if needed
How to serve homemade Chimichurri Sauce:
The short answer is – put it on everything savory! It adds so much flavor to different foods.
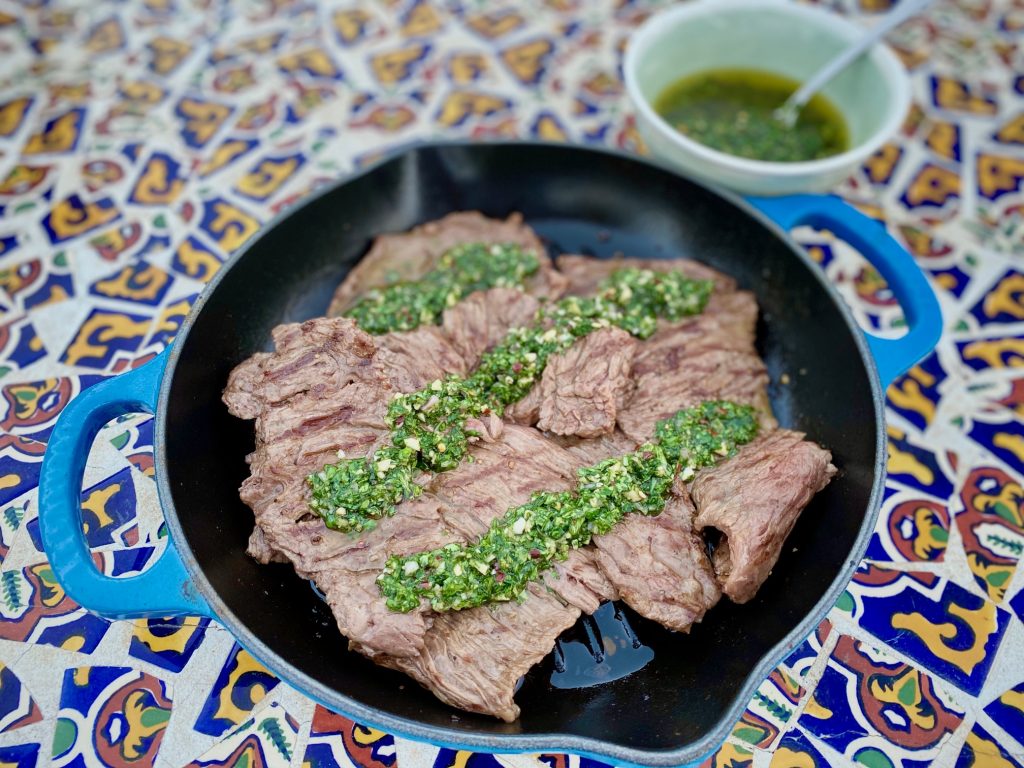
- Traditionally, chimichurri sauce is served with grilled meats, and, in particular skirt steak, hangar steak, or flank steak.
- Our Chimichurri Steak Recipe, using skirt steak, is one of our all-time favorites because it’s simple yet tastes so complex.
- This sauce also tastes fantastic drizzled over roasted or Grilled Vegetables such as cauliflower, zucchini, eggplant, broccoli, carrots, and asparagus
- Spread it on your scrambled eggs for a zesty kick at breakfast
- If you love whole grains and ancient grains (who doesn’t?) try mixing it into farro, millet, couscous, wild rice, quinoa, or brown rice as a zesty dressing
- Chimichurri is perfect with grilled chicken or pork tenderloin
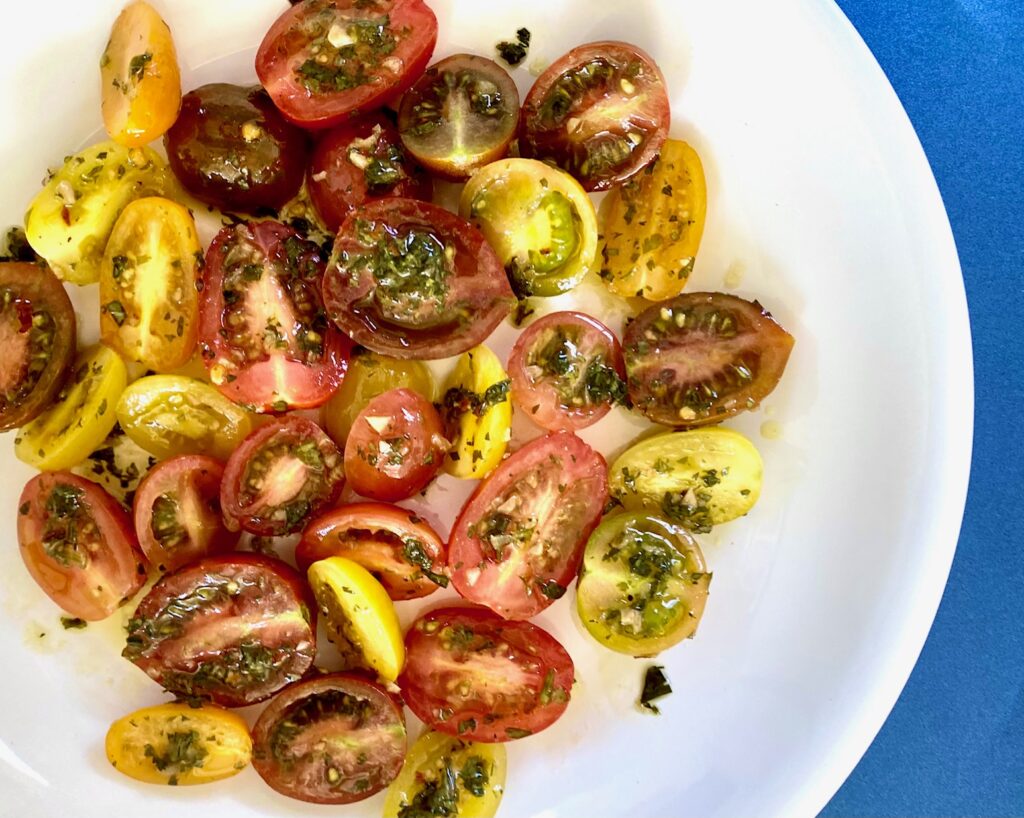
- We love it as a drizzling sauce over sliced cherry tomatoes
- Grab a loaf of crusty sourdough or french bread and dip it in the sauce
- Add flavor by slathering a burger or sandwich with a little chimichurri sauce
- Drizzle this over our grilled Carne Asada skirt steak or a grilled T-Bone or Fillet
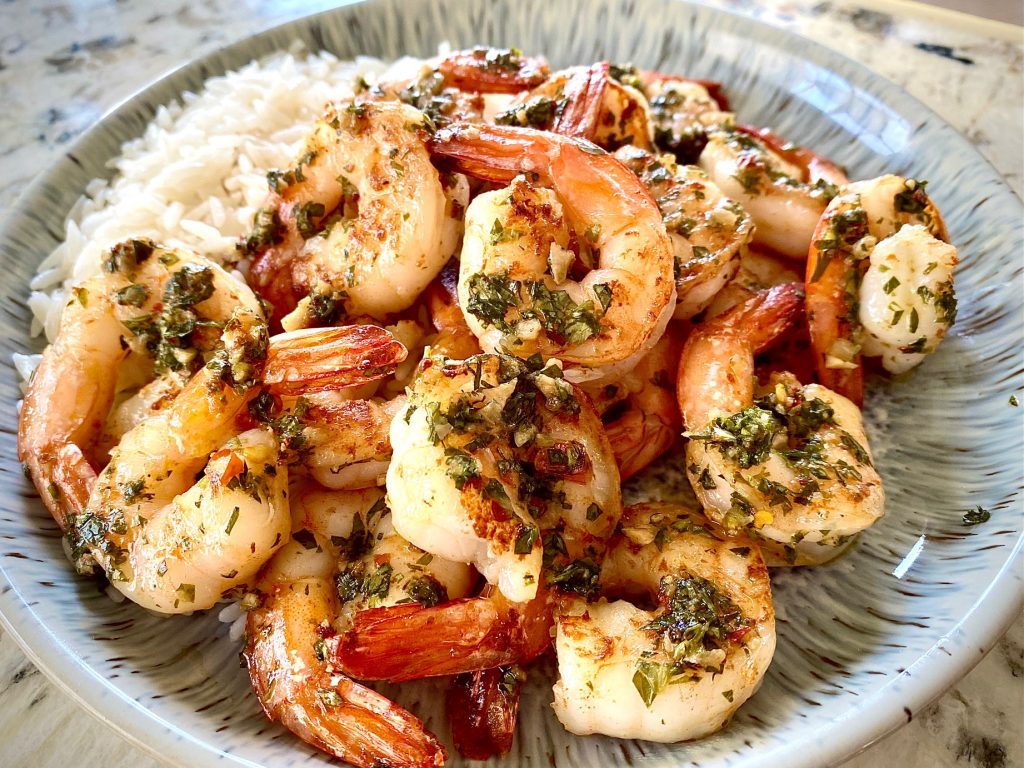
- This sauce would be ideal drizzled over our Perfect Pan Seared Scallops and ideal on Chimichurri Shrimp
How to keep and store Chimichurri:
This beautiful sauce will keep well in the refrigerator for about a week (if you can resist it that long!). The best way to store it is in a sealed mason jar so that you can give it a good shake before using it to redistribute all of the ingredients.
Can you freeze Chimichurri Sauce?
Yes! This sauce freezes beautifully. I recommend freezing this sauce, or any condiment-type sauce, in 2 Tablespoon serving sizes. My absolute go-to favorite way to store is with Super Cubes Freezing Trays with Lids. They are sturdy but flexible so you can remove the condiments in small increments. Like an ice cube tray but so much better and easier. The sauce keeps well for about 2 months.
Chimichurri Sauce Recipe
Ingredients
- ½ cup flat leaf parsley, finely chopped
- ¼ cup cilantro, finely chopped
- 2 Tablespoons shallots, finely chopped
- 2 Tablespoons fresh oregano, finely chopped (or 1 teaspoon dried)
- 4 cloves garlic, finely chopped
- 2 Tablespoons red wine vinegar
- 1 Tablespoon red chile flakes
- 1 teaspoon sea salt
- ½ teaspoon black pepper, freshly ground
- ½ cup olive oil
Instructions
- Wash, dry and finely chop the flat leaf parsley, cilantro and oregano. Add to a medium sized bowl or large mason jar.
- Finely chop the shallots and garlic then add to the bowl.
- Add in the red wine vinegar, red chile flakes, sea salt and freshly ground pepper. Stir to combine.
- Drizzle in the olive oil and whisk vigorously to combine. Alternately, combine in a medium jar, seal and shake well.
- If using a mini chopper be sure to just pulse in short bursts, chopping to combine but not puree.
- Serve at room temperature and whisk again before using.
- Remaining chimichurri sauce can be stored, sealed, in the refrigerator for about 2 weeks or frozen for at least 2 months.
Nutrition
These savory pancakes make a great snack, starter, or side dish and are super simple to make at home

This post may contain affiliate links. Please see our affiliate disclosure for more details.
What are Scallion Pancakes or Pajeon?
In Korean “pa” means scallion and “jeon” means pan-fried battered food.
Every culture has its own version of pancakes, and these savory Korean style are my favorite! This type of pancake, also called Pajeon or Pa Jun, is a crispy flour-based pancake made with lots of scallions, and often has seafood.
We make ours with added shrimp but they are great with a variety of add-ons.
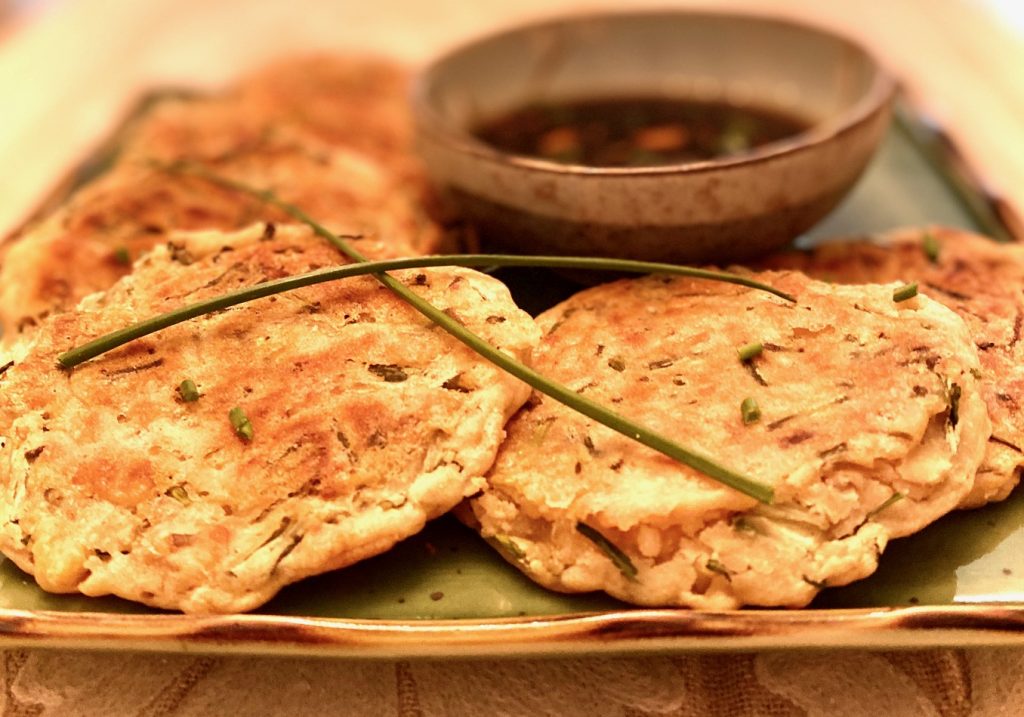
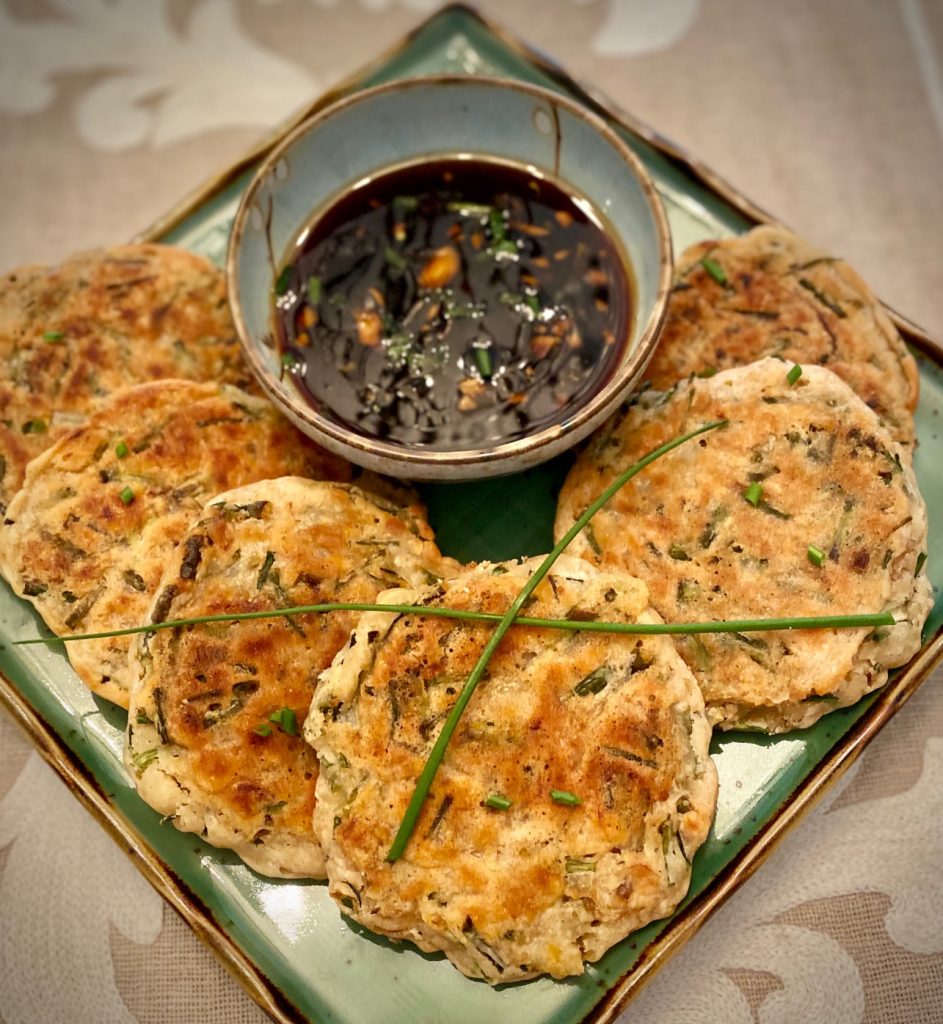
Scallion pancakes are the perfect appetizer or snack, especially paired with an easy soy dipping sauce. We like to make them as 4″ pancakes, but you can easily make bigger pancakes. These pancakes are so easy to make at home that you’ll never need to order take out again!
Ingredients for Scallion Pancakes with Shrimp:
Our recipe has 2 parts: The Pancakes and the Ginger Soy Dipping Sauce
This recipe makes 8 pancakes that are 4″ in diameter and approximately 1/3 cup of dipping sauce. See the recipe card below for exact measurements.
Pancake Ingredients:
- Flour
- Cornstarch
- Sugar
- Salt
- Cold Sparkling Water (or Club Soda)
- Soy Sauce
- Sesame Oil
- Scallions, green and white part
- Chives
- Shimp (optional)
- Vegetable Oil
Ginger Soy Dipping Sauce:
- Soy Sauce
- Fresh Ginger
- Rice Vinegar
- Sriracha, Sambal Oelek, Gochujang Paste, or Chili Oil
- Sugar
How to make Korean Pancakes:
These pancakes can be cooked in a large non-stick skillet, however, we find it easier to cook them on a nonstick electric griddle.
Each 4-inch pancake takes about 1/4 cup of batter, and you will want to make sure they have room in the pan and are not touching each other.
To make the dipping sauce:
- Whisk all of the dipping sauce ingredients together in a small serving bowl and set aside to let the flavor develop. This sauce can be made ahead of time and refrigerated for up to 2 days and then brought to room temperature before using it.
To make the pancakes:
- Chop scallions into pieces. If your onions are on the large side, cut the scallions lengthwise first and then crosswise. Chop the chives
- If using, chop the shrimp into small pieces
- In a large bowl whisk all of the dry ingredients together
- In a medium bowl whisk the wet ingredients and then pour into the dry ingredients
- Gently mix together wet and dry ingredients, but do not over mix. It’s OK to have a few small lumps
- Fold in the chopped scallions, chopped chives, and cooked chopped shrimp, and very lightly mix to combine
- Note: The batter will be thinner than an American-style pancake batter
- Let the batter rest for 10 minutes while the pan is heating


- Heat the griddle or pan to medium, add and heat the oil
- Check batter consistency. It should be runnier than an American pancake, so if needed add a little more cold water to get that consistency
- Pour 1/4 cup batter for each pancake onto hot griddle/pan
- Cook for about 2 minutes or until the pancakes are set and golden on the edges, then flip to the other side, and repeat
- Scallions can easily burn so flip a few times to avoid burning them
- Press down on pancakes occasionally to ensure even cooking
- Remove from pan and cool on a wire rack for a few minutes
- Cut into wedges and serve with the spicy Ginger Soy Dipping Sauce


Variations and Additions to try:
Like most recipes, you can tweak this one to make it your own! This recipe was originally just scallions, but we added chives and chopped shrimp.
Other additions to try:
- Zucchini, carrots and mushrooms are popular add-ins
- Any chopped seafood will work – such as scallops, mussels or calamari
- Kimchi or sliced red chile peppers are great for more heat
- I like to sprinkle a few additional pieces of chopped scallions on top of the dipping sauce before serving
- If you can find Spring Onions, like the ones pictured below, use them because the colors and flavor are fantastic!

Can you freeze leftover Scallion Pancakes?
Yes, they freeze beautifully! Be sure to let them cool completely, then layer each one with a piece of parchment, plastic wrap, or foil between each pancake. Store in an airtight bag or container for up to 3 months in the freezer. Reheat in a lightly oiled skillet until they are thawed and crispy again.
You can also refrigerate using the same method for 1 day if they have seafood, and 3 days if they do not.
Tips for best results:
- Use VERY cold water. The cold water, in the mixture, hitting the hot pan helps create the best crispy exterior
- You may need to add a little oil to the pan between batches
- Want more onion flavor? Just add more! This recipe is very forgiving
- Chop some longer pieces of onion, along with some shorter pieces, for a more beautiful and interesting presentation. Also, save some of the thinner green ends for garnish!
What to serve with this Korean Scallion Pancake recipe:
These pancakes make an amazing starter to any Asian style dinner. Try them with:
- Asian Baked Chicken Thighs
- Tofu Sesame Rice Bowls
- A great light dinner paired with our Ahi Tuna Poke Bowl
- Stir Fry Broccoli and Beef
- Korean style Beef Bulgogi is the perfect main dish to accompany these scallion pancakes


Korean Scallion Pancakes with Ginger Soy Dipping Sauce
Ingredients
Korean Pancakes
- 1 cup all-purpose flour
- 4 Tablespoons cornstarch
- 2 teaspoons salt
- 1 teaspoon sugar
- 1 cup sparkling soda water (or club soda), Very Cold
- 1 Tablespoon soy sauce
- 1 teaspoon sesame oil
- 1 ½ cup scallions (green onions), roughly chopped about ¾" long (or Spring onions)
- ¼ cup chives, roughly chopped (optional)
- ½ cup Cooked shrimp, chopped, medium dice (optional)
- 1-3 Tablespoons vegetable oil, or more as needed
Ginger Soy Dipping Sauce
- 3 Tablespoons soy sauce
- ⅓" piece fresh ginger, peeled and thinly sliced or grated
- 3 Tablespoons rice wine vinegar
- 2 teaspoons sugar
- 1 teaspoon Sriracha, sambal oelek, gochujang paste, or chili oil
Instructions
- In a small bowl, whisk all sauce ingredients together, and set aside.
- In a large bowl, whisk together dry ingredients: flour, cornstarch, salt, and sugar.
- In a medium bowl, whisk together wet ingredients: sparkling water, soy sauce, and sesame oil.
- Add wet ingredients to dry ingredients and whisk lightly just to combine (do not overmix!).
- Gently stir in scallions, chives, and cooked chopped shrimp until just combined.
- Let the batter rest for 5-10 minutes while warming the pan
- Prepare a large non-stick skillet or non-stick griddle by heating 1 tablespoon of oil over medium heat. Oil should be shimmering.
- Make pancakes by pouring about 1/4 cup of batter into the pan or onto the griddle, per pancake. Do not crowd, and the pancakes should not be touching. Make in batches if needed.
- Cook for about 2-3 minutes, or until pancake is lightly golden and set. Flip and cook on the other side for additional 2 minutes until set. Flip a few times to make sure scallions don't burn. The pancakes will cook for about 7-8 minutes total. Occasionally, press down on the pancakes to ensure even cooking.
- Repeat with additional oil and batter if using a skillet.
- Transfer cooked pancakes to a plate or wire rack to cool slightly. Cut into wedges and serve with the Ginger Soy Dipping Sauce
Notes
- Use VERY cold water. The cold water, in the mixture, hitting the hot pan helps create the best crispy exterior
- You may need to add a little oil to the pan between batches
- Want more onion flavor? Just add more! This recipe is very forgiving
- Chop some longer pieces of onion, along with some shorter pieces, for a more beautiful and interesting presentation. Also, save some of the thinner green ends for garnish!
Nutrition
Just a few ingredients from your refrigerator and pantry will make an amazing lunch or dinner.
These one-pan baked Asian chicken thighs are full of Asian flavors. You can add the marinade in the morning, refrigerate and bake for dinner, making it a great weeknight meal. The marinade becomes rich and sticky as it cooks and seals in a delicious Asian flavor.
Common ingredients for Asian Baked Chicken:
This is an easy Asian sauce that you can use for fish, pork or chicken
- Bone-in Chicken Thighs with the skin on. Breasts, legs, and wings work as well but will need less cooking time. Thighs will give you the most tender results, but the breast will be lower in fat.
- Honey
- Soy Sauce
- Garlic and Ginger
- Dark Brown Sugar – light brown will work fine but dark brown will have a deeper flavor and color
- Hot Chili Paste. I like Sambal Oelek, but Sriracha or gochujang work great too. Add more if you like it spicier!
- Sesame seeds, for garnish
How to make a great Asian marinade sauce
It’s important to let the flavors of the sauce meld together. Everything comes together pretty quickly.
- Combine all of the sauce ingredients together
- Heat the sauce to a low boil until the honey and brown sugar are melted, whisking continuously. The sauce should start to thicken
- Let sauce cool for about 5-minutes
- Place chicken in a large baking dish, cover with sauce and cover tightly with foil
- The chicken should marinate for 2-hours and up to 12-hours


How to Cook Asian Chicken Thighs
Chicken thighs have more flavor than other parts of the chicken and they are harder to overcook. As a result, they are perfect for this recipe. Be sure to use bone-in thighs. These thighs will cook at 350°F, then finish at 375°F to caramelize the skin.
- Preheat oven to 350°F
- Cook the chicken, covered with foil, for 30 minutes, skin side down.
- Increase cooking time to 375°F
- Turn the chicken skin side up, uncover, and bake for another 15 minutes, to caramelize the chicken. Check the temperature as the chicken is finished cooking at 165°F
- If needed, finish cooking for about 5-15 more minutes
- Cooking time will vary based on the size of your chicken thighs
- Even if you don’t want to eat the skin it’s still best to cook with it on to ensure moist chicken.
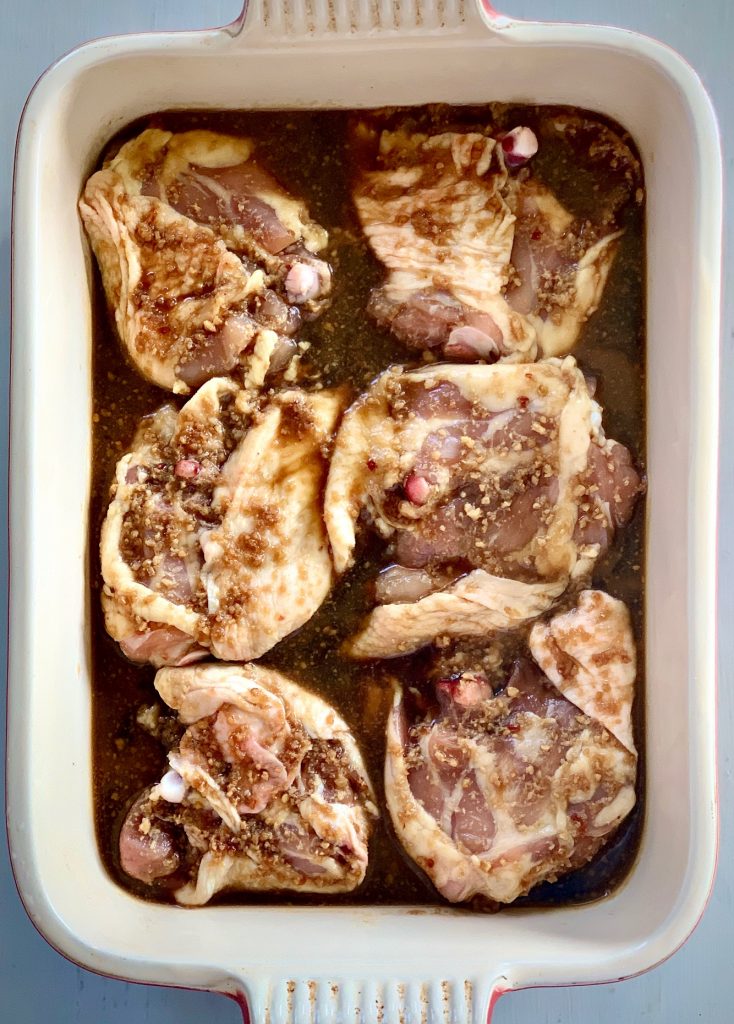
Thighs marinating 
Baked Chicken
Serving Asian Baked Chicken
Be sure to let the chicken rest for about 5 minutes after cooking to allow the juices to settle back into the meat. Before serving, spoon some additional sauce over the top of the chicken, and sprinkle with sesame seeds.
Other great easy main dishes to try:
- Perfect Pan-Seared Scallops
- Easy Oven Baked Salmon
- Chipotle Roasted Shrimp
- Garlic Shrimp with Roasted Tomatoes
- Skirt Steak with Mustard Sauce

Asian Baked Chicken
Equipment
- Roasting pan or large baking dish
Ingredients
- 8 Boneless Chicken thighs, skin on
- 1 cup honey
- ½ cup soy sauce
- ¼ cup garlic minced, about 12 cloves
- ¼ cup ginger, grated
- 1 Tbsp brown sugar
- 1-2 tsp Sriracha, sambal oelek or gochujang, or any chili paste, to taste
- 1 Tbsp sesame seeds, optional
Instructions
- Rinse chicken thighs and place in a large baking dish skin side down.
- In a small saucepan combine honey, soy sauce, garlic, ginger, brown sugar, and chili paste. Whisk together and cook over medium heat until the sauce comes to a low boil, and the brown sugar is completely melted. The sauce will start to thicken. Remove from heat and allow the sauce to cool for 5-minutes.
- Pour sauce over chicken, making sure all pieces are well coated.
- Cover with foil and marinate in the refrigerator for at least 2-hours, and up to 12-hours.
- Once marinated, preheat oven to 350°F.
- Place covered baking dish in the oven and bake for 30 minutes. Remover the foil from the pan and turn the chicken skin side up. Check temperature. Chicken is cooked at 165°F.Increase temperature to 375°F and bake for additional 5-15 minutes. Spoon extra juices that are at the bottom of the pan over the chicken thighs and cook to an internal temperature of 165°F.
- Remove from oven and let rest for 5 minutes before serving. Sprinkle with sesame seeds, if desired.
Nutrition
The secret to perfect Pan Seared Scallops is cooking them quickly in a blazing hot cast iron pan and basting them with butter
Dinner is ready in 15 minutes!
Intimidated by cooking scallops?
Once you follow the easy step by step instructions below you will become a pro in no time! This pan seared scallops method is easy, but each step is important to follow. The best part is the whole process only takes 15 minutes.
This post may contain affiliate links. Please see our affiliate disclosure for more details.
Cooking Tips for Perfect Pan Seared Scallops:
- Buy large or jumbo scallops for this recipe. They are also called U-10 scallops. Bay scallops are very small and have a different taste and cooking method.
- Frozen scallops are harder to sear unless you completely defrost and dry them, so it’s best to get wet-packed or dry-packed scallops at the fish counter.
- Scallops have a small muscle on the side of them that needs to be removed. It can easily be pulled off. The muscle will become very tough and rubbery when cooked so definitely take the time to remove it. See steps 1 and 2 photos below.
- Always rinse scallops prior to use in cold water because sand can hide in the tiny cracks. We love the beach but nobody wants sandy scallops!
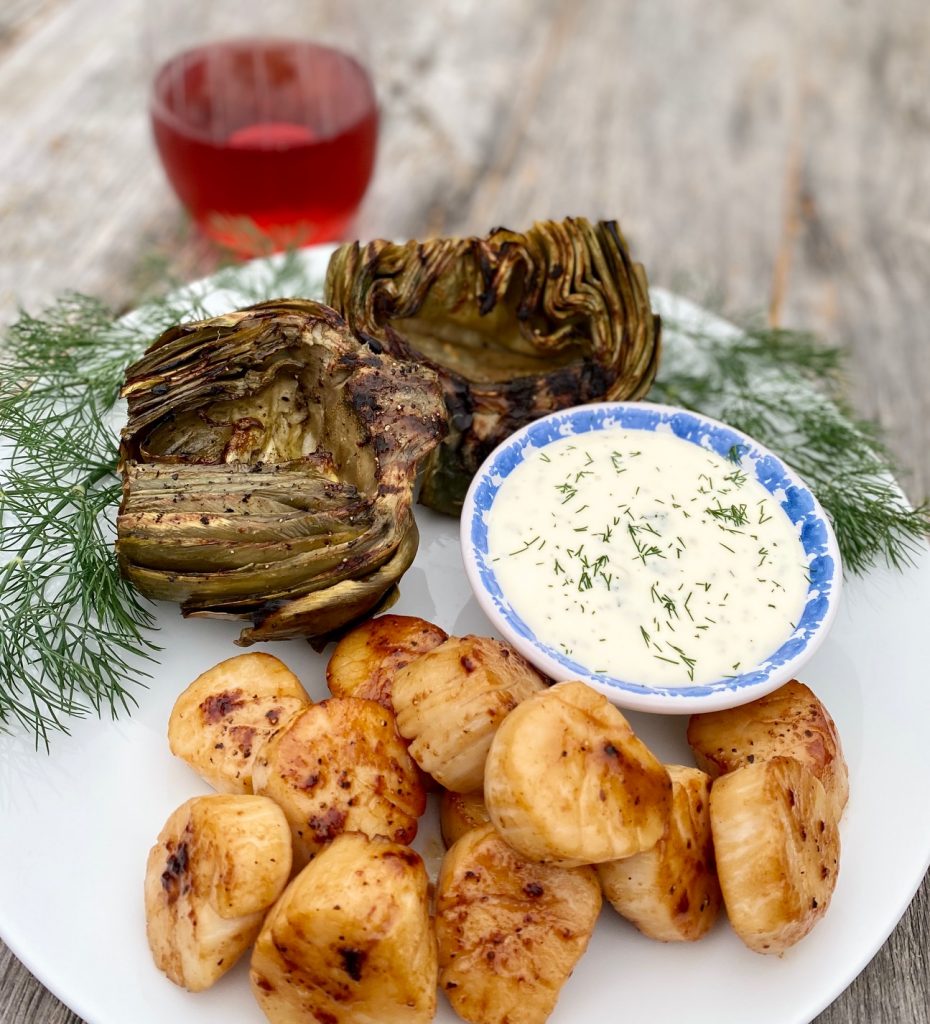
Perfectly Seared Scallops and Grilled Artichokes with Lemon Dill Aioli
Dry scallops are the key to a perfect sear
- Dry the scallops completely by patting dry with paper towels for 10-15 minutes. Put them on top of paper towels and also press down on the top of the scallops with a paper towel. This is crucial to getting a great sear so don’t skip this step! See step 3 in the photos below.
- Once dried, season liberally with salt and freshly ground pepper. See step 4 in the photos below.
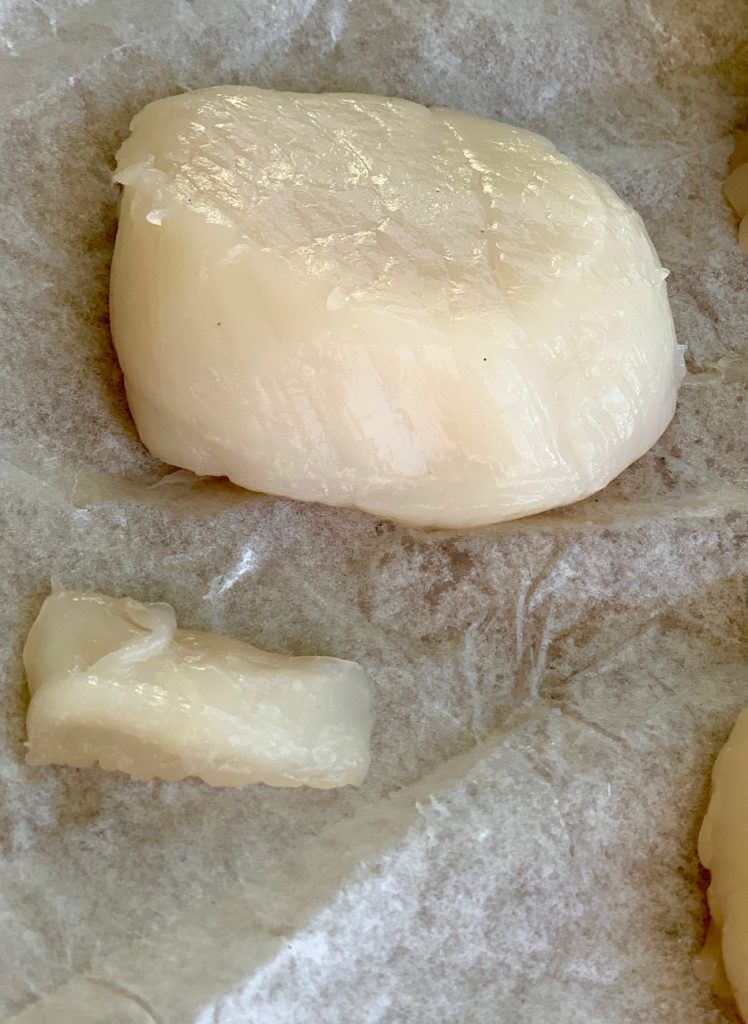
FIRST STEP: Scallop with muscle removed 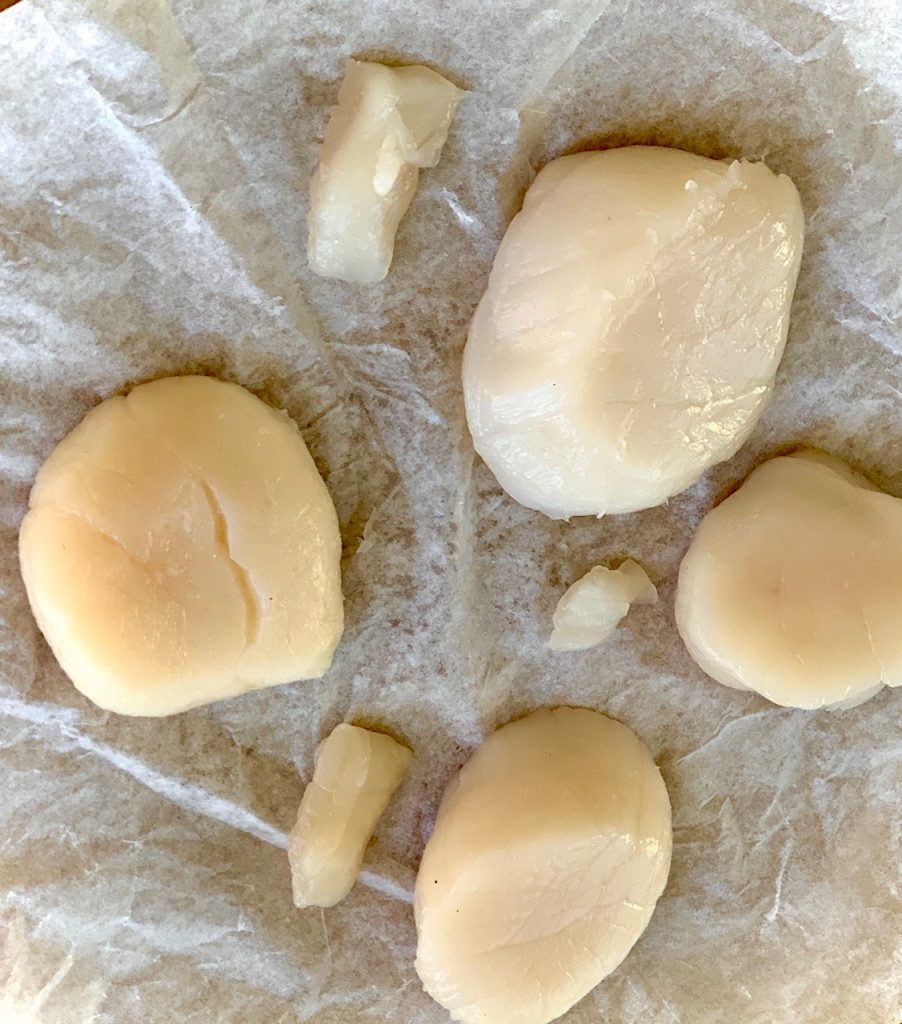
SECOND STEP: Scallops muscles removed
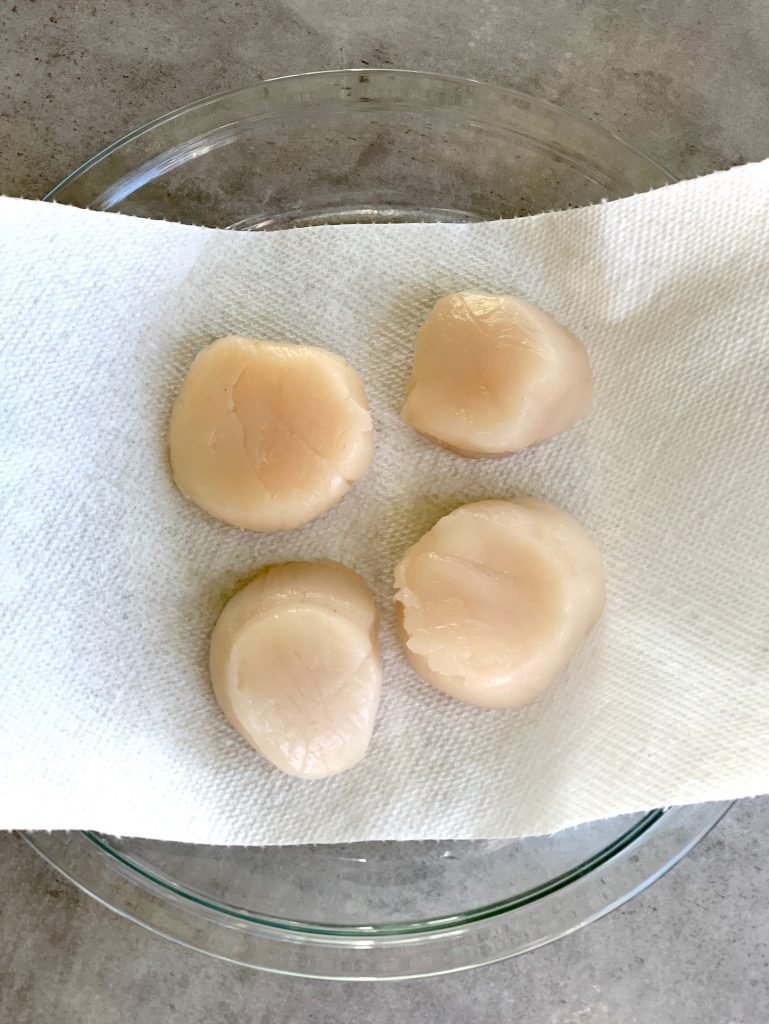
THIRD STEP: Dry on a paper towel 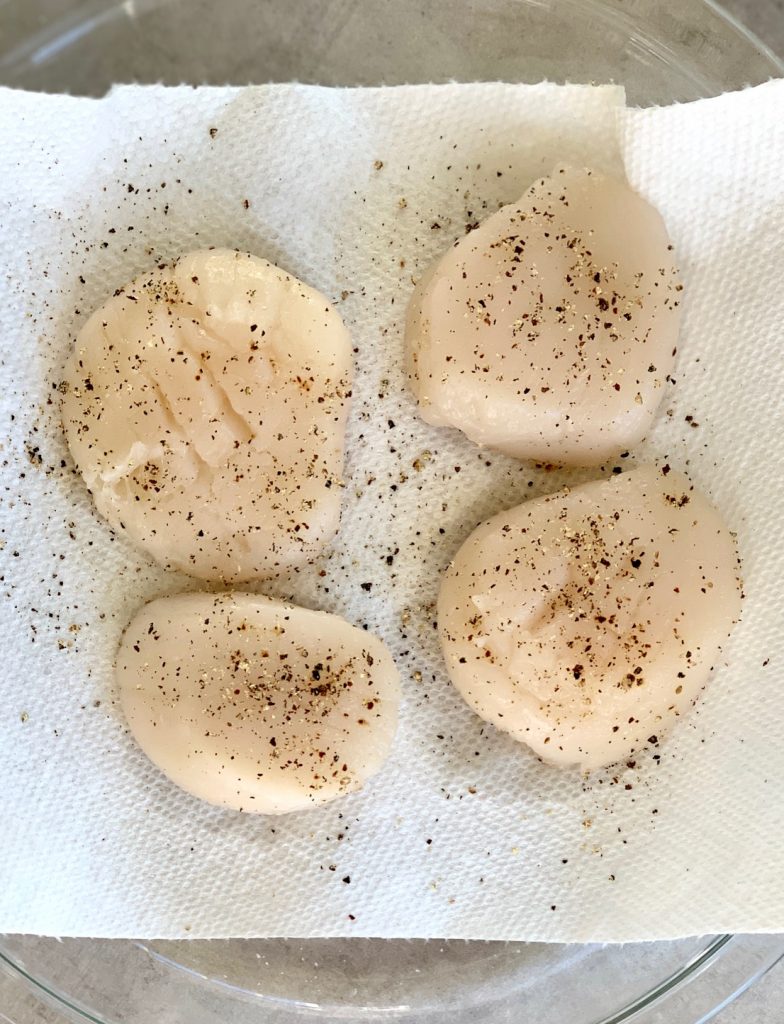
FOURTH STEP: Scallops with salt & pepper
How to Cook Scallops in Cast Iron
- Use a heavy-bottomed pan, preferably a cast-iron skillet.
- Add the oil and make sure it is blazing hot, but not smoking.
- Place scallops carefully in a hot pan in a single layer and don’t crowd
- How long to cook seared scallops: Sear – without touching or moving for about 1 1/2 – 2 minutes on each side. This is the most important part – do not move them – but wait until they are beautifully golden brown.
- If you try to flip them and they aren’t fairly easy to release then wait another 15-20 seconds. When they are ready they will release easily.
- Use a metal spatula or tongs – not a rubber spatula.
- Flip scallops to the other side and reduce heat to medium.
- Add butter and let it melt all around scallops. Using a large spoon baste the scallops with the melted butter.
- If you don’t have a cast-iron pan use your heaviest bottom pan
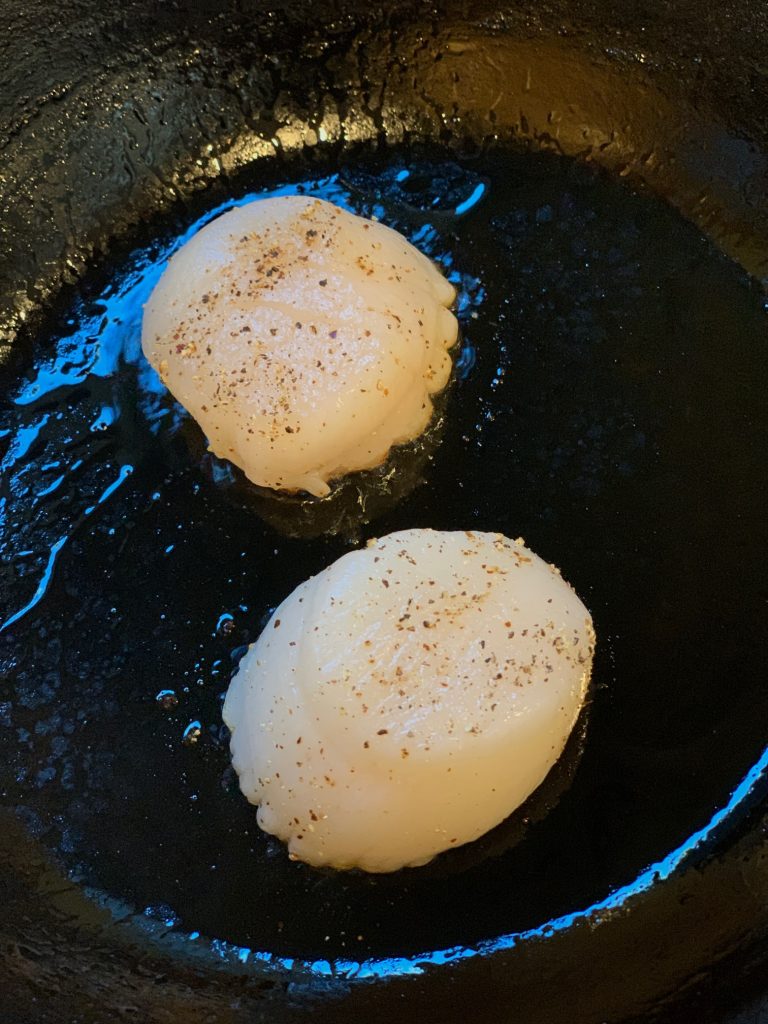
Scallops beginning to sear 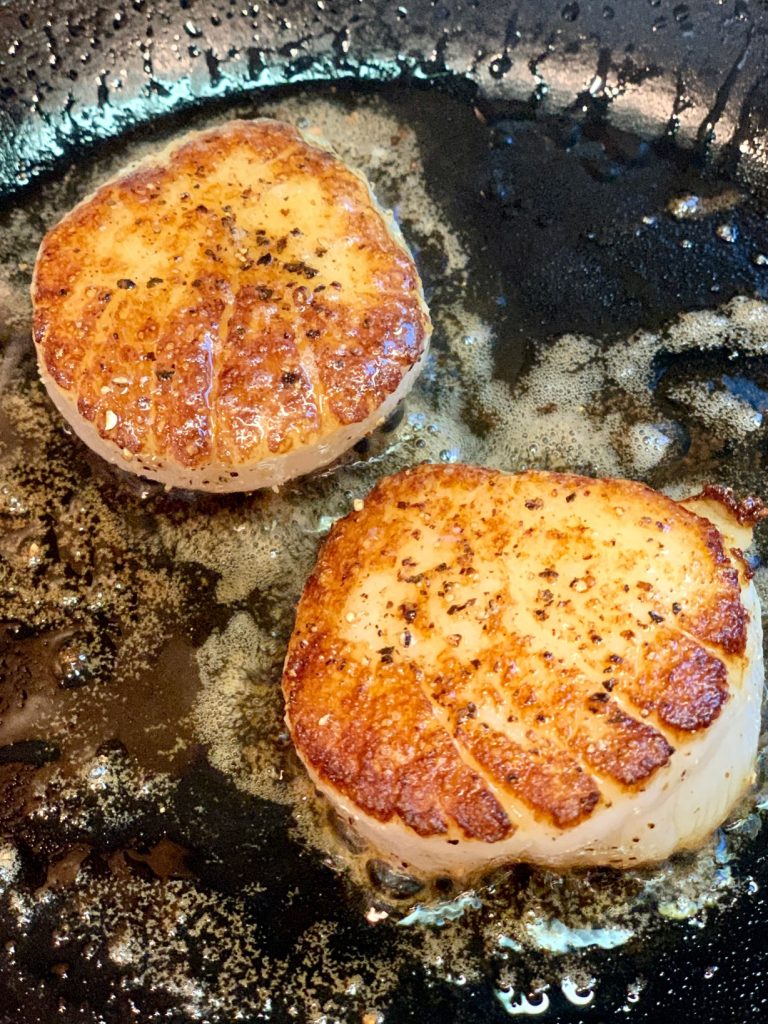
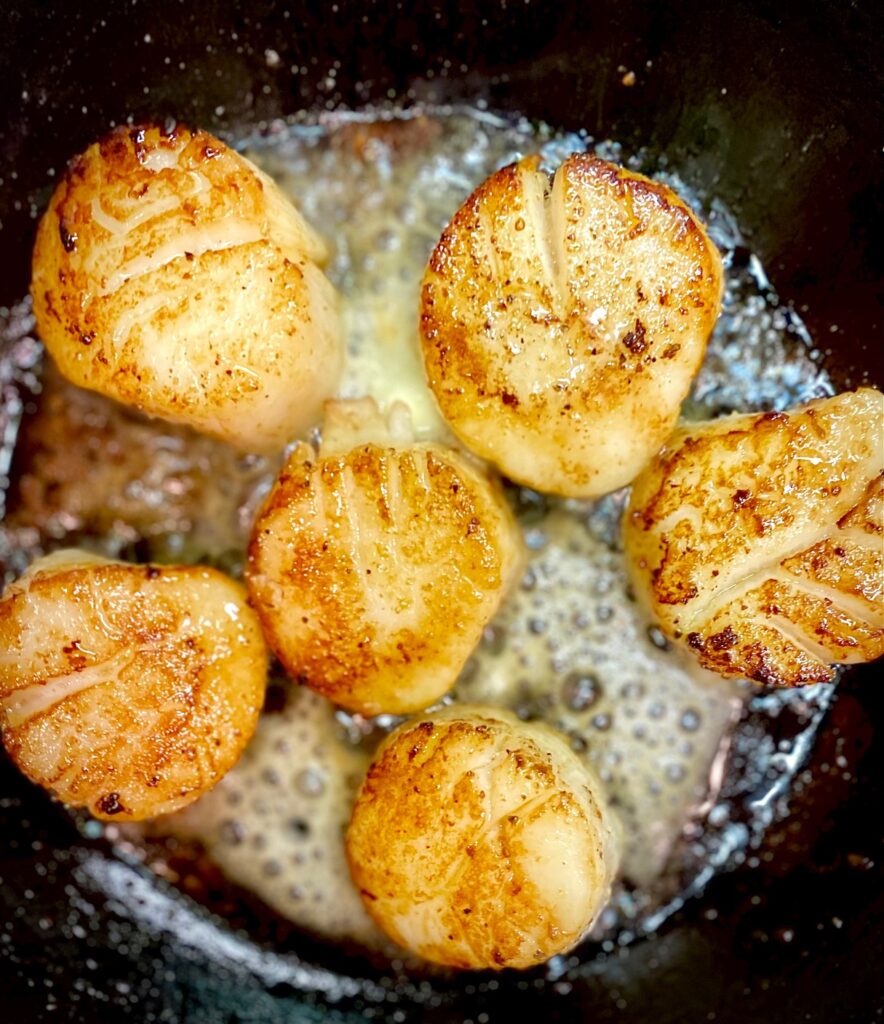
Golden Brown Crust 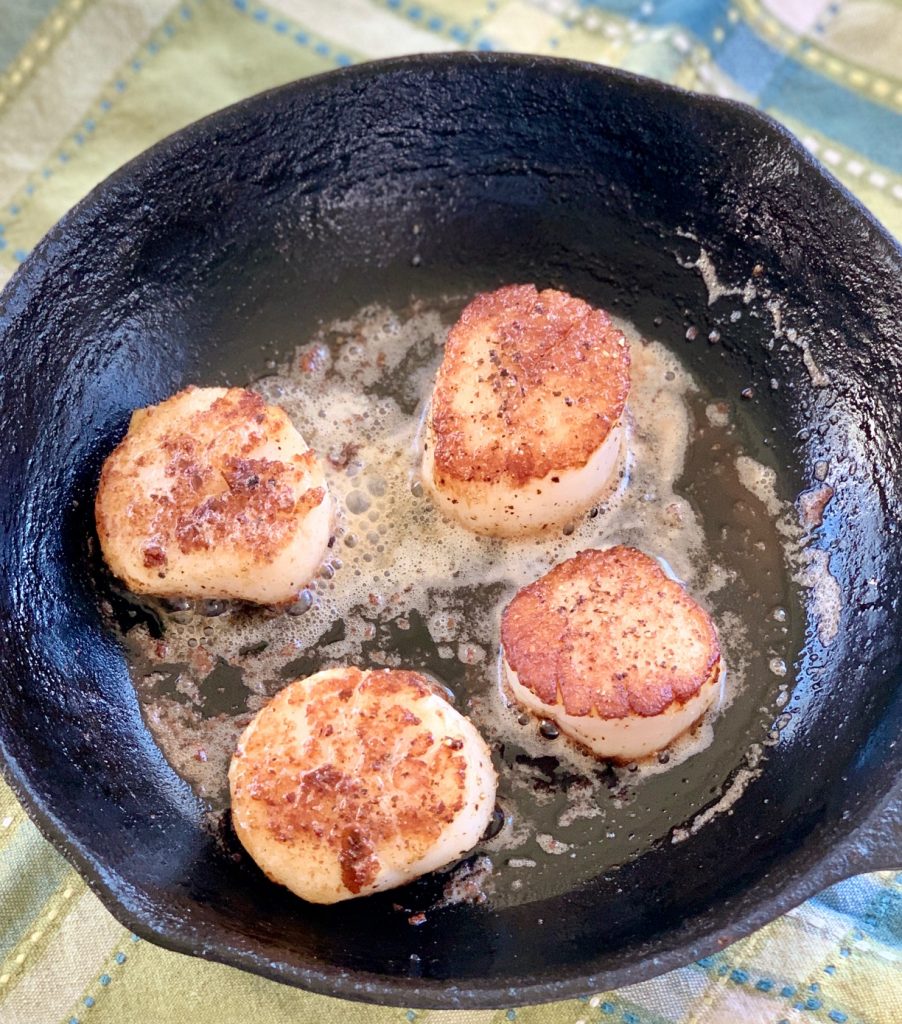
Finish with butter baste
How long to sear scallops:
- Cook for about 2 minutes on each side, or until the side centers of the scallops are opaque. The exact time will depend on the size of your scallops.
- Remove from pan and plate the scallops.
- Optional: Add lemon slices to pan and sear for about 30-45 seconds on each side. Use as a garnish
- Sprinkle with chopped parsley (optional). If desired drizzle the remaining butter in the pan over the plated scallops.
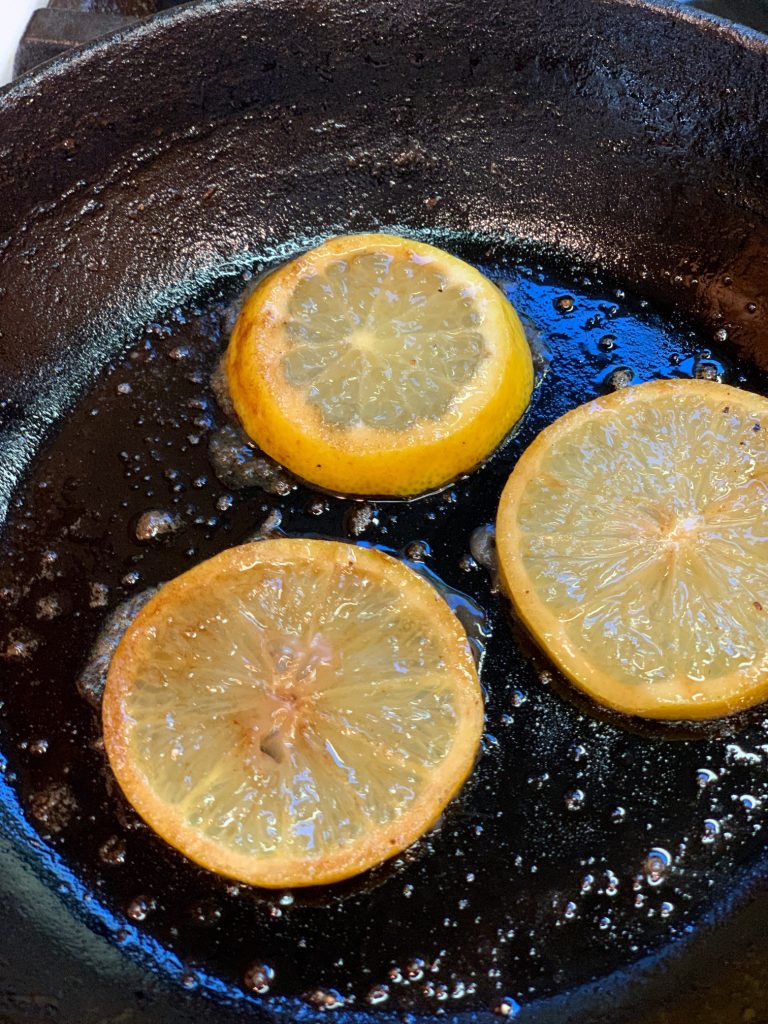
Seared Lemon Slices 
Scallops served with seared lemon slices
Our Sommeliers wine pairings for pan seared scallops:
A medium-bodied white wine with bright acidity will contrast well with the tangy lemons and butter alongside these briny scallops.
Your weekday wines:
- Pascal Jolivet Sauvignon Blanc, France
- Domaine Adele Rouze Quincy White Wine, France
Your weekend wines:
- Hippolyte Reverdy Sancerre, France
- Sauvion Sancerre, France
Special Occasion Wines:
- Laurent Perrier Cuvee Rose, Limited Edition, Tiger Cage Champagne, France
- Dom Perignon Champagne, France
What to serve with Seared Scallops
Pan seared Scallops pair perfectly with nearly every side dish, including vegetables, potatoes or rice. Try one of these dishes on our site:
- Tricolore Salad with Vinaigrette
- Braised Leeks with Parmesan
- Grilled Artichokes with Lemon Dill Aioli
- Spicy Szechuan Green Beans
Cooking with cast iron pans
Cast iron pans are workhorses in the kitchen, very affordable, and get better with age. Once you start cooking with cast iron you will never look back! We prefer the Lodge brand of cast iron and here’s your link to the 10.25″ pan we use over and over.

Perfect Pan Seared Scallops
Equipment
- Large Heavy bottomed pan
Ingredients
- 1.5 lbs jumbo scallops, wet or dry-packed, side muscle removed
- salt and pepper, to taste
- 1½ Tbsp olive or vegetable oil
- 1½ Tbsp butter cut into pieces
- 4 slices lemon, optional garnish
- 2 tsp Italian parsley, chopped, optional garnish
Instructions
- Prepare scallops by removing side muscle. Rinse and pat dry with a paper towel. Once dry, sprinkle with salt and pepper.
- Heat a heavy bottom or cast iron skillet over medium-high and add olive oil. Heat until the oil is very hot but not smoking.
- Carefully add scallops in a single layer and do not crowd.
- Sear undisturbed for 1½-2 minutes, until golden brown. Scallops should release easily from the pan. If not, let them cook a little longer.
- Turn each scallop over with metal tongs or spatula. Reduce heat to medium and add butter pieces.
- Using a large spoon baste the scallops with the melted butter and cook for about 60-90 seconds further. The center side of the scallops should be opaque.
- Remove scallops from the pan and onto plates. The scallops should have a golden crust.Add lemon slices to the pan and sear on each side for 30-45 seconds.
- Add a lemon slice to each plate as a garnish. Drizzle the butter from the pan on top of scallops and sprinkle with chopped parsley. Serve.
Notes
- If using frozen scallops be sure they are 100% thawed before using them.
- U-10 size scallops are recommended. Don’t use bay scallops
- Be sure to remove the side muscle from the side of the scallops. Gently pull it off and discard it.