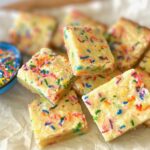
A sweet one-bowl treat with minimal ingredients
This simple recipe is one of our favorite “go-to’s” because it’s so easy for when you need to bring a treat somewhere, or just need your own sugar fix, but you need it fast!
[feast_advanced_jump_to]The addition of sprinkles brings in the fun factor and who can resist sprinkles? Nobody! This easy Sugar Cookie Bar recipe is like a cross between our Easy Drop Sugar Cookies and simple one-bowl Blondies.
These treats are ready in about 30 minutes, with no chilling, and one bowl means less cleanup. Easier than cut-out sugar cookies and always a win-win in our book!
This post contains affiliate links. See our affiliate disclosure policy for details. We only recommend products we love and use.
Ingredients for Sugar Cookie Bars
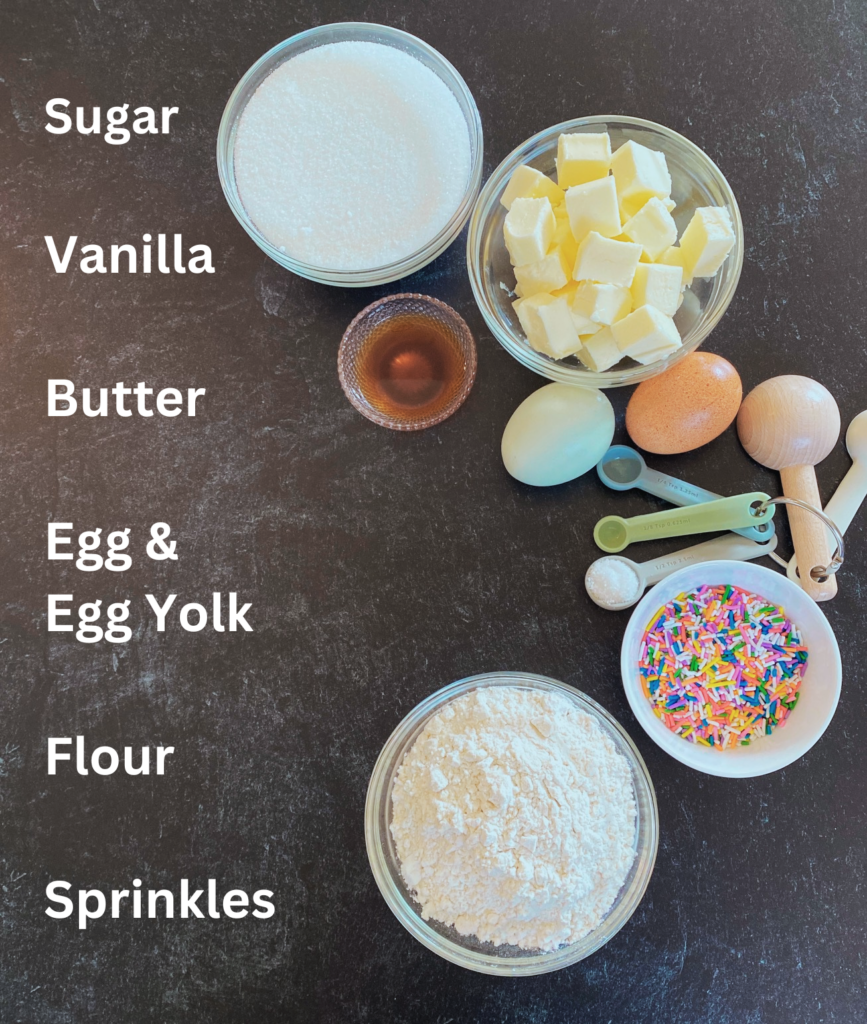
- Sugar – These are sugar cookie bars, after all! 😀
- Flour – all-purpose is best
- Butter – At room temperature. We used unsalted butter, but if you only have salted butter you can use that but cut the salt below to 1/4th teaspoon
- Vanilla Extract – Have you tried making your own vanilla? It’s easy!
- Whole Egg + an Egg Yolk – The additional yolk acts as a binder, makes the cookie bars extra chewy, and adds moisture to these bars. Save the extra white for another use (maybe tomorrows breakfast!)
- Salt – Salt always helps balance the sweetness in baked goods
- Sprinkles – Optional, but everyone loves sprinkles!
How to make Sugar Cookie Bars
The method is simple following these easy steps, and the dough is similar to a sugar cookie dough.
- Preheat the oven to 375˚F
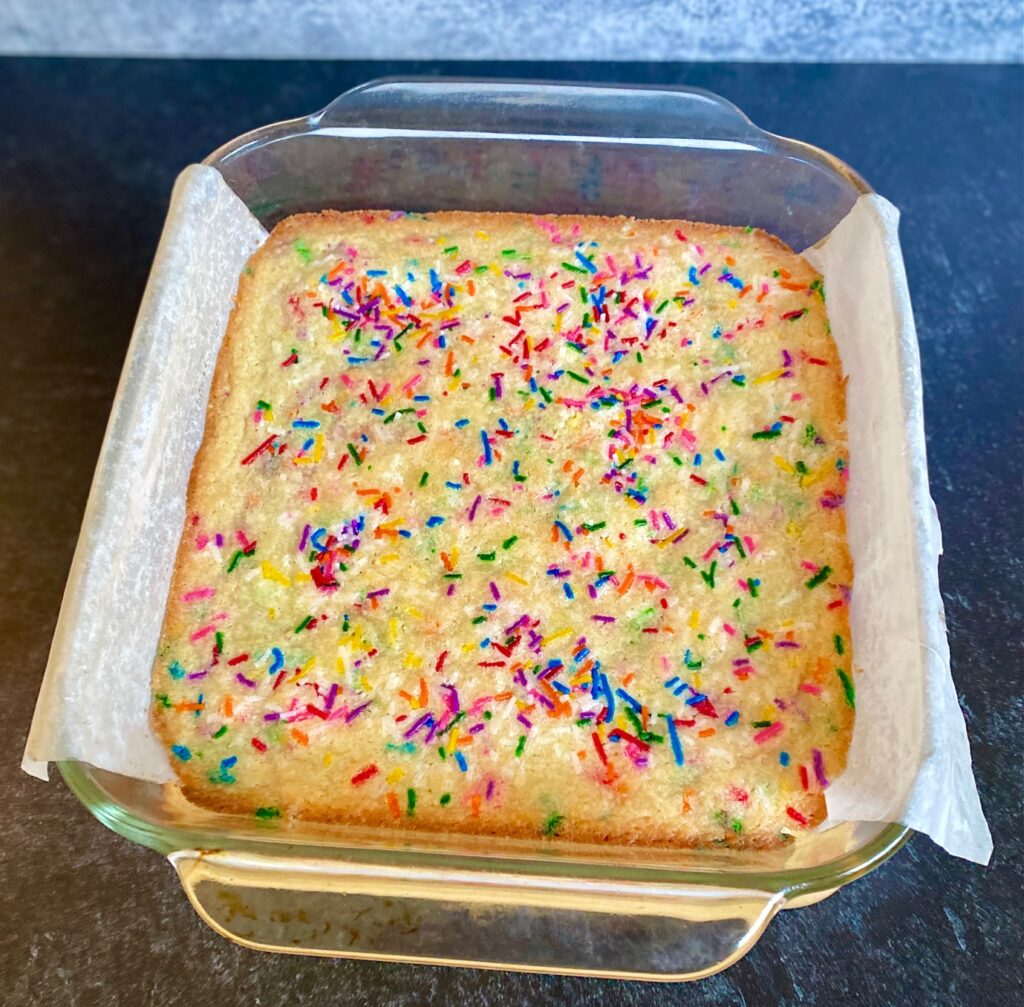
- Prepare an 8″x 8″ square pan by lining it with parchment paper or lightly spray with nonstick cooking spray. (see below for tips on using parchment)
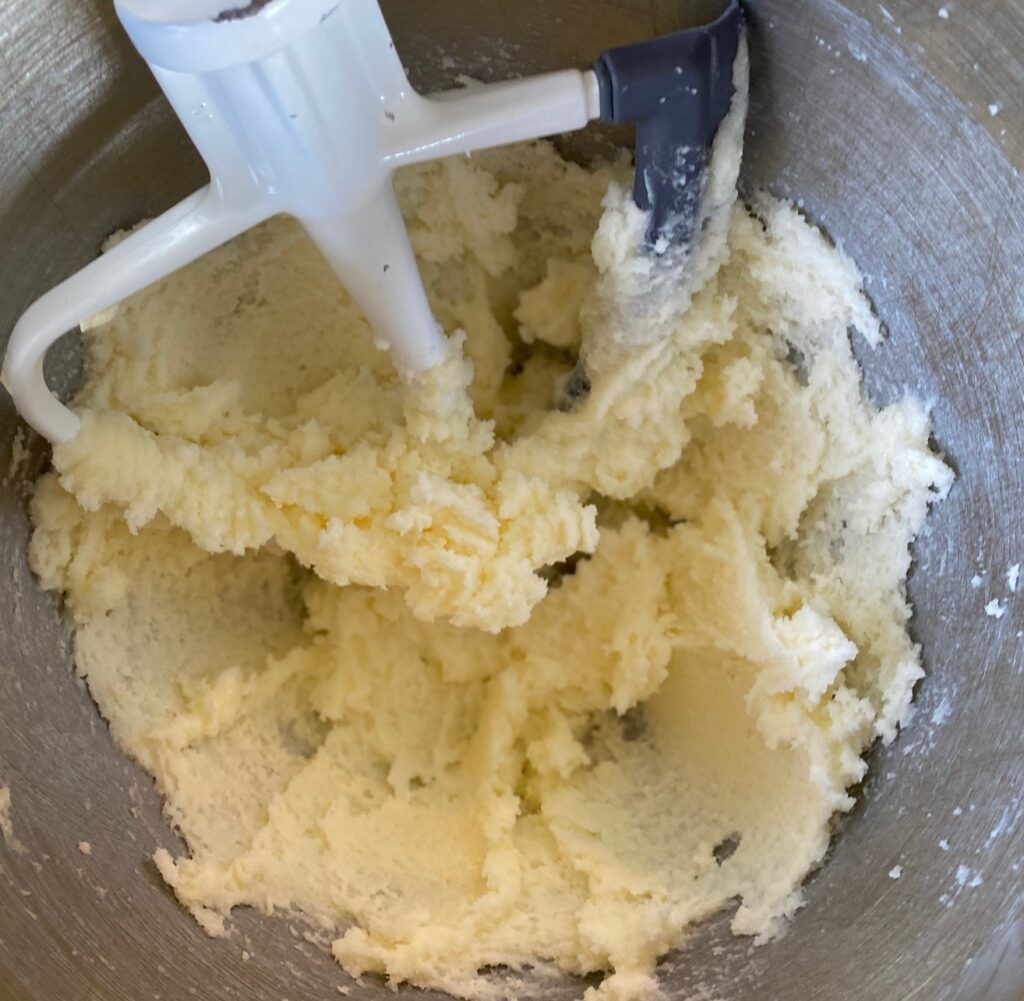
- Cream the butter for about 1 minute until lightly fluffy in a stand mixer fitted with a paddle attachment, or in a large bowl with a hand mixer, on medium speed
- Add the sugar and beat for 2 more minutes. The mixture should be light and fluffy. Be sure to stop and scrape the bowl once or twice to make sure everything is fully combined
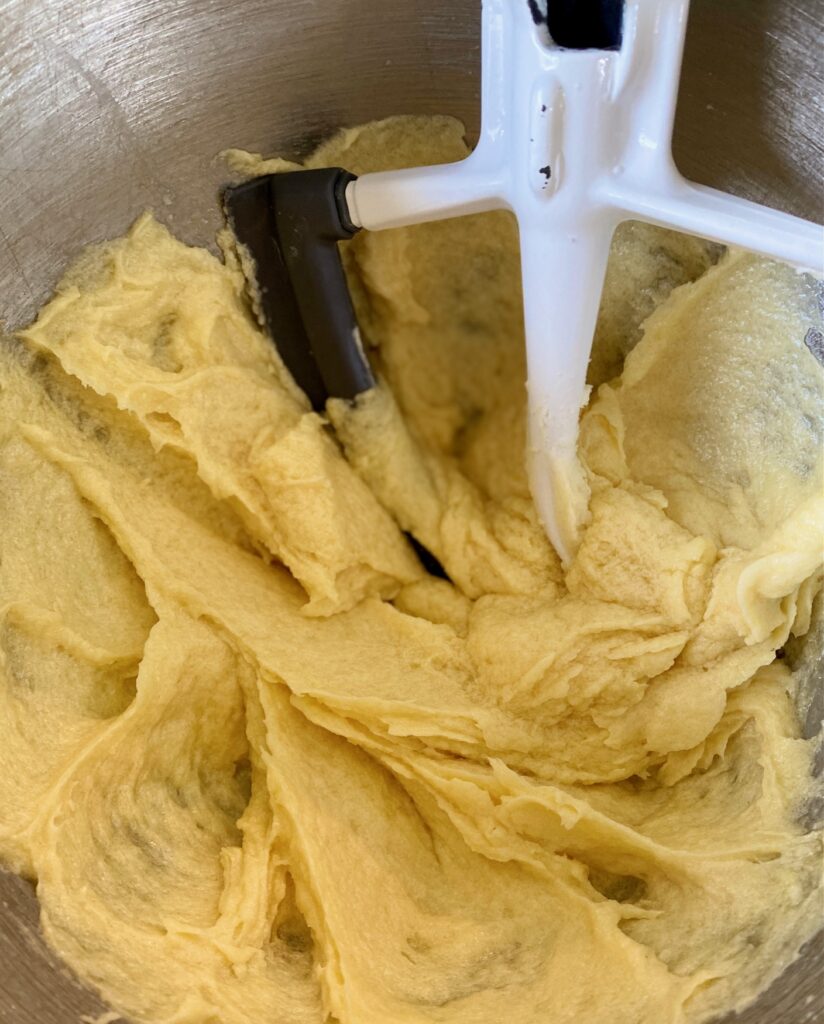
- Gently beat in the whole egg, the egg yolk, and the vanilla and mix until just combined

- Turn off the mixer, add the dry ingredients (flour and salt) to the wet ingredients, and mix until blended and no streaks remain
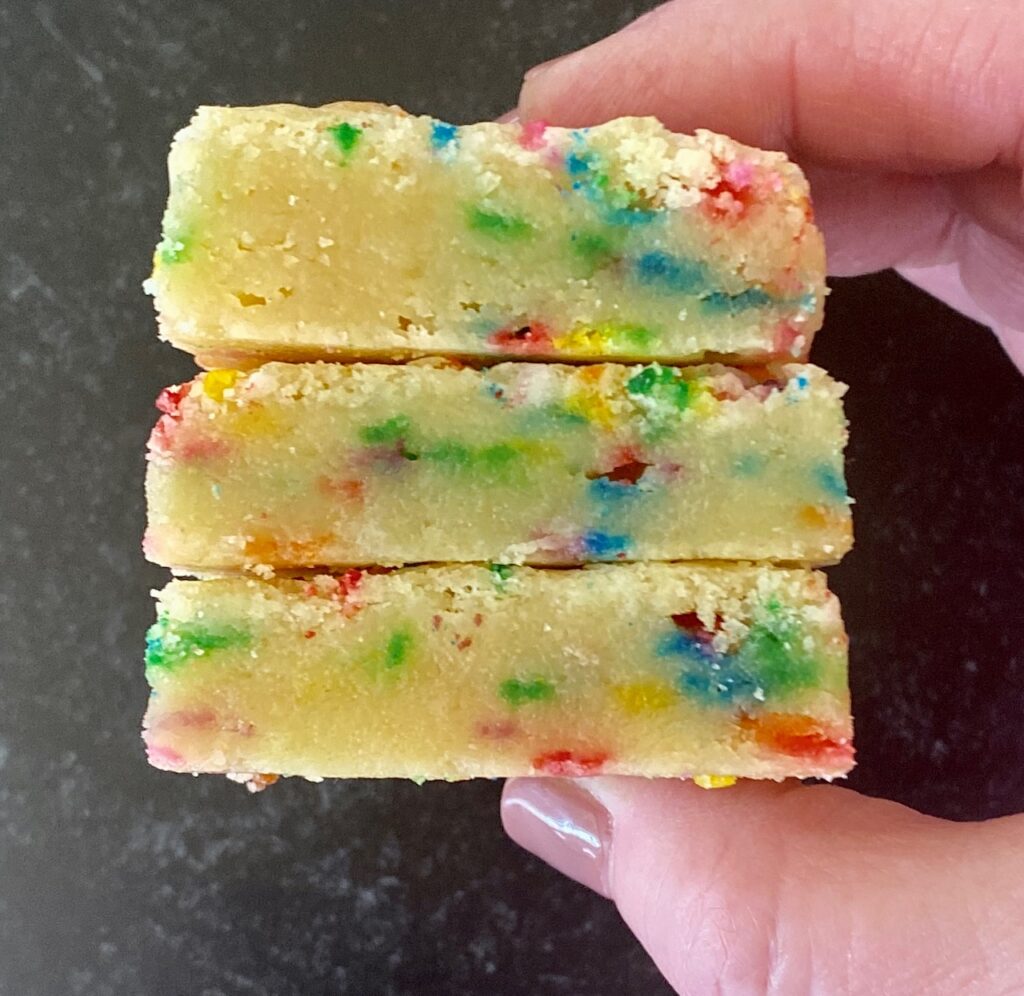
- Fold in 3 Tablespoons of the colorful sprinkles and gently combine

- Spread mixture evenly into the prepared pan and scatter the remaining sprinkles over the top
- Bake for 21-23 minutes, or until lightly golden brown on the edges
- Be careful not to overbake. The center will not be brown – just the edges. The bars are done when they lose their glossy sheen and will continue to bake, after they’ve been removed from the oven, while cooling
- Remove bars from the oven and let them cool completely in the pan
- Once cooled lift the bars out with the parchment paper “handles”
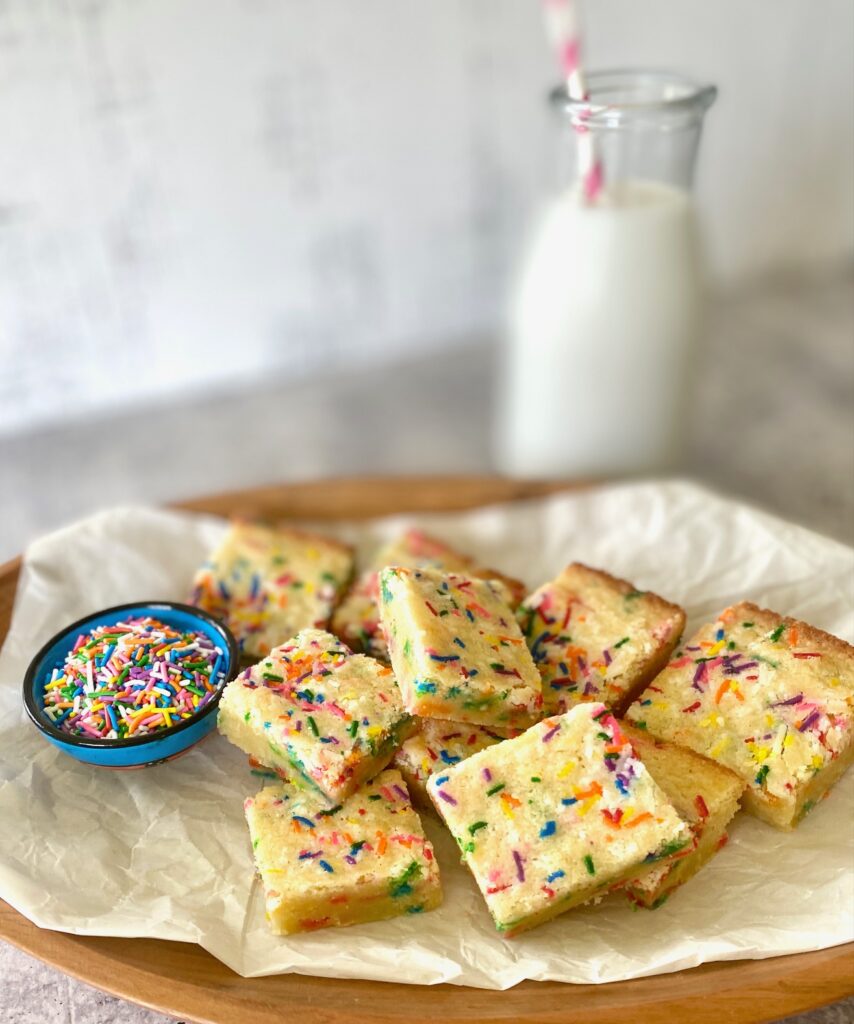
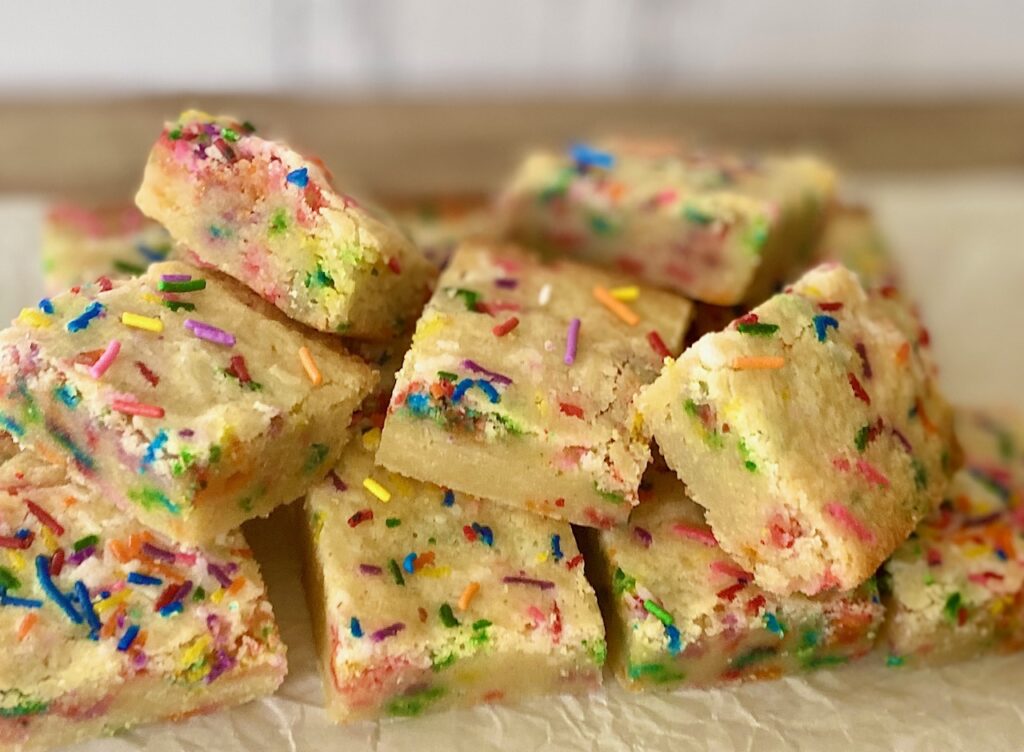
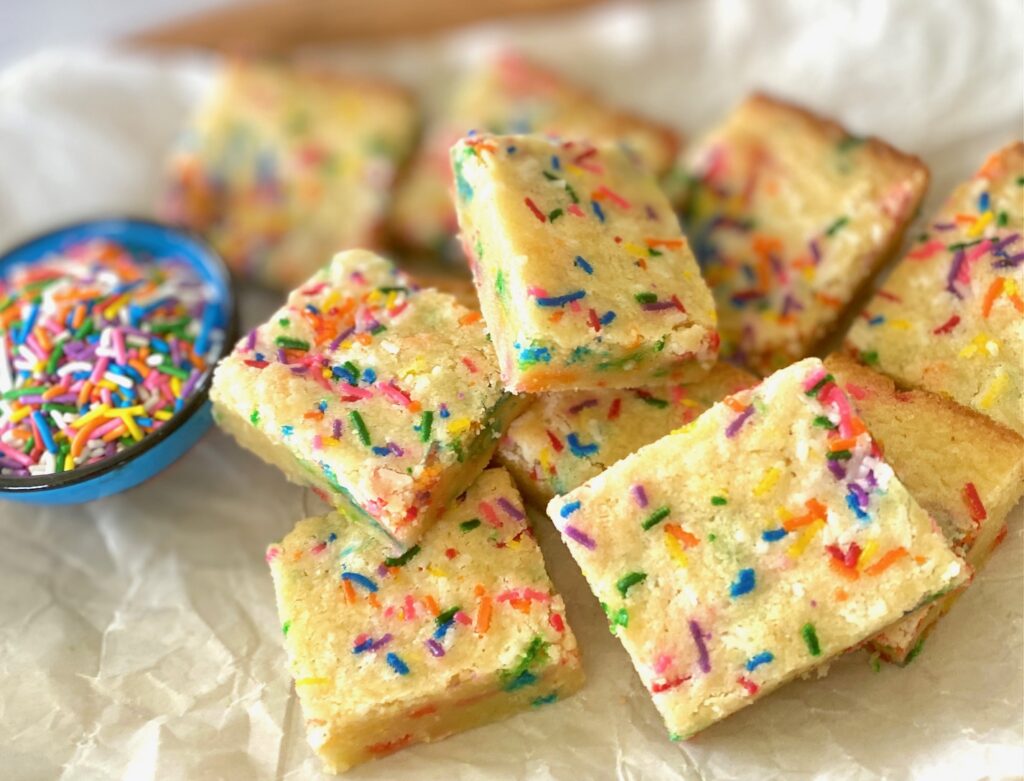
- Place on a cutting board and cut into 16 squares
- NOTE: If planning to frost the bars it’s easier to frost them before cutting
Storage:
These cookie bars are perfect for make-ahead: Store the cookie bars, covered, at room temperature, for up to 5 days. If frosting your bars store them in the refrigerator instead.
To Freeze: Let the pan cool completely and then cut into bars. Wrap tightly in plastic wrap and put in a freezer bag or airtight container. Freeze for up to 2 months. Thaw completely in the refrigerator or on the countertop.
Sugar Cookie Bar Variations
You can customize these delicious bars for any season or occasion by switching the color of the seasonal sprinkles. It’s easy to make these into Christmas sugar cookie bars with Christmas sprinkles or sweet Valentine’s Day sprinkle bars. They are perfect for the 4th of July with red, white, and blue sprinkles!
Here are some of our favorite variations:
- In place of vanilla: Use almond extract or add 1 Tablespoon of lemon juice and some lemon zest for lemon sugar cookie bars
- Sprinkles: Here’s your chance to customize – any fun sprinkles will work! We used rainbow sprinkles in our bars.
- Instead of Sprinkles: chocolate chips, peanut butter chips, crushed Oreos, dried cherries, or cranberries
- Frosted Sugar Cookie Bars: The only thing that could make these cookie bars better is to slather them with your favorite frosting recipe. We like simple buttercream frosting but cream cheese frosting would be delicious, as well
- Doubling: You can double this recipe and bake in a 9″ x 13″ pan. They may need a few extra minutes of cooking time
- Colored Cookie Bars: Add a few drops of food coloring for instantly fun colored cookie bars
Tips and Tricks
- Room-temperature softened butter works best
- Separating eggs is easier when the eggs are cold
- When lining the pan with parchment it helps to clip the sides with binder clips. They won’t melt in the oven and it keeps the parchment in place. See picture below ⬇️

Looking for other amazing easy treats?
- Scrumptious Chocolate Chip Skillet Cookie (also called a pizookie) is an easy twist on traditional chocolate chippers
- One Bowl Brownies are a cinch with tons of rich chocolate flavor
- Banana Bread with Chocolate Chips is another easy one bowl treat
Sugar Cookie Bars
Equipment
- 1 8-inch square baking pan
- Stand or hand mixer
Ingredients
Cookie Bars:
- ¾ cup unsalted butter, softened to room temperature
- 1 ¼ cup sugar
- 1 egg
- 1 egg yolk
- 1 Tablespoon vanilla extract
- 1 ¾ cups all-purpose flour
- ½ teaspoon salt
- ¼ cup sprinkles, optional
Instructions
- Preheat oven to 375° F. Lightly butter, or line with parchment paper, an 8-inch square baking pan leaving some overhang to let you easily remove the bars later.
- In a large bowl, using a stand mixer fitted with a paddle attachment, or hand-held mixer, cream the butter for about 1 minute. Add the sugar and beat until light and fluffy, about 2 more minutes. Scrape the side of the bowl occasionally.
- Beat in the whole egg, egg yolk, and vanilla until just combined.
- Turn off the mixer and add the flour and salt. Blend gently just until combined and no streaks remain. Scrape bowl if needed.
- Add in most of the sprinkles (about 2/3rds), if using, and mix with a rubber spatula. (The sprinkles could shatter if using the mixing blade to mix them in)
- Press the batter into the prepared pan and evenly smooth the top and then scatter the remaining sprinkles on top.
- Bake for 21-23 minutes or until lightly browned on the edges and top. The top should no longer be shiny.These bars are supposed to be soft so be careful not to overbake them because every oven bakes differently.
- Remove from the oven and allow the pan to cool completely on a cooling rack. The middle may sink a little but that is normal.
- Remove the entire square from the pan by loosening the edges and lifting them out or use the parchment overhang. Place on a cutting board.Cut into about 16 pieces.
- If frosting the bars it's easier to frost them before cutting.
Storage:
- Store in an airtight container and keep at room temperature for up to 5 days.
Notes
- These bars can be tightly wrapped and frozen for up to 2 months
- Store, sealed, at room temperature for up to 5 days
- Substitutions ideas for sprinkles: chocolate chips, peanut butter chips, crushed Oreos, dried cherries, or cranberries
Nutrition
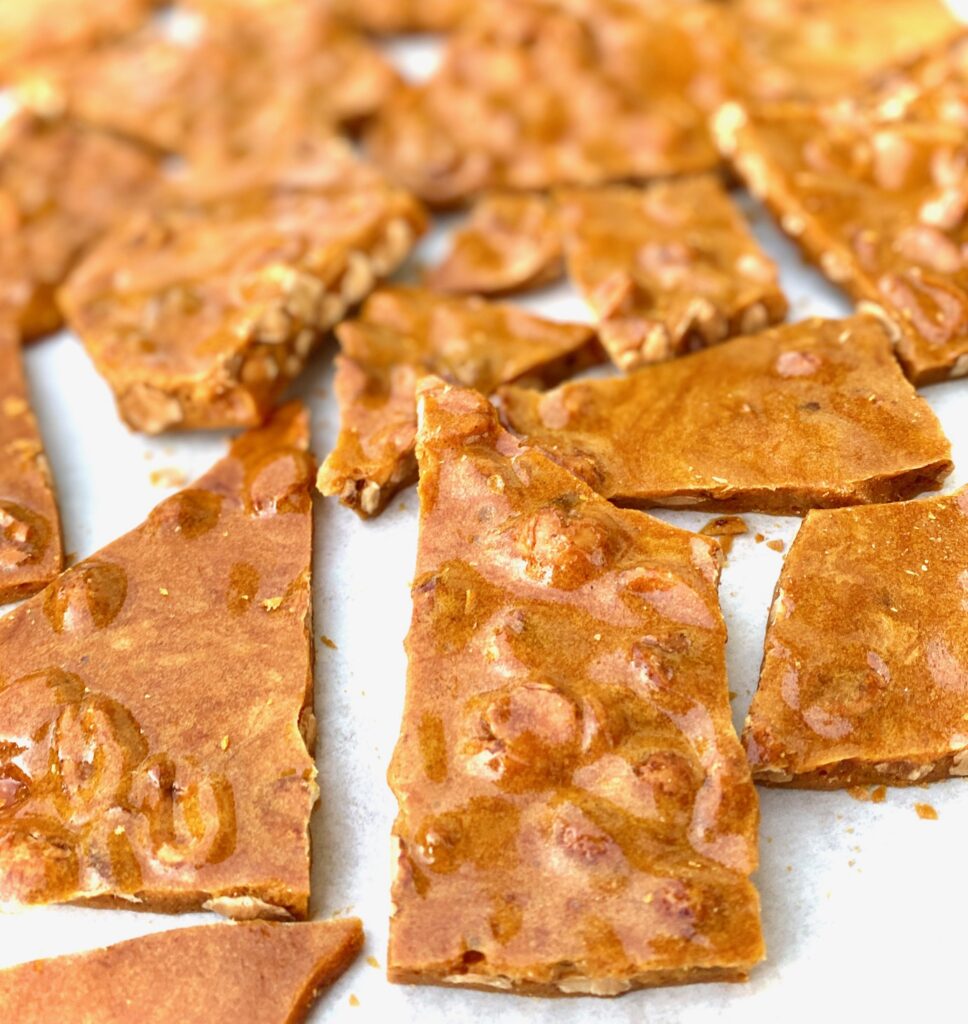
This recipe is a dream come true because it has all the big flavor and light airy texture of the best nut brittles but is super simple and ready in a flash
A true win-win in our book!
We are big fans of peanut brittle in my house however it’s fairly time-consuming to make. This is a great alternative to the traditional method and I’m hooked on this easier method.
Nut Brittle is a holiday tradition for us, much like our 4-ingredient Peppermint Bark and Chocolate Dipped Pretzels, but it’s delicious any time of the year. It makes a very welcome gift for friends and neighbors too.
Jump to RecipeThis post may contain affiliate links. Please see our affiliate disclosure for more details.
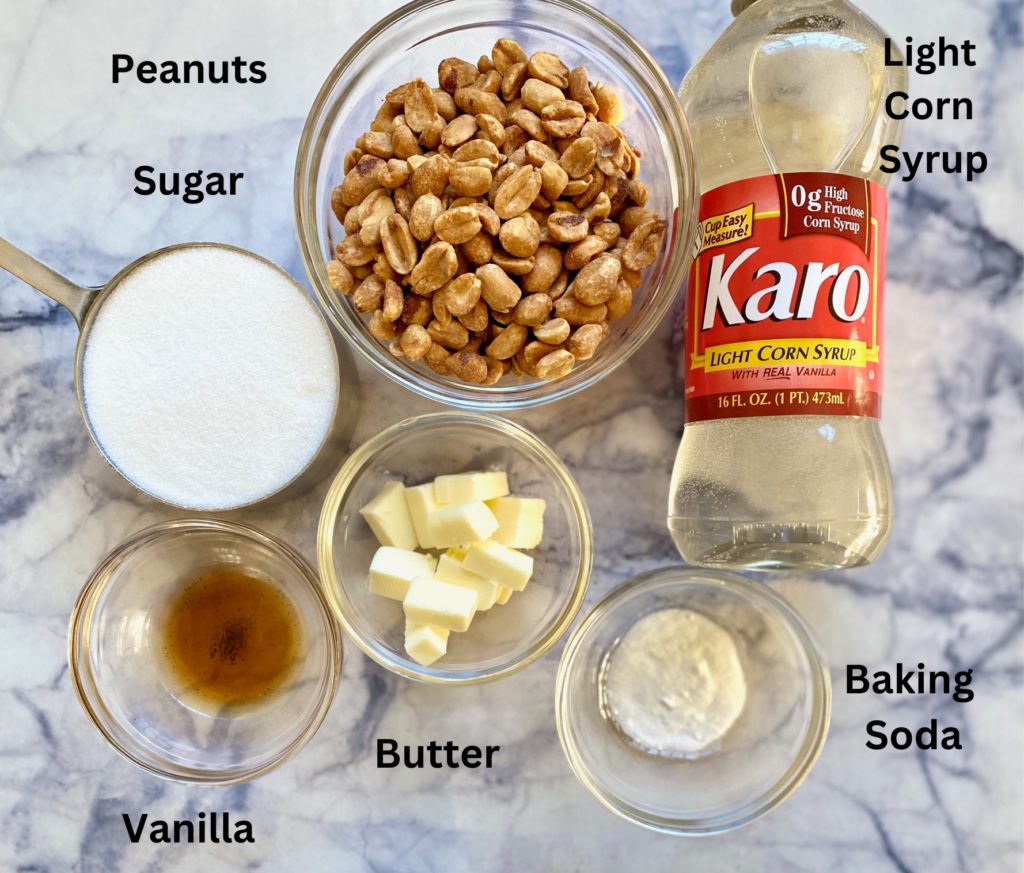
Ingredients for Nut Brittle:
Just a few simple ingredients are needed for this easy peanut brittle.
- Sugar – Regular white sugar is all you need
- Light Corn Syrup – Choose non high fructose and it must be light colored
- Peanuts – We like dry-roasted but raw peanuts are a common choice. Any nuts will work for this recipe so go ahead and get creative!
- Butter – You can use salted or unsalted. (Vegan butter is an easy swap, but see notes below in the substitutions section)
- Vanilla Extract – Use the best you can because the vanilla flavor is important in this candy. We use our easy homemade vanilla.
- Baking Soda – This is where the magic comes in because baking soda gives the brittle its light airy texture
- Sea Salt – optional but really gives the brittle a nice little flavor pop
How to make microwave Peanut Brittle:
This recipe, like any candy recipe, requires your full attention (luckily this one only needs 15 minutes of your time!) so it’s very important to have ALL of your ingredients ready to go before starting.
Steps 1-3
- Prep all of the ingredients and have them near the microwave
- Line a large sheet pan with parchment paper, Silpat style mat, or lightly spray or grease the pan (don’t skip this step)
- It’s best to use a large wooden spoon for brittle. Grease or spray the spoon with non-stick spray before starting
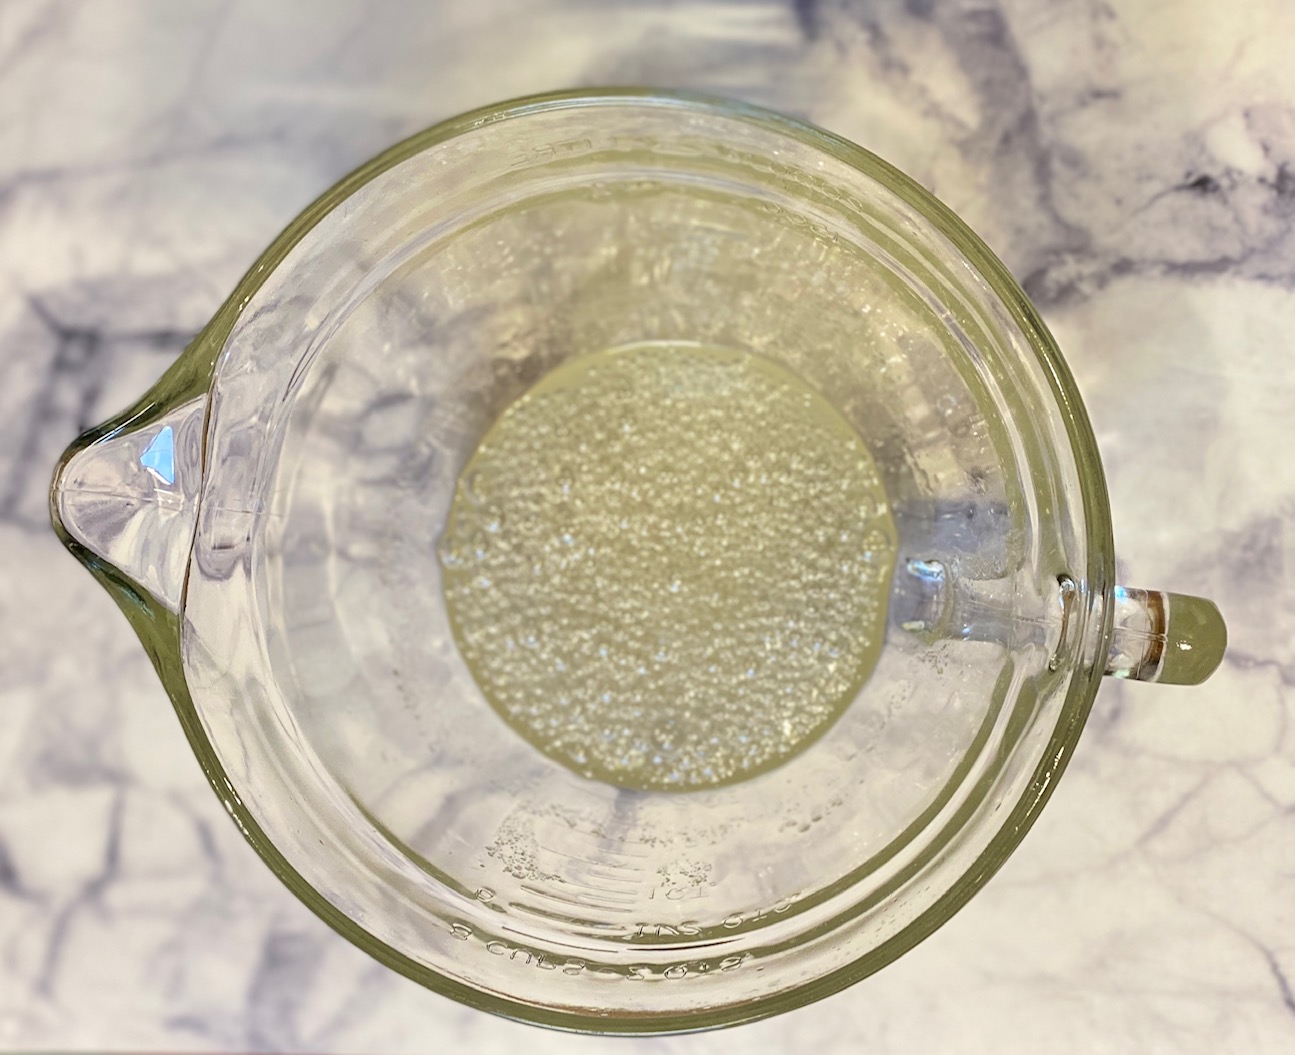
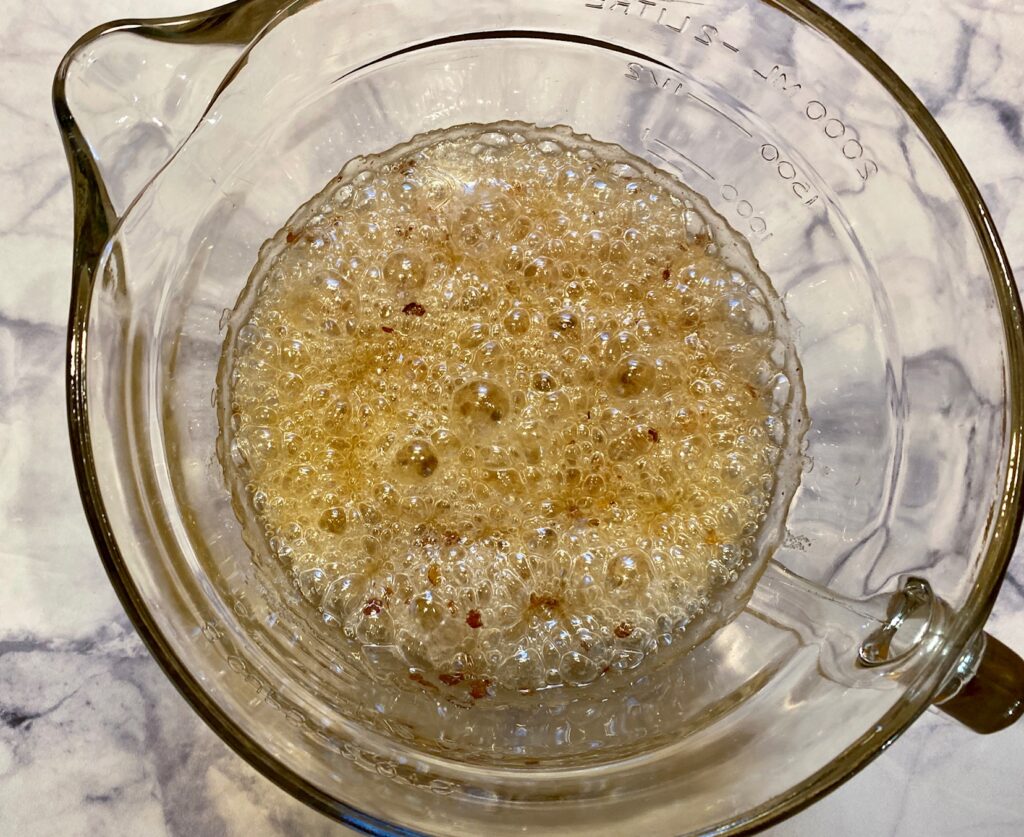
- In a large glass bowl (don’t use plastic), combine the sugar and corn syrup, and mix until combined. The mixture should not fill the bowl more than 1/3 full because the mixture will bubble up during cooking. Step 1 photo below
- Microwave on High for 4-minutes
- Carefully remove the bowl, stir, mix in the nuts, and stir again (If your bowl doesn’t have a handle be sure to use oven mitts). Step 2 photo below
- Microwave on High for 3-minutes. Step 3 photo below

Steps 3-5
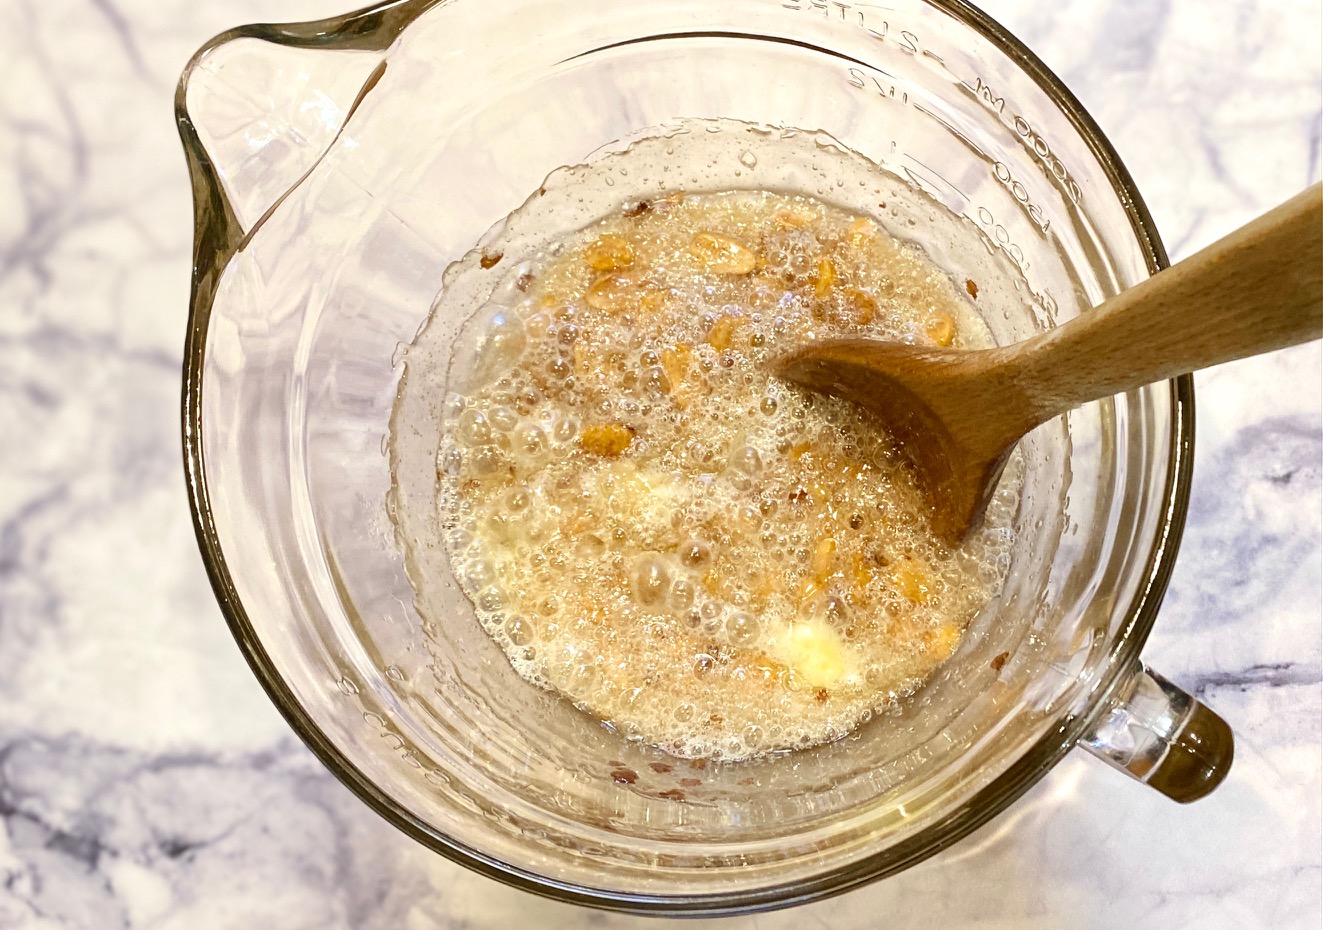
- Remove bowl from microwave and stir in the butter pieces. Step 4 photo below
- Return to the microwave and cook on High for 2 to 3 minutes or until the mixture reaches 305˚-310˚F and is a caramel brown color. Using a microwave-safe thermometer that you can leave in the bowl will make this much easier. This temperature is also called the “hard crack stage”
- NOTE: The variation in cooking time will depend on the strength of your microwave. (We tested in an 1100-watt microwave and only needed 2-minutes)
- Remove from microwave and immediately add the vanilla extract and baking soda and quickly stir. Step 5 photo below
- The mixture will bubble furiously. You need to stir quickly to combine because the mixture will begin to harden but DO NOT overmix. You want the mixture to stay light, airy, and creamy

Steps 6-7
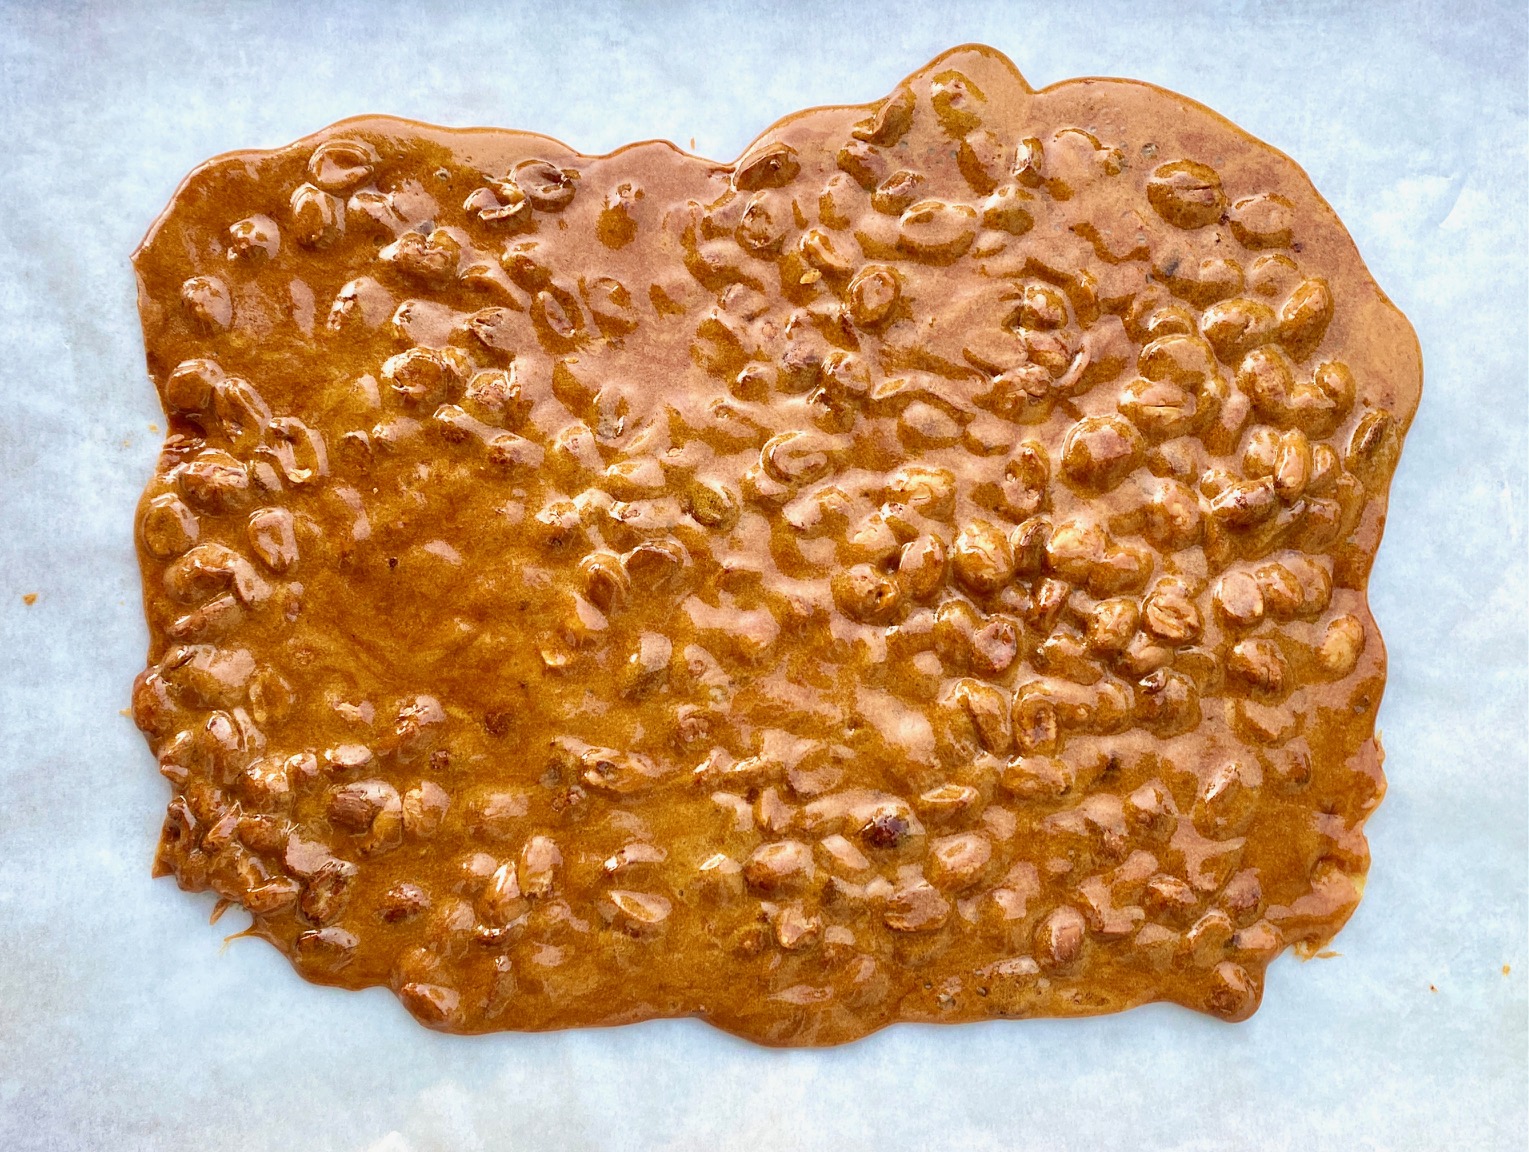
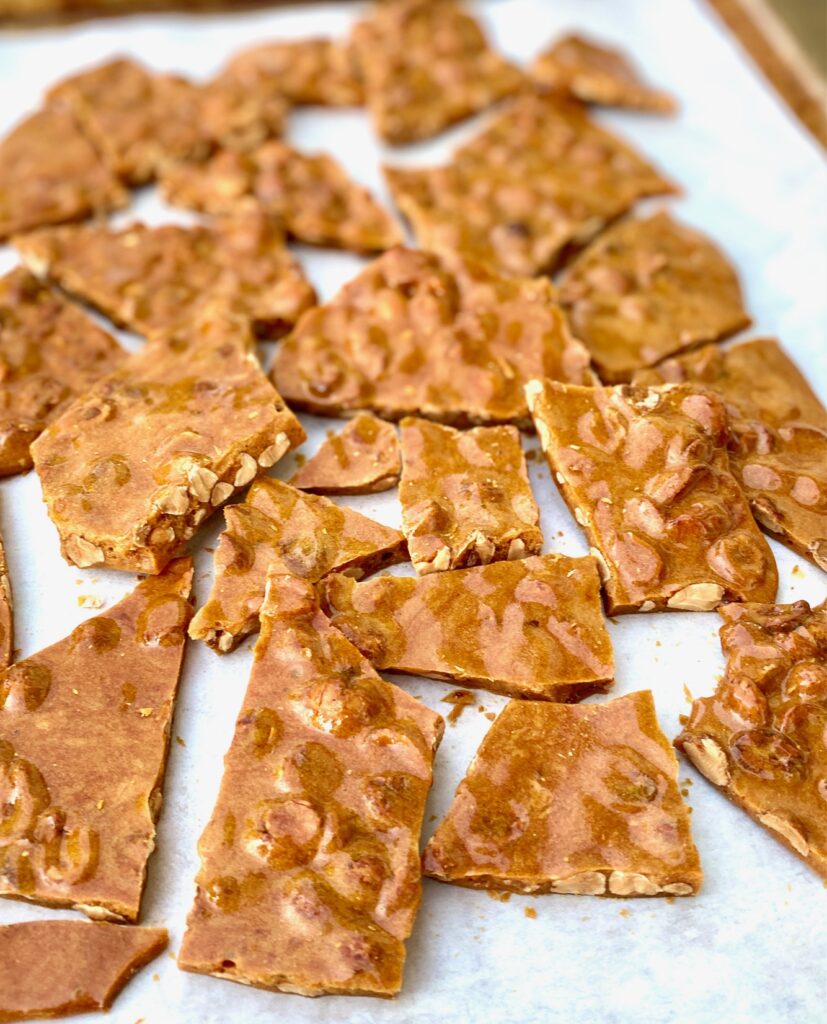
- Pour immediately onto the prepared baking sheet and lightly spread around so that the brittle is somewhat even in thickness. Step 6 photo below
- Sprinkle with sea salt, if desired
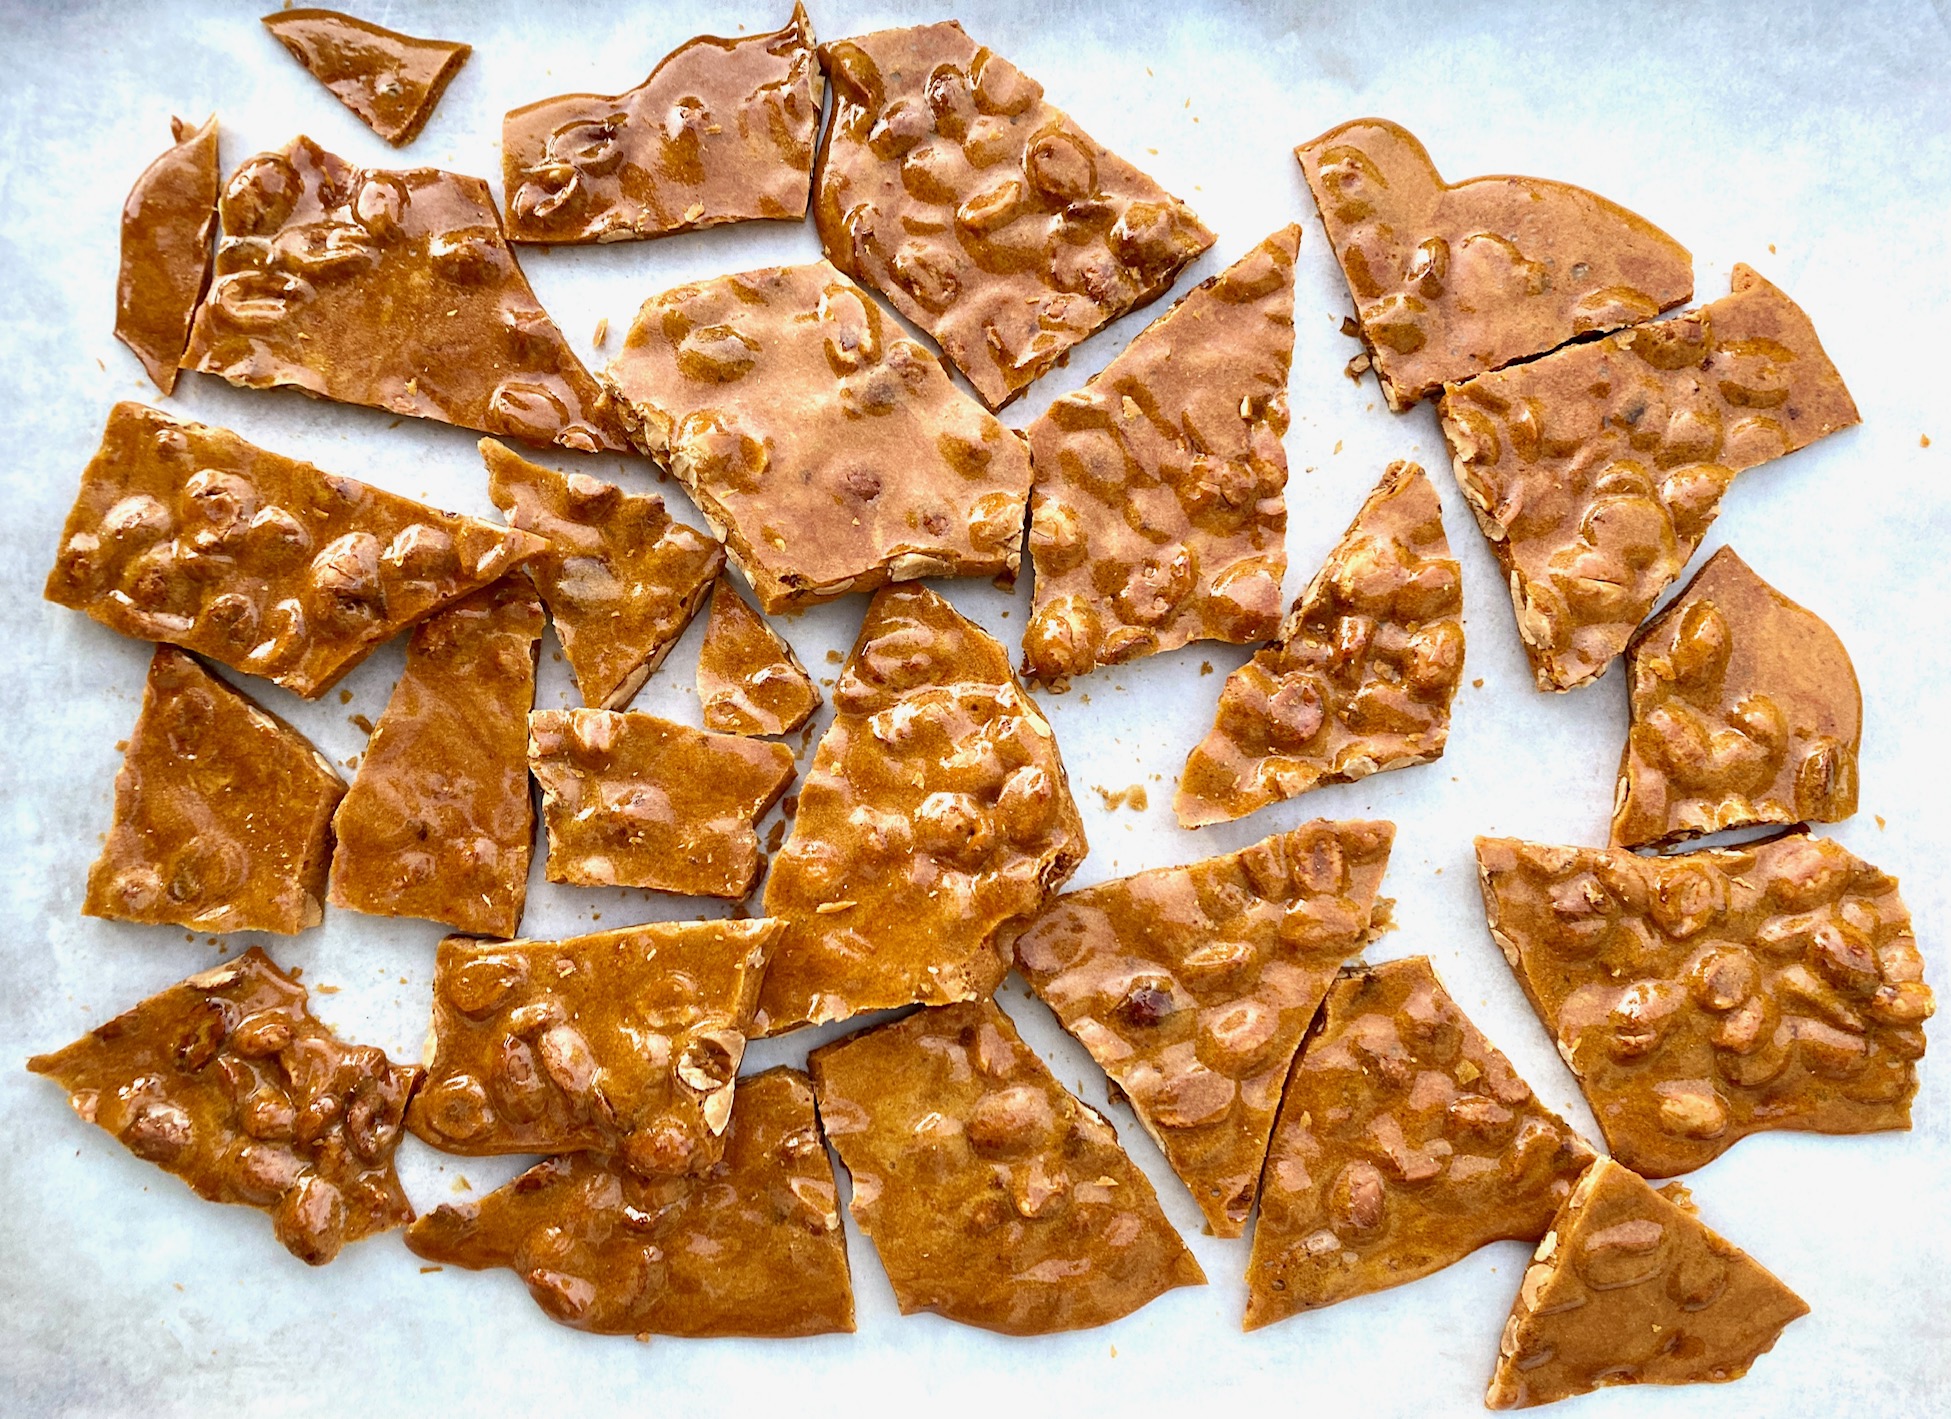
- Allow the peanut brittle to set at room temperature for at least 30-minutes. Once fully set break the brittle into pieces. Step 7 photo below
Substitution Ideas:
- Any nuts will work for this recipe and it’s fun to mix it up. Try cashews, pepitas, hazelnuts, or raw Spanish peanuts
- Want to keep it vegan? Substitute vegan butter but only use 2 Tablespoons instead of 3
How to store Peanut Brittle
Once completely cooled store your peanut brittle pieces in an airtight container but do not refrigerate. Keeps well for about 4 weeks.
Pro Tips and Frequently Asked Questions
- Do not overmix the candy once you add the baking soda. You want the bubbles to remain fluffy and full of air
- Using a candy thermometer makes it easier to avoid under and overcooking
- Keep an eye on the color – peanut brittle can go from light to dark quickly
- Using a large 8-ounce glass measuring cup, with a handle on it, works perfectly for this recipe because the handle stays cool while cooking
- Why is my peanut brittle chewy? The candy must cook to 305˚F to reach the “hard crack” stage. If not, the brittle will be too soft and won’t have that crisp crackle characteristic of peanut brittle. It will also be too chewy
- Why didn’t my peanut brittle harden? There are likely 2 reasons: you didn’t cook it long enough, or there is too much humidity in the air (see below for more info on humidity and candy making)
- Why do you add baking soda to peanut brittle? Adding baking soda allows the mixture to bubble which creates the airy fluffy texture we all love in peanut brittle
Can you make peanut brittle in humid weather?
Humidity is no friend to any sugary candy making. The moisture in humidity slows down the cooling process and can increase unwanted sugar crystals, which means your brittle won’t set properly, and it will be softer than desired.
Experts say to cook hard candy, like brittle, an extra 2˚higher. I live in California so haven’t had the chance to test this method.
I credit my cousin for sharing this no-fail recipe with me. Trust me ~ you’re going to love it! ❤️

Microwave Peanut Brittle
Equipment
- 1 Sheet Pan
- 1 instant-read or candy thermometer (optional but recommend)
- 1 large glass bowl or measuring cup
Ingredients
- 1 cup sugar
- ½ cup light corn syrup
- 1 cup peanuts, roasted (We prefer dry-roasted, but you can substitute any nut)
- 3 Tablespoons butter cut into pieces
- 2 teaspoons vanilla extract
- 1 teaspoon baking soda
- 1 teaspoon sea salt, to taste optional
Instructions
- Lightly grease a 12" x 18" baking sheet, or line it with parchment paper or a Silpat mat. Spray a wooden spoon with non-stick spray
- Mix the sugar and corn syrup in a large glass microwave-proof bowl until well combined. Do not use a plastic bowl.The bigger the bowl the easier it is to ensure the mixture cooks evenly. The mixture should fill it no more than 1/3 full.
- Microwave on high for 4 minutes. Carefully remove the bowl and stir in the nuts. Microwave for additional 3 minutes.
- Remove from the microwave and carefully fold in the pieces of butter.
- Microwave on high for an additional 2-3 minutes, or until the mixture reaches 305-310°F on an instant-read or candy thermometer.The color should be a medium-brown caramel color.(Cooking time will vary based on each individual microwave)
- Remove, and carefully add vanilla and baking soda. The mixture will be very bubbly and creamy. Stir quickly but DO NOT overmix. Immediately pour onto the prepared baking sheet and if needed lightly smooth out with the back of the wooden spoon. If desired, sprinkle with sea salt.
- Allow candy to rest for about 30-minutes before breaking into pieces.
Notes
- If you don’t have a thermometer watch carefully as you approach the final 2-minute mark. The mixture should be a medium-brown caramel color.
- We tested in a microwave that is 1100 watts
- Pro Tip: Don’t stir too much or too hard after adding the baking soda. Baking soda adds air to the mixture, which makes it lighter, and gives it the “melt-in-your-mouth” texture. If you overmix after adding the baking soda, you will end up breaking down the air bubbles.
- Cleaning up after making brittle is easier than you think. Just soak everything in super hot water and let it sit for awhile.
- Any nuts work well – try cashews, pumpkin seeds, hazelnuts or a combination of nuts
- Vegan Butter – use just 2 Tablespoons instead of 3 Tablespoons
Nutrition
I think the whole world can agree that there is nothing better than an easy warm cookie that can be prepared in no time!
Even the most reluctant baker can make these easy-peasy Oatmeal Cookies
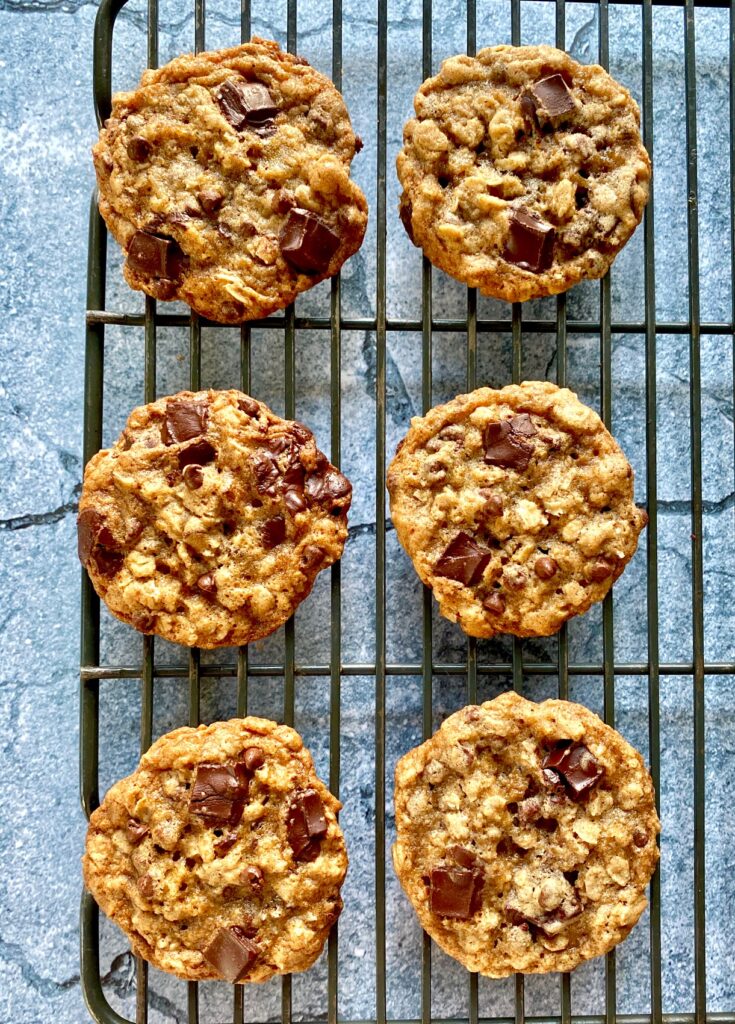
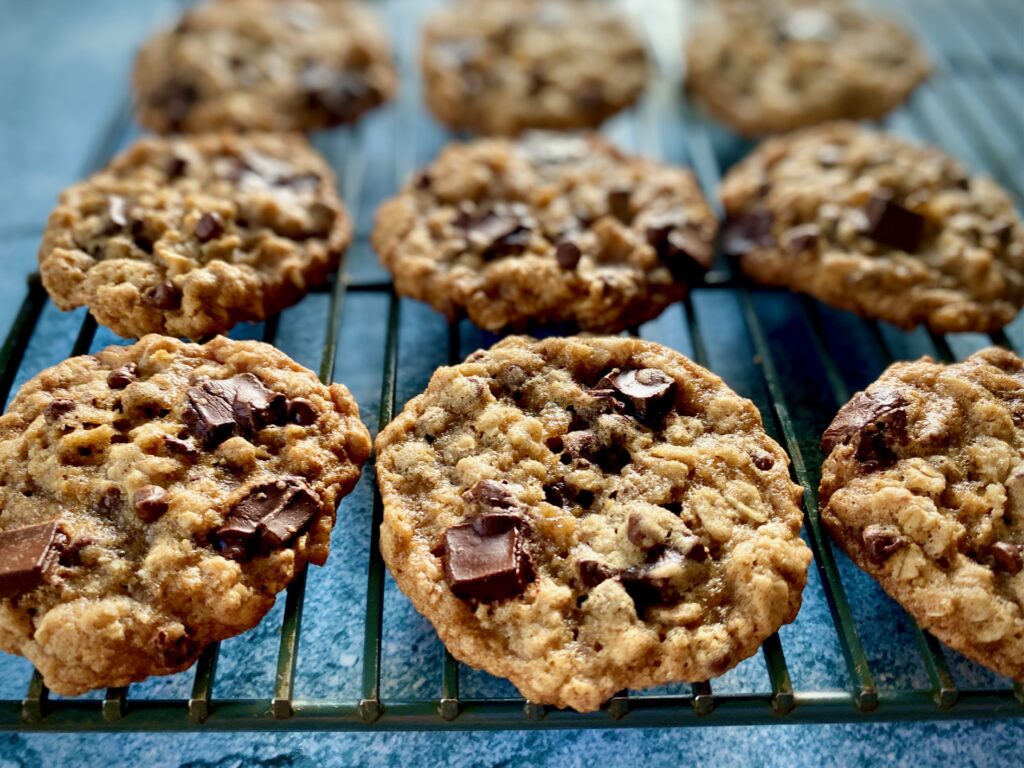
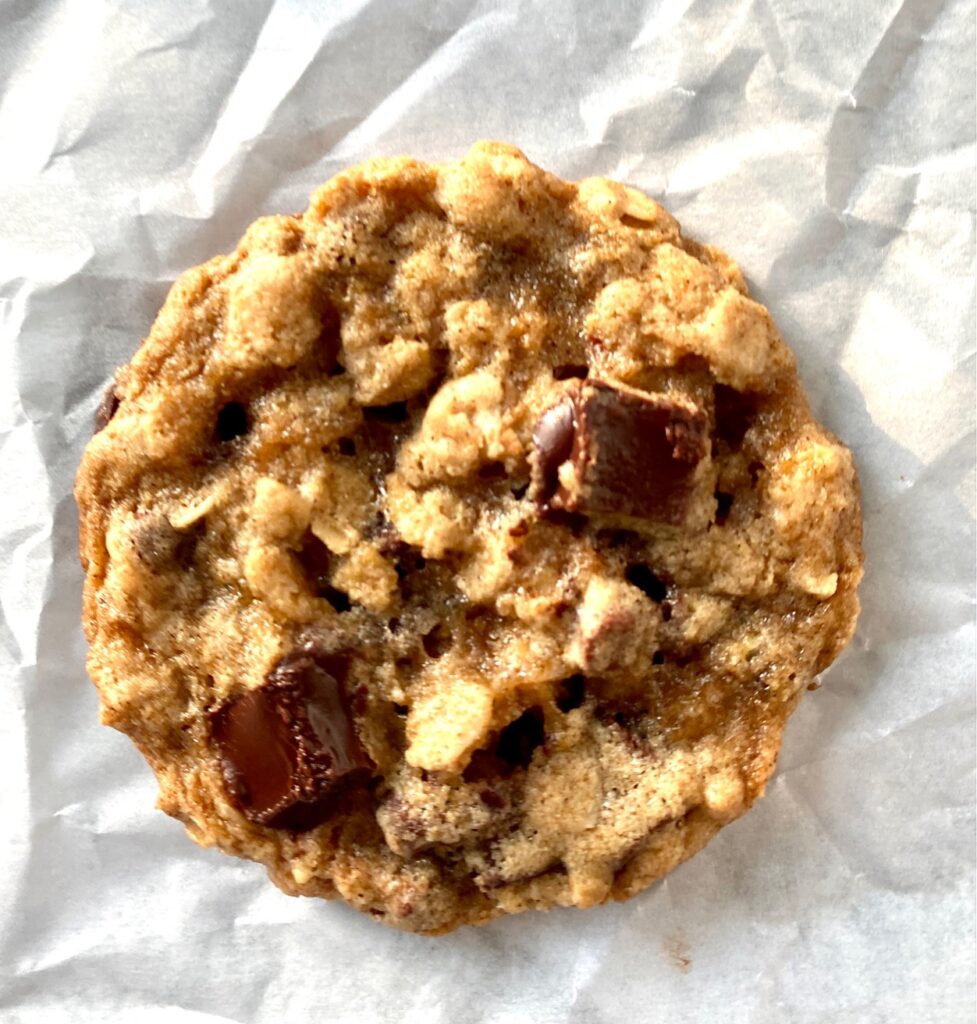
Traditional Oatmeal cookies contain raisins, which I love, but nobody else in my household likes so I added chocolate chips and chocolate chunks instead. These cookies taste amazing with these little bits of chocolate in every bite!
Many Oatmeal Cookies tend to be dry, but not this version. They are moist and tender!
Amazing homemade cookies fresh from the oven in about 30-minutes!
Jump to RecipeThis post may contain affiliate links. Please see our affiliate disclosure for more details.
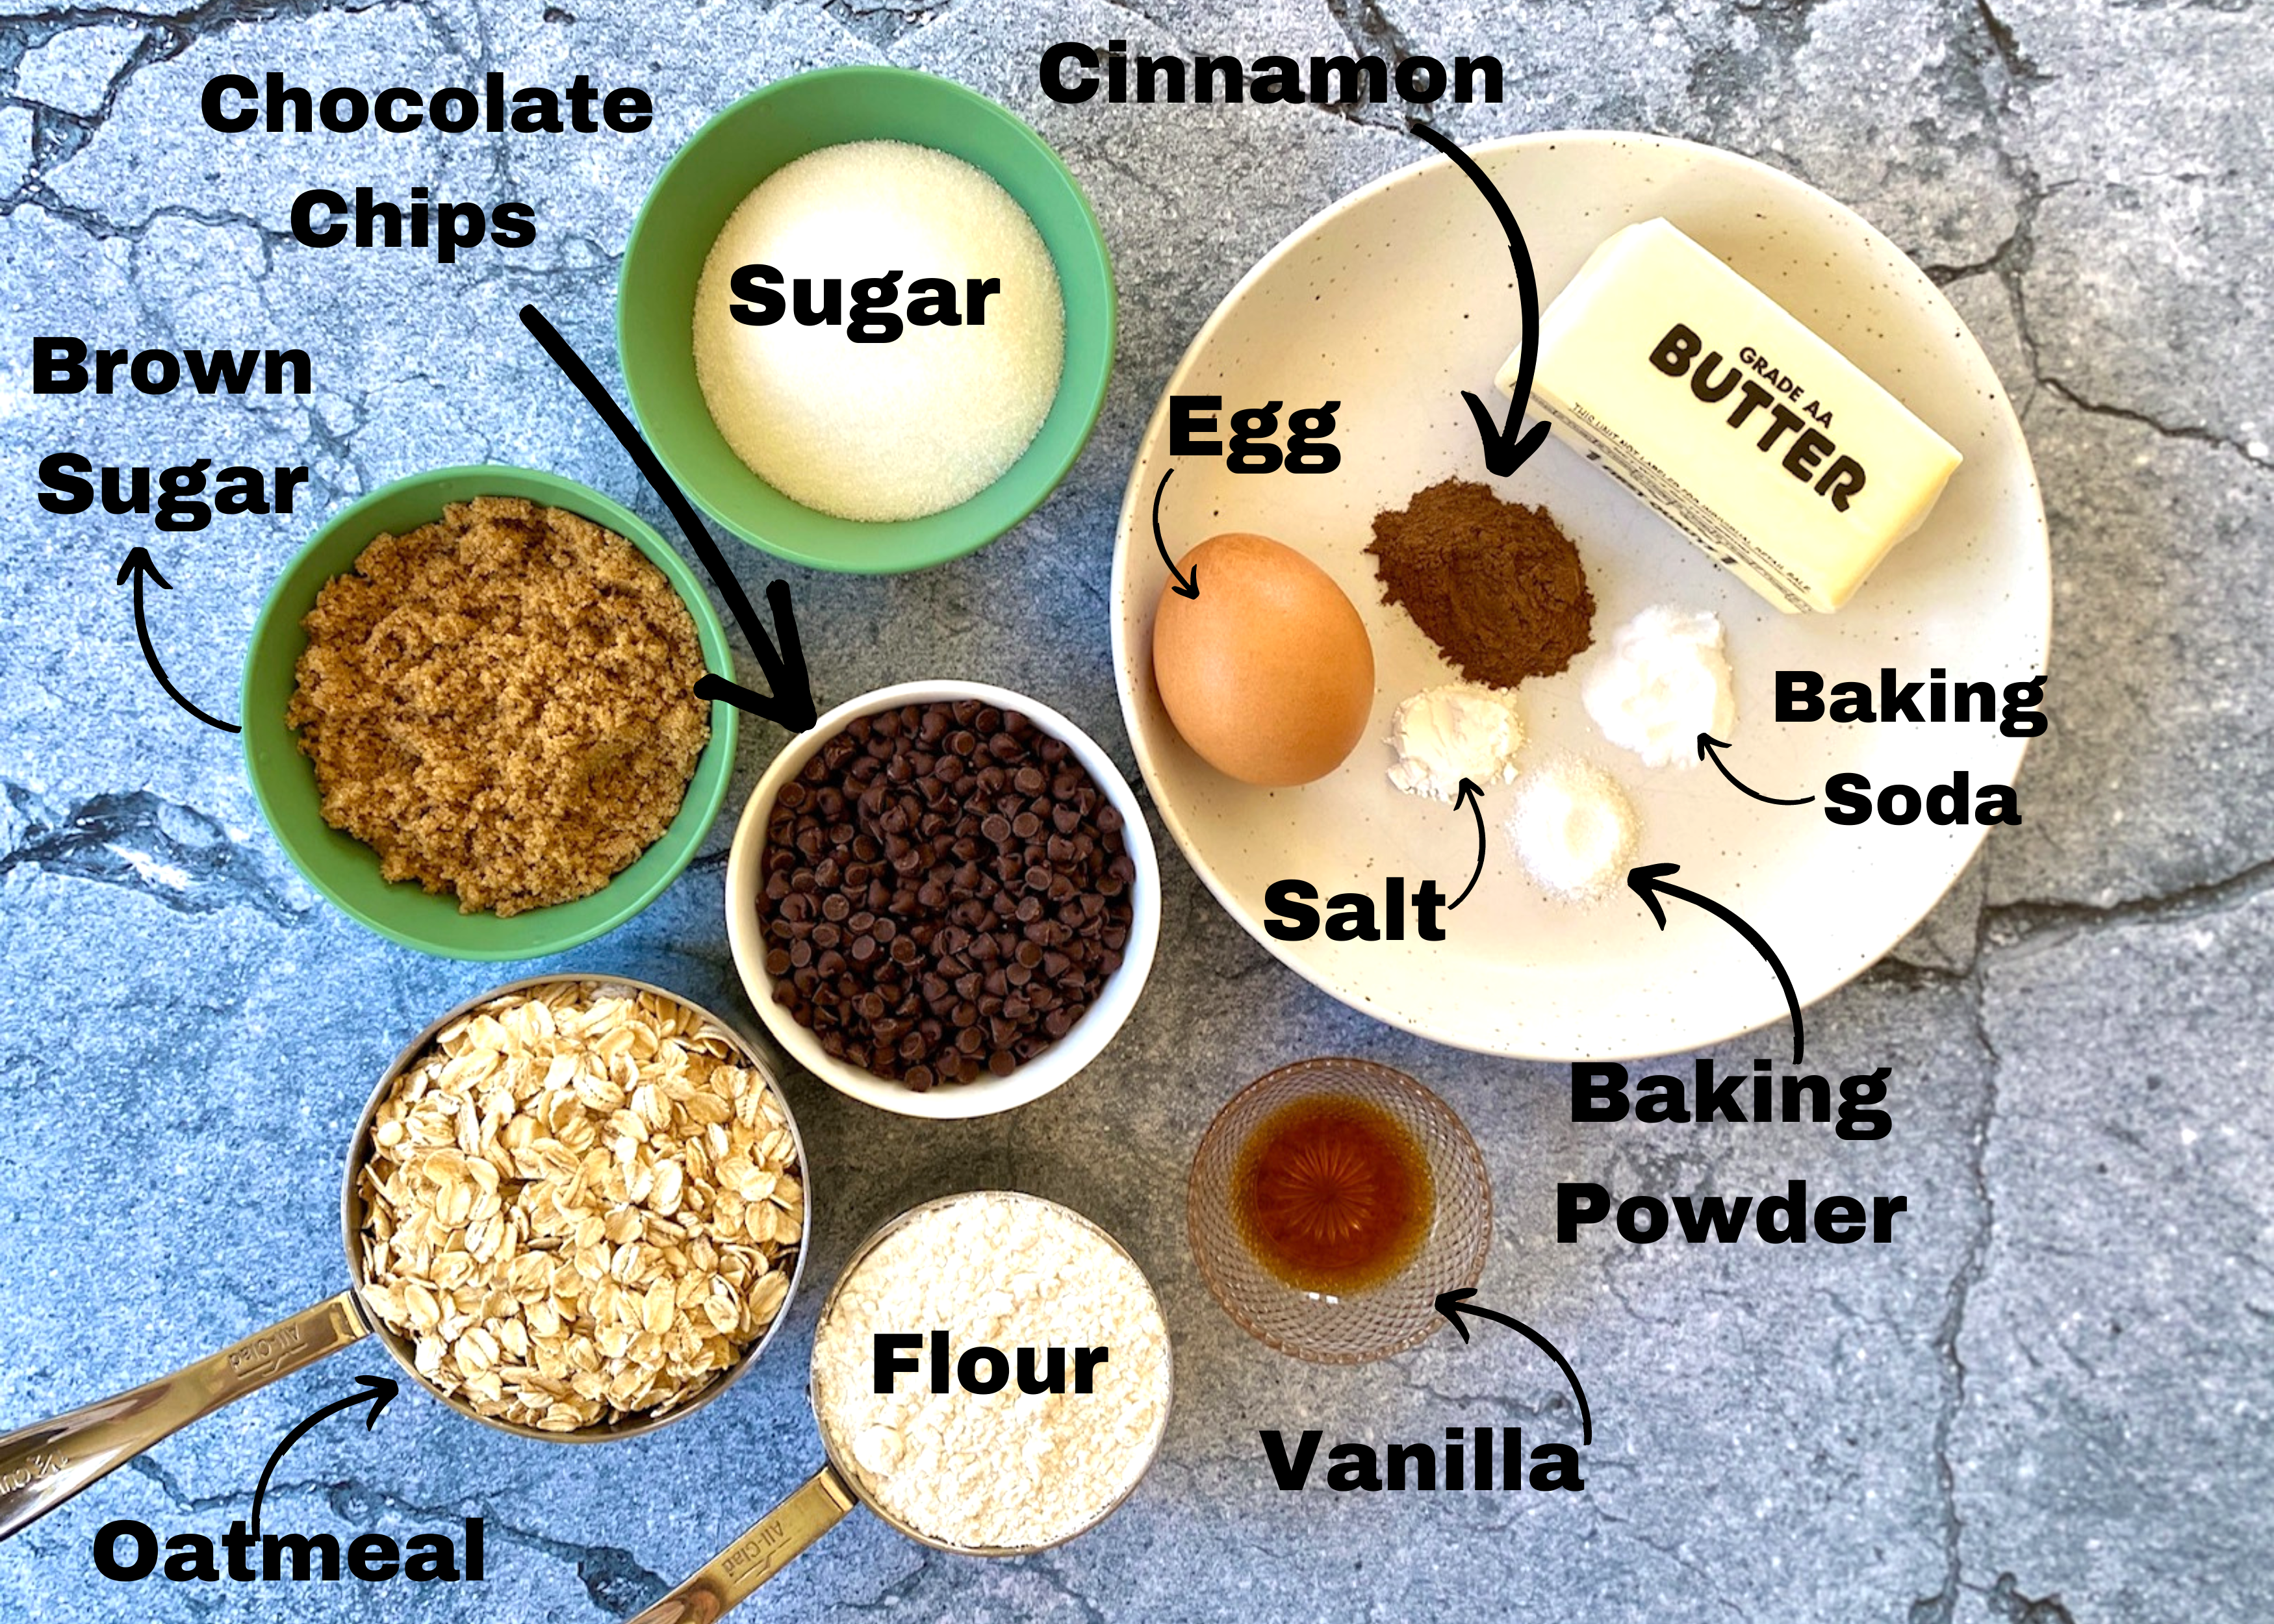
Ingredients needed:
One of the best things about these cookies is that they are made with basic baking ingredients
- All-Purpose Flour
- Baking Powder and Baking Soda – you’ll need both to get a little lift in these cookies
- Cinnamon – if you really love cinnamon you can use up to 2 teaspoons
- Salt – salt helps balance the sweetness in baked goods
- Unsalted Butter – if you only have salted butter go ahead and use it and skip the added salt in the dry ingredients
- Sugar and Dark Brown Sugar – the dark brown sugar really adds depth of flavor
- Egg
- Vanilla Extract – use the good stuff or make your own vanilla, like we do!
- Old Fashioned Oats – be sure they are the old-fashioned type, not quick-cooking or steel-cut variety
- Mini Chocolate Chips and Chocolate Chunks – we like the variety in texture that both provide but any chip will do the trick!
How to make the best Oatmeal Chocolate Chip Cookies:
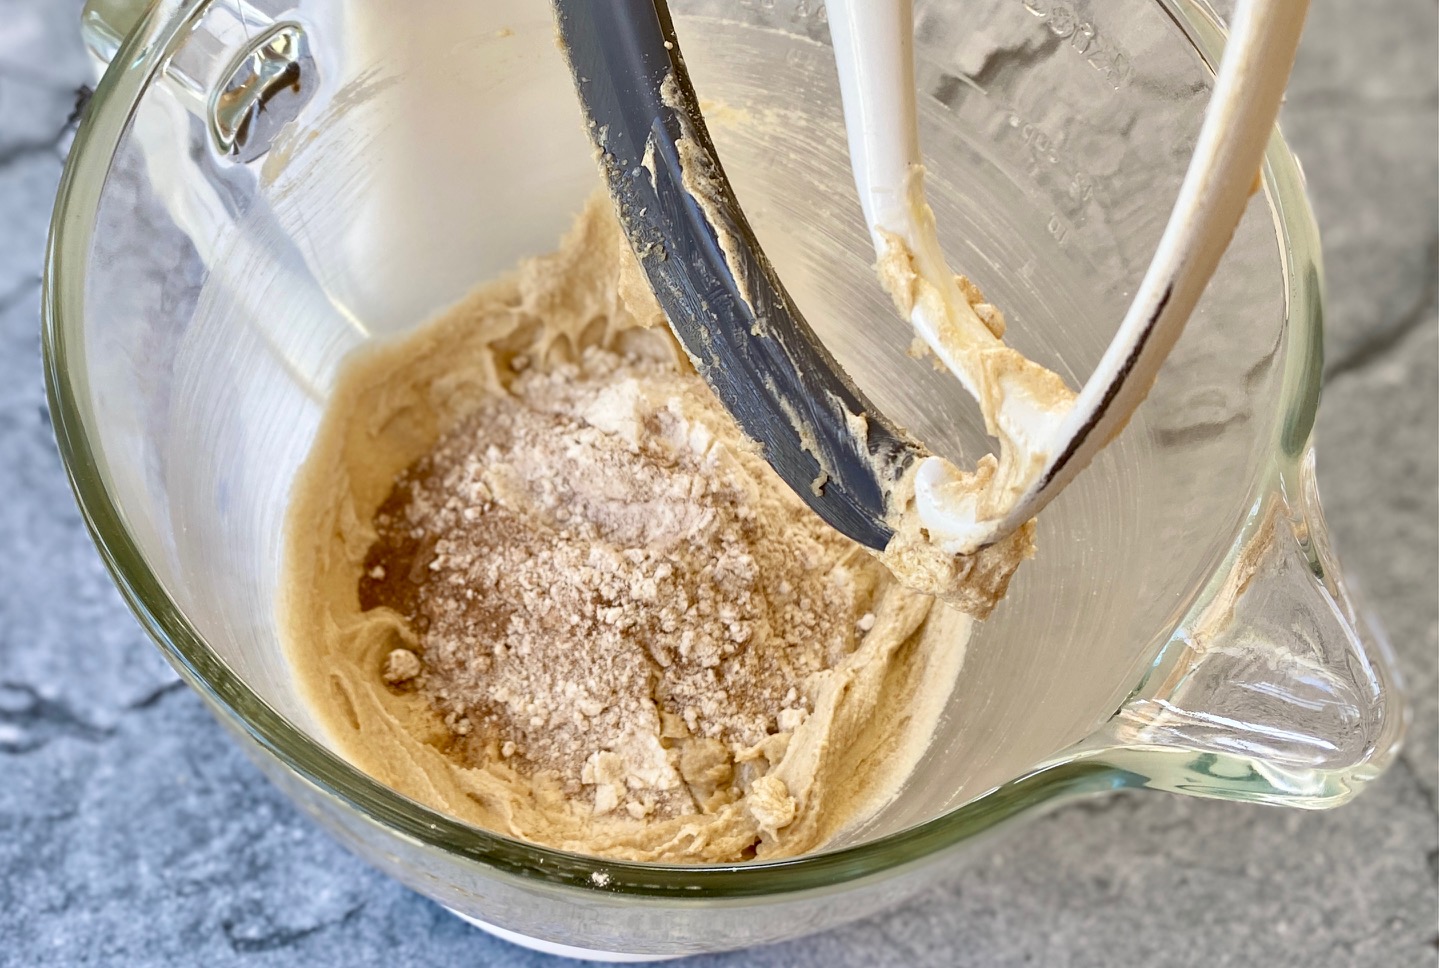
- Blend all of the dry ingredients together in a small bowl – flour, cinnamon, salt, baking soda, and baking powder
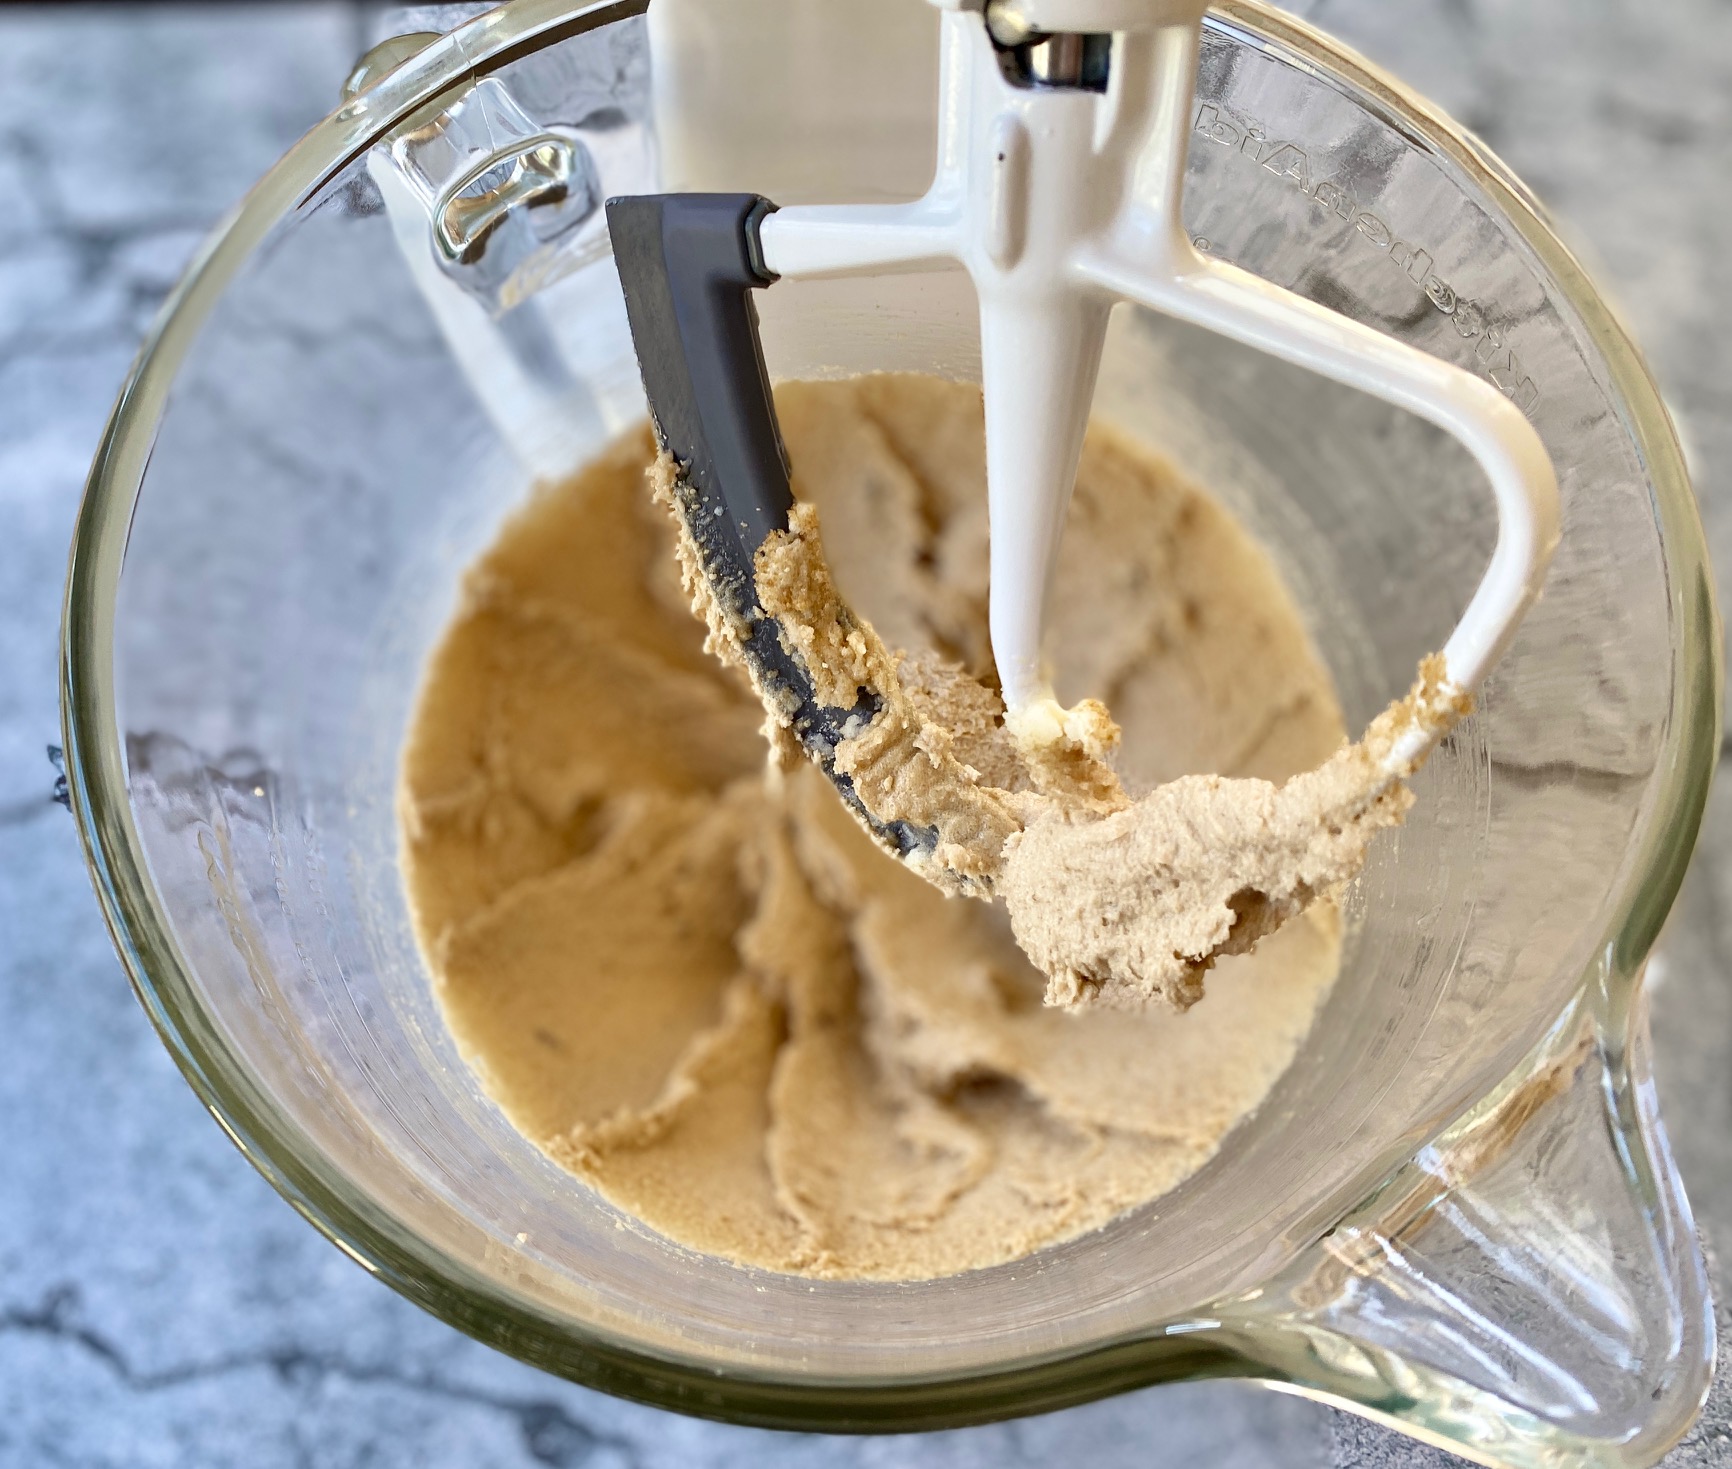
- In a mixing bowl cream the butter, sugar, and brown sugar together for about 3-minutes until smooth (photo 1 below). We use a Kitchen Aid stand mixer.
- Lightly beat the egg in a small bowl and then add to the sugar and butter mixture, along with the vanilla extract. Blend gently but do not overmix
- Add the flour mixture, gently mixing just until all streaks are gone (photo 2)
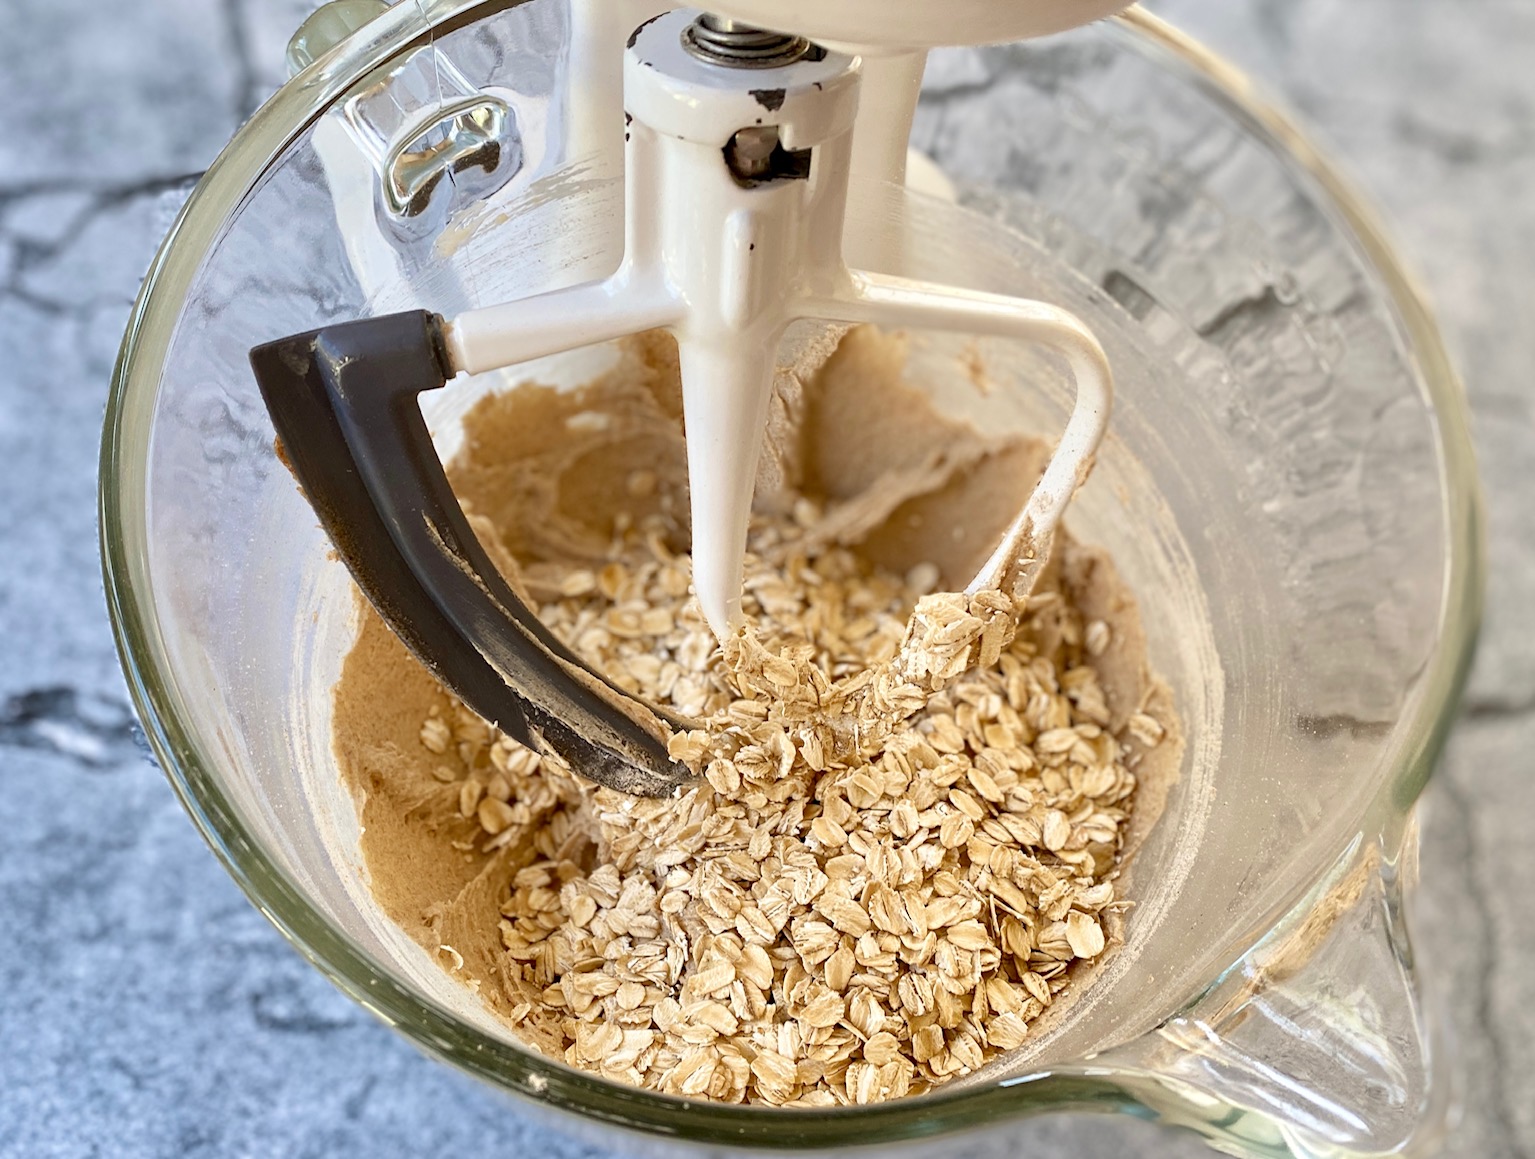
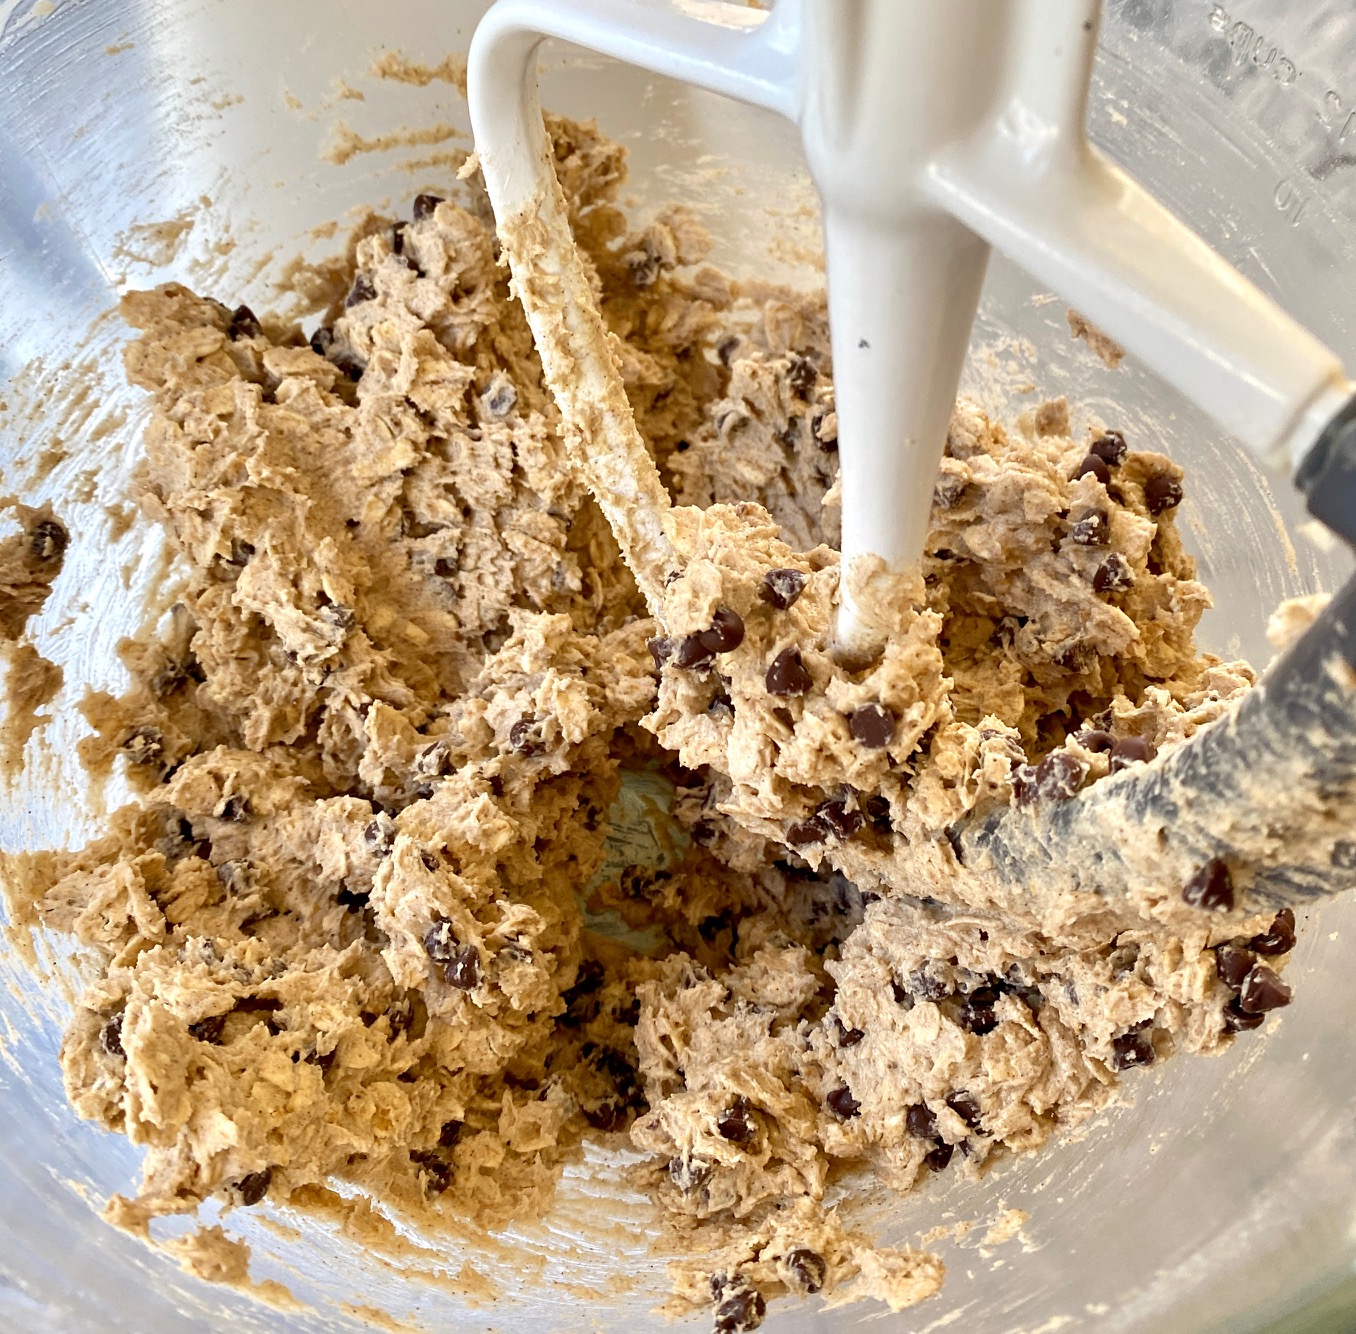
- Add the oatmeal and chocolate chips and again blend gently (photos 3 and 4)
- Cover the cookie dough and refrigerate for about 30-minutes (and up to 4 hours). This step is not 100% necessary but is highly recommended because the cold dough will hold its shape better in the oven
Baking the cookies:
- Preheat the oven to 350˚F
- Make sure the oven rack is in the center of the oven for best baking results
- Line a baking sheet with non-stick parchment paper. This is optional but makes for an easy clean up. If not using parchment paper do not grease the baking sheet
- Drop the dough, the size of a rounded Tablespoon or use a cookie scooper, onto the sheet pans
- Leave about 2-inches of space between the cookies because they will spread when baking
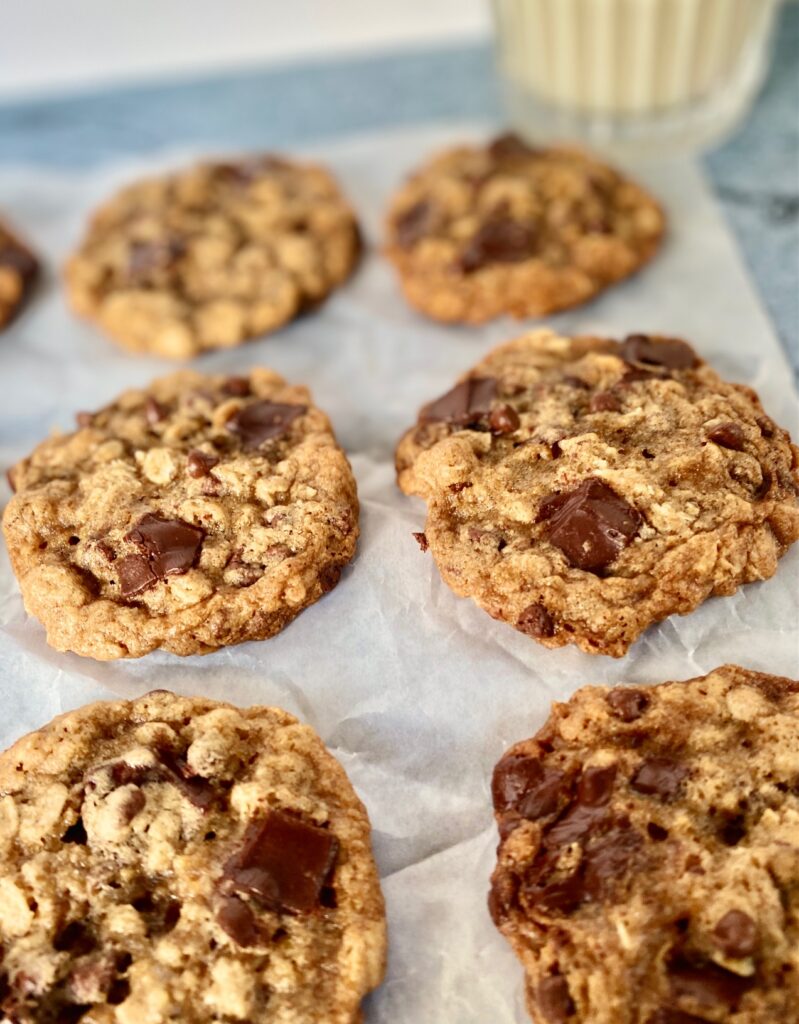
- Bake for 10-13 minutes. I always recommend checking the cookies at the 10-minute mark since every oven cooks differently. The cookies should be set and no longer shiny, but still soft
- Remove from the oven and let the cookies sit on the pan for 1 minute
- Move to a cooling rack to cool completely
Tips for Cookie Success:
- Chilling your dough always produces a taller more well-formed cookie
- Use room temperature eggs and slightly chilled butter
- Blending the egg separately before adding it to the dough helps prevent over blending the dough
- Use a variety of chocolate chips for a great look and added texture. We like the combo of chocolate chunks and mini chocolate chips.
- Always bake cookies on the center rack of the oven
How to store oatmeal cookies:
- Oatmeal cookies are best at room temperature. Keep sealed in an airtight container for up to 3 days
- The cookies can be frozen once cooled. Tightly seal and freeze for up to 3-months
- The uncooked dough can be frozen for 3-months. It’s easier to use if you pre-scoop the cookie dough rounds first, then freeze, and cook the frozen dough for about 15 minutes.
Looking for more easy dessert ideas?
We love a quick and easy dessert and here are some of our reader favorites:
- Double Chocolate Chip Cookies
- One Bowl Espresso Brownies
- 10-Minute Hot Fudge Sauce
- Chocolate Chip Skillet Cookie

Oatmeal Chocolate Chip Cookies
Ingredients
- ¾ cup all-purpose flour (4 ounces)
- 1 teaspoon cinnamon
- ¼ teaspoon baking powder
- ¼ teaspoon baking soda
- ¼ teaspoon salt
- 4 ounces unsalted butter, cool but not cold
- ½ cup dark brown sugar, packed
- ½ cup sugar
- 1 teaspoon vanilla extract
- 1 egg, lightly beaten
- 1 ½ cups old fashioned oats
- ½ cup mini chocolate chips
- ¼ cup chocolate chunks (optional)
Instructions
- Preheat the oven to 350˚F. Place oven rack in center of the oven
- Combine the flour, cinnamon, baking powder, baking soda, and salt, in a small bowl and set aside
- In a large mixing bowl (with a paddle attachment) cream the butter and both sugars for about 3 minutes until well blended.
- Add the beaten egg and vanilla extract. Gently blend. Do not overmix.
- Add the flour mixture and gently mix until all the streaks are gone and everything is well combined.
- Add the oats and chips. Gently combine until completely blended.
- Cover and chill the dough for about 30-minutes (and up to 4 hours). Optional but recommended.
- Drop by rounded Tablespoon, or use a cookie scooper, onto ungreased sheet pans. Cookies should be spaced about 2-inches apart because they will spread.(Line the sheet with parchment paper for easy clean up)
- Bake for 10-12 minutes. Remove pan from oven and let cookies rest on the pan for 1-minute. Remove from pan and cool completely on a cooling rack.
Notes
- This recipe can be doubled
- If you prefer, in place of the chocolate chips, add in raisins, craisins, dried cranberries, white chocolate chips, or butterscotch chips
- Blending the egg ahead of time helps avoid overmixing when combining the ingredients
Nutrition
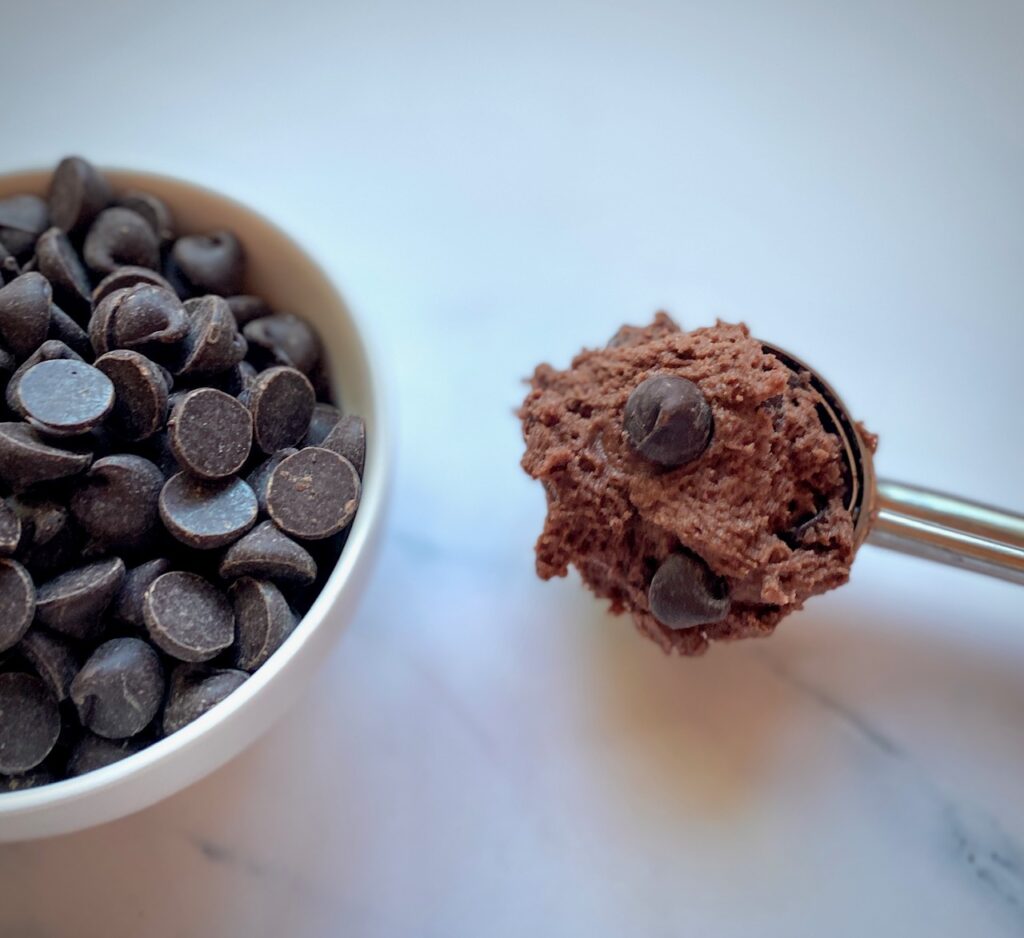
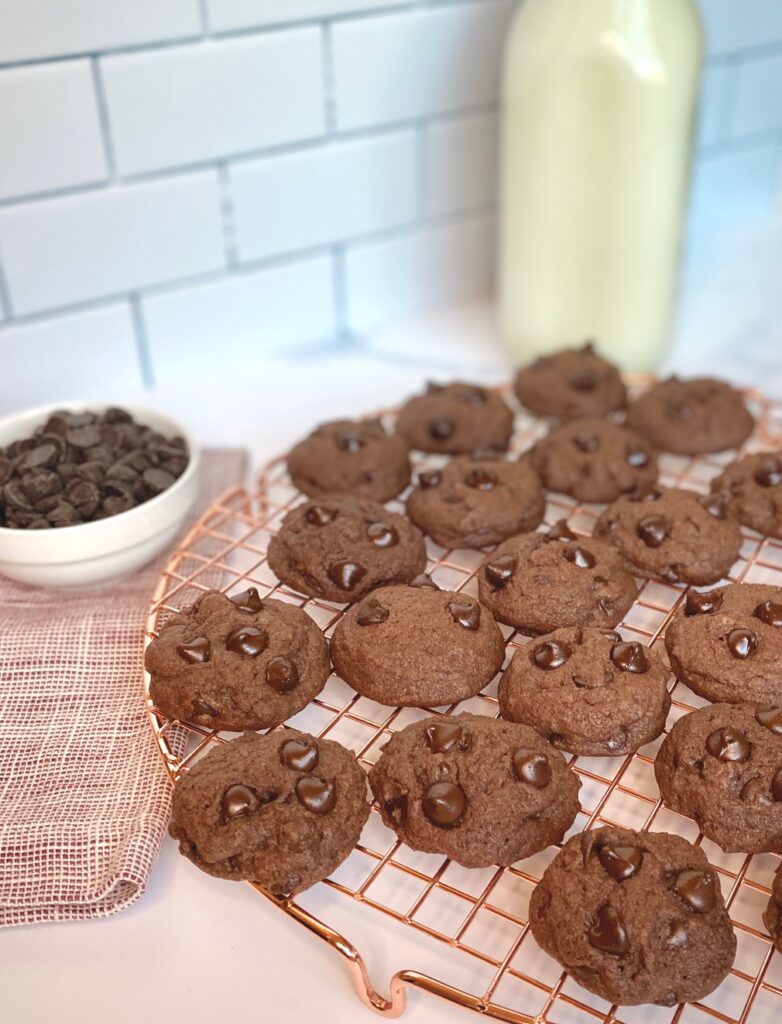
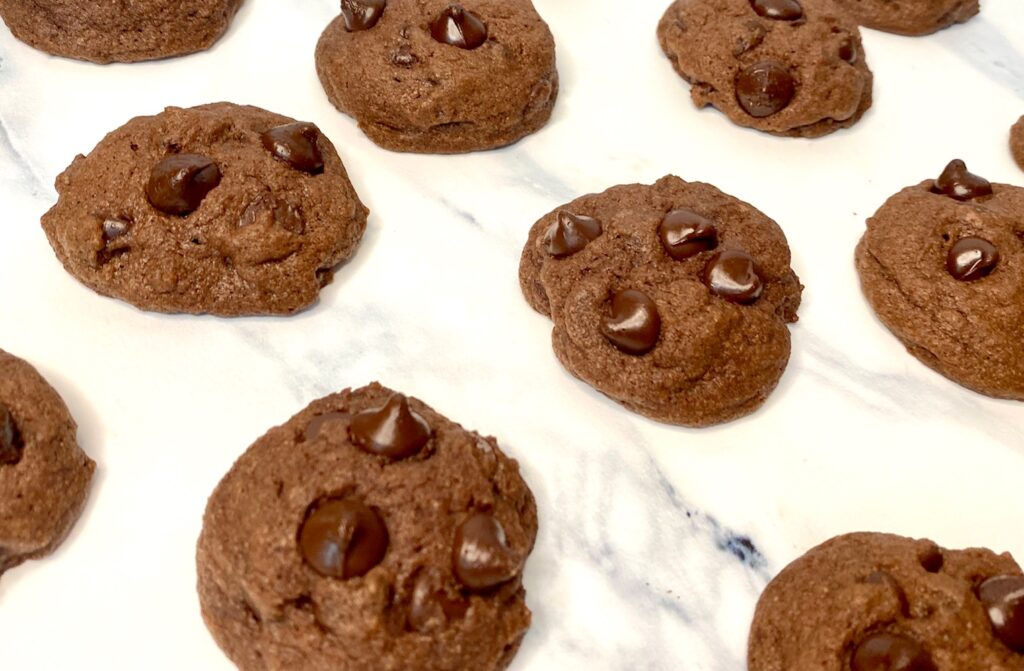
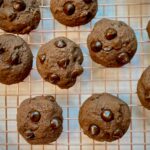
If you love chocolate (who doesn’t?) then these are the cookies for you!
They are fudgy, with a deep rich flavor, and melting gooey chocolate chips throughout. Ready in just 30-minutes!
Jump to RecipeThis post may contain affiliate links. Please see our affiliate disclosure for more details.
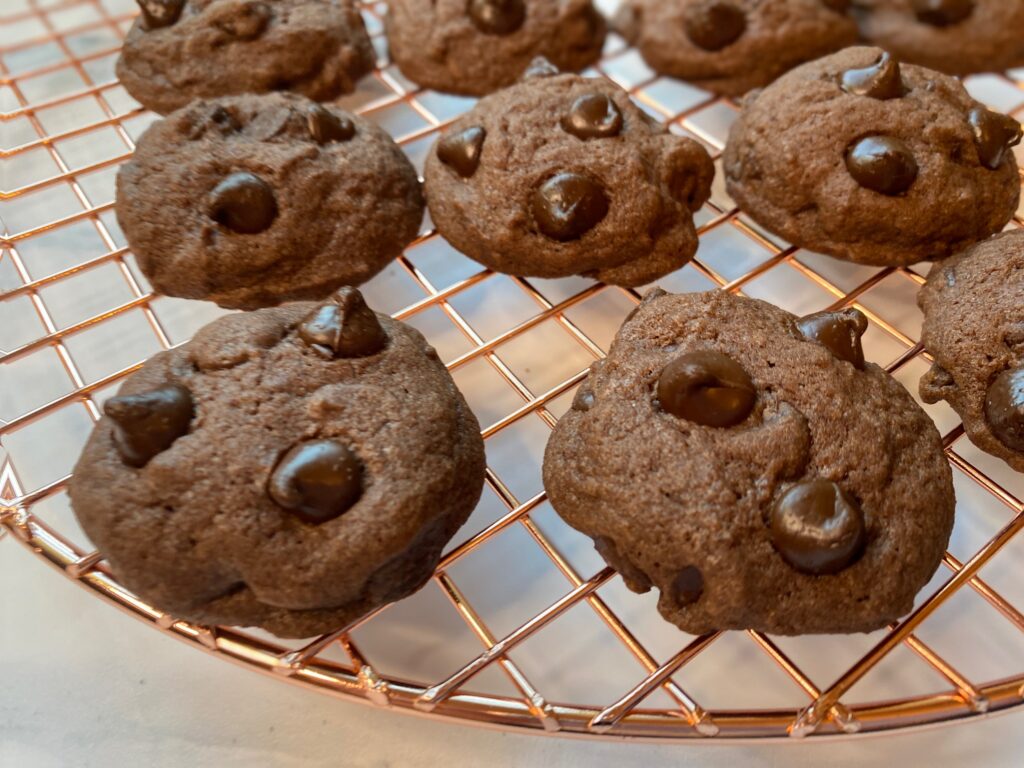
A decadent twist on our Chocolate Chip Skillet Cookie recipe, which is a fan favorite, these cookies have big rich flavor thanks to the addition of unsweetened dark cocoa powder.
This one-bowl wonder is super simple so you can whip up a batch of these in no time.
Grab your spatula and lets get baking!
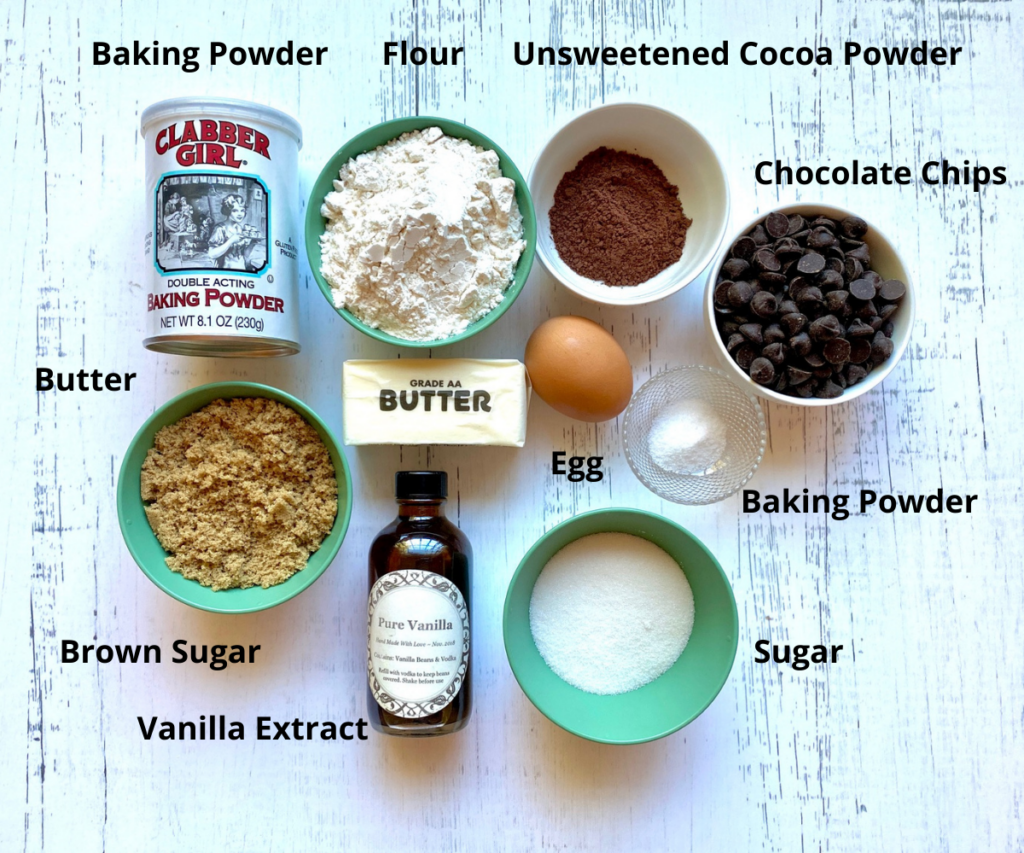
Ingredients for Double Chocolate Chip Cookies
Just a few basic ingredients are needed for these cookies:
- Butter – We bake with unsalted butter. Salted butter works fine but be sure to taste your butter because some salted butter is much saltier than others on the market. (if yours seems salty then skip the added salt in this recipe)
- Sugar and Dark Brown Sugar – The combo of these 2 sugars gives the cookies a nice touch of sweetness. If you only have light brown sugar that will work but the cookies will look and taste a little lighter.
- Egg – We use standard large size eggs.
- Pure Vanilla Extract – We like to use our own Homemade Vanilla Extract – try it, it’s easy!
- All-purpose Flour – These cookies have just enough flour to give the thick dough it’s structure and a more cakey texture. Be sure to stir or whisk the flour to break up any clunky bits before adding to the butter mixture to make sure that you don’t over work the dough.
- Unsweetened Dark Cocoa Powder – We like Ghiradelli brand or Hershey’s Special Dark, but any dark cocoa will work, so use your favorite brand.
- Baking Powder – Important for leavening and helping make the cookies fluffy rather than flat. Make sure yours is fresh so that it does it’s job! (see below for how to test for freshness).
- Salt – A must for balancing all the flavors in most baked goods, so please don’t skip it!
- Chocolate Chips or Chocolate Chunks – We chose dark chocolate morsels but we’ve also made them with chocolate chunks many times, so just use what you have on hand!
How to make Double Chocolate Chip Cookies:
Before beginning follow these important steps:
- Bring your butter as close to room temperature as possible. Room temperature butter helps keep the cookies fluffy, as opposed to flat. So, it’s best to pull the butter out about 30-40 minutes ahead of time. Cutting into smaller pieces speeds up the process of bringing it to room temperature, as well. Resist the urge to soften in the microwave which will make it melty.
- Preheat the oven to 350˚F and make sure the oven rack is in the center of the oven.
- Line a baking sheet with parchment paper or a silicone baking mat for best results
To Prepare:
Note: We use a Kitchen Aid 5-Quart Stand Mixer with a flexible edge beater blade that scrapes as it mixes, but a handheld mixer works well too. If mixing by hand you will need to beat longer to get the same consistency.
- In a large mixing bowl beat the butter for 1-minute.
- Add the sugar and brown sugar and beat for 2-minutes until fluffy and light.
- Add egg and vanilla to the bowl and gently mix.
- In a small bowl combine the flour, cocoa, baking powder and salt and whisk lightly with a fork to remove any small lumps.
- Gently add the flour mixture to the butter sugar mixture and blend just until mixed and no streaks remain.
- Fold in the chocolate chips or chunks and combine. The mixture will be fairly thick.


- Scoop 12 cookies onto the prepared tray using a cookie scoop or two spoons.
- Bake the cookies for 10-12 minutes until set
- Remove from oven and let rest for 1-minute on the pan
- Place cookies on a cooling rack and let cool completely
- Repeat with remaining dough

Freezing and Storing Chocolate Cookies
These cookies are perfect right out of the oven but will stay fresh 3-4 days in a sealed container (if they last that long in your house – mine never do!).
You can freeze the baked cookies in a sealed container for up to 3-months. Make sure they are 100% cooled before freezing. Pull them out and let them warm up to room temperature for the best flavor.
The uncooked dough also freezes very well. We’ve had the best luck scooping them into balls, and then freezing them in a sealed container. Once ready to bake just pull out the pre-scooped dough and cook for about 14 minutes.
How to test the freshness of baking powder:
If you can’t remember when you last purchased your baking powder it’s likely time to buy a fresh batch! The shelf life of an open can is generally about 6 months. However, if you want to test to see if it’s still fresh and effective try this easy test:
Mix a half cup of hot water with 1 teaspoon of baking powder
If there’s an immediate fizzy reaction and all of the baking powder dissipates then you will know it’s still fresh enough to use. This tests works for baking soda, as well.
Optional add-ins:
- A teaspoon of espresso powder (mixed with the cocoa powder) will give these cookies a super charged cocoa flavor
- Try adding different flavored chips for variety and color, such as Peanut Butter Chips, White Chocolate Chips, Mint Chips, Milk Chocolate or Red Cherry Chips
Check out our Sweets & Desserts page for more great recipes like these:
- Chocolate Lava Cake
- Easy One-Bowl Espresso Brownies
- One-Bowl Blondies
- Lemon Olive Oil Cakes
- Cinnamon Apple Crisp
Double Chocolate Chip Cookies
Ingredients
- 8 Tablespoons Butter, softened (4 ounces)
- ⅓ cup sugar
- ½ cup dark brown sugar, packed
- 1 egg
- 1 teaspoon vanilla extract
- 1 ½ cups all-purpose flour
- 2 Tablespoons unsweetened dark cocoa powder
- 1 teaspoon baking powder
- ½ teaspoon salt
- 1 cup chocolate chips or chopped dark chocolate chunks
Instructions
- Preheat the oven to 350˚F. Set oven rack to center position. Line a baking sheet with parchment paper.
- In a large bowl beat butter for 1 minute. Add sugar and brown sugar and beat an additional 2 minutes until fluffy.
- Add the egg and vanilla and beat gently until combined.
- In a small bowl combine flour, cocoa powder, baking powder and salt. Blend with a whisk or fork to make sure no lumps remain.
- Add flour mixture to the butter and sugar mixture and gently blend until just combined and no streaks remain. Do not over mix.
- Fold in chocolate chips/chunks and blend gently.
- Place dough in small heaps, about 1 Tablespoon in size (easiest with a cookie scooper), on the baking sheet, leaving about 2" in between.
- Bake for 10-12 minutes. The cookies should be golden brown and set.
- Remove from oven and let rest on the baking sheet for 1 minute, remove to a cooling rack. Let cool completely and serve.
- Store cookies in an airtight container, to keep fresh, for up to 3 days
Notes
- Be sure to whisk the cocoa powder and flour together to remove any lumps before adding to the sugar mixture
- If making the cookies smaller reduce baking time to 8-10 minutes
- Optional: Add 1 teaspoon of instant coffee or espresso granules to the flour mixture to deepen the chocolate flavor
- Mix up the chips for variety and color: try white, red, or peanut butter chips
Nutrition
Easy to make and ready in about 30 minutes
If chocolate is what you dream of this decadent dessert will become your new favorite for every special occasion (or even Monday!). We love it for birthdays, anniversaries and Valentines Day.
Just 7 simple ingredients are needed for this melt-in-your-mouth cake, and you probably have most of them on hand in your pantry and refrigerator.
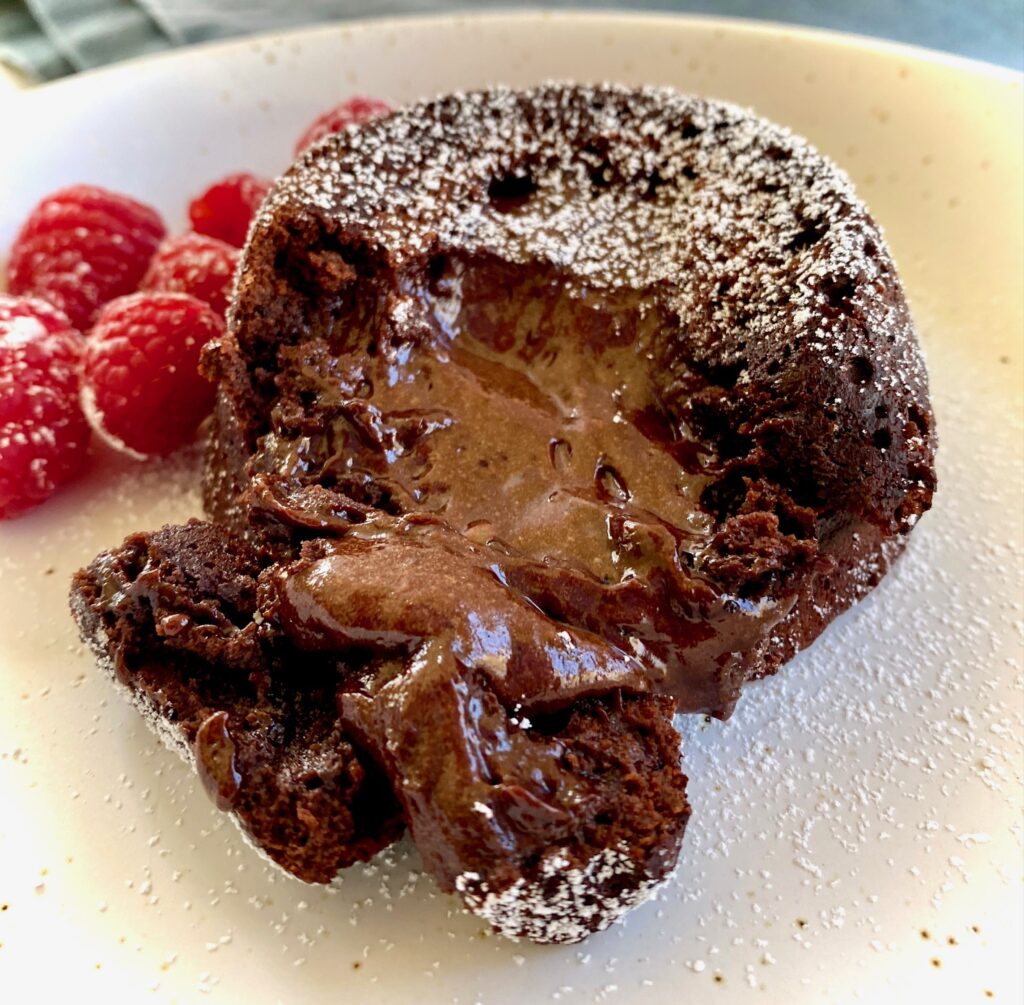
Classic Chocolate Lava Cake is also called Molten Chocolate Cake. The outside is soft and cake-like while the inside is silky and molten when you cut into it.
These cakes are surprisingly easy to make so let’s get cookin’…
Jump to Recipe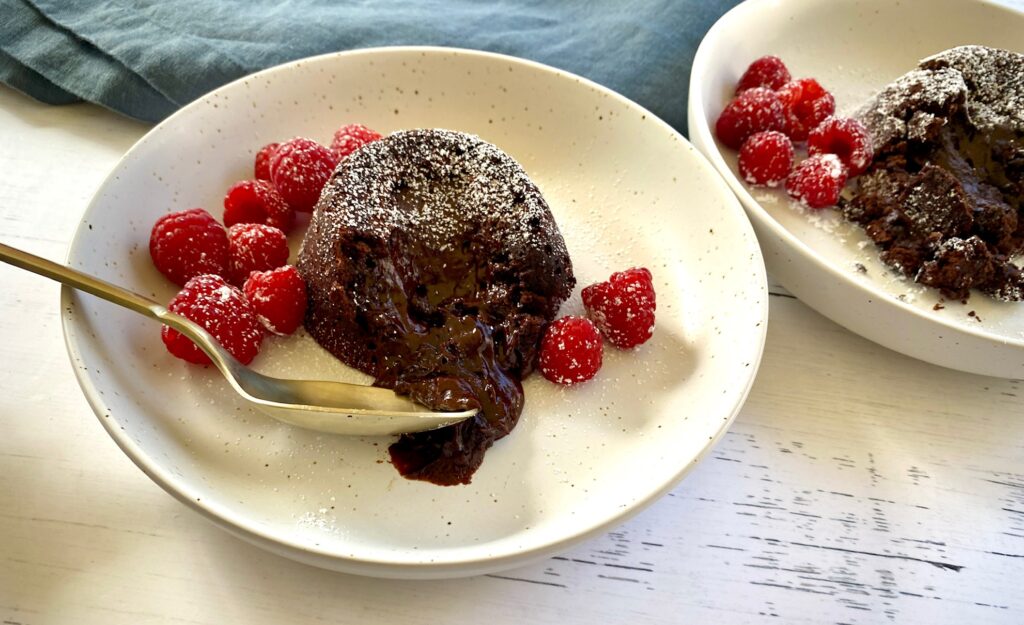
This post may contain affiliate links. Please see our affiliate disclosure for more details.
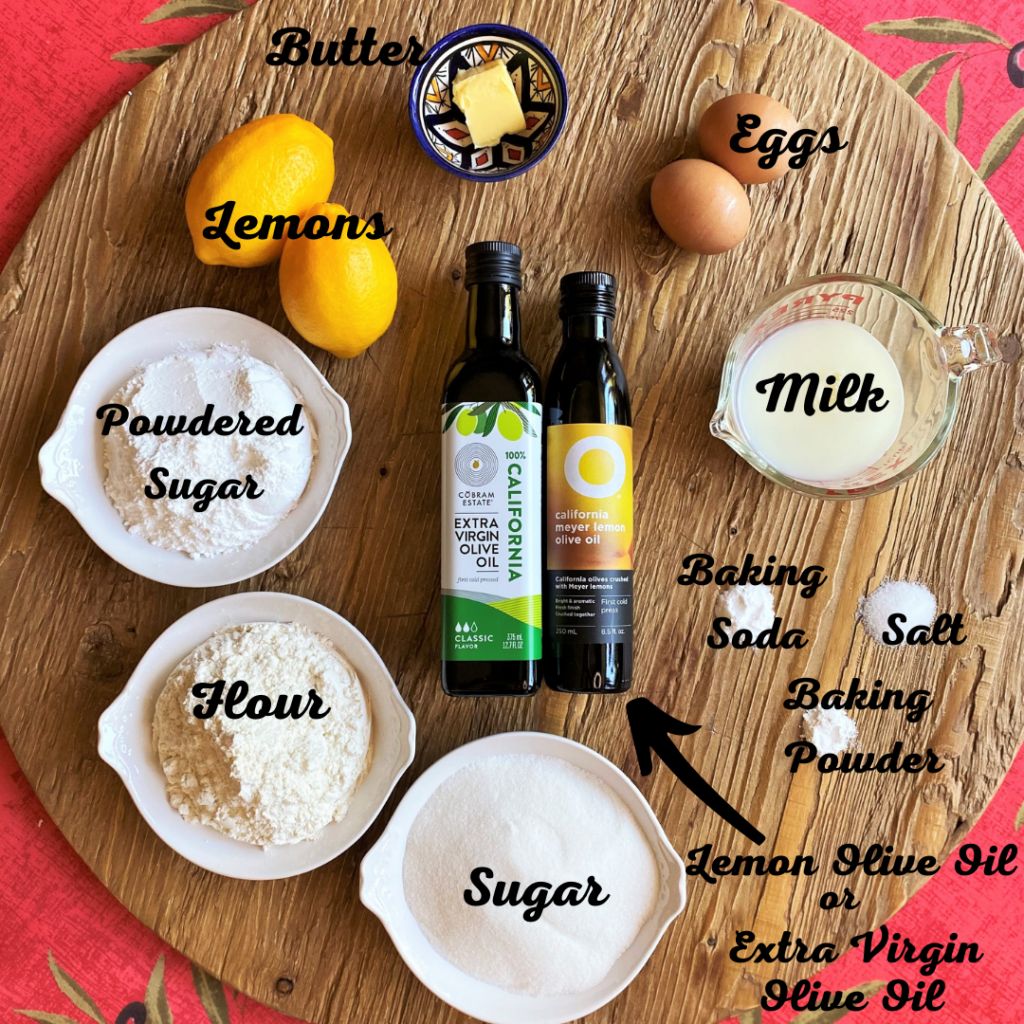
Ingredients for Chocolate Lava Cake:
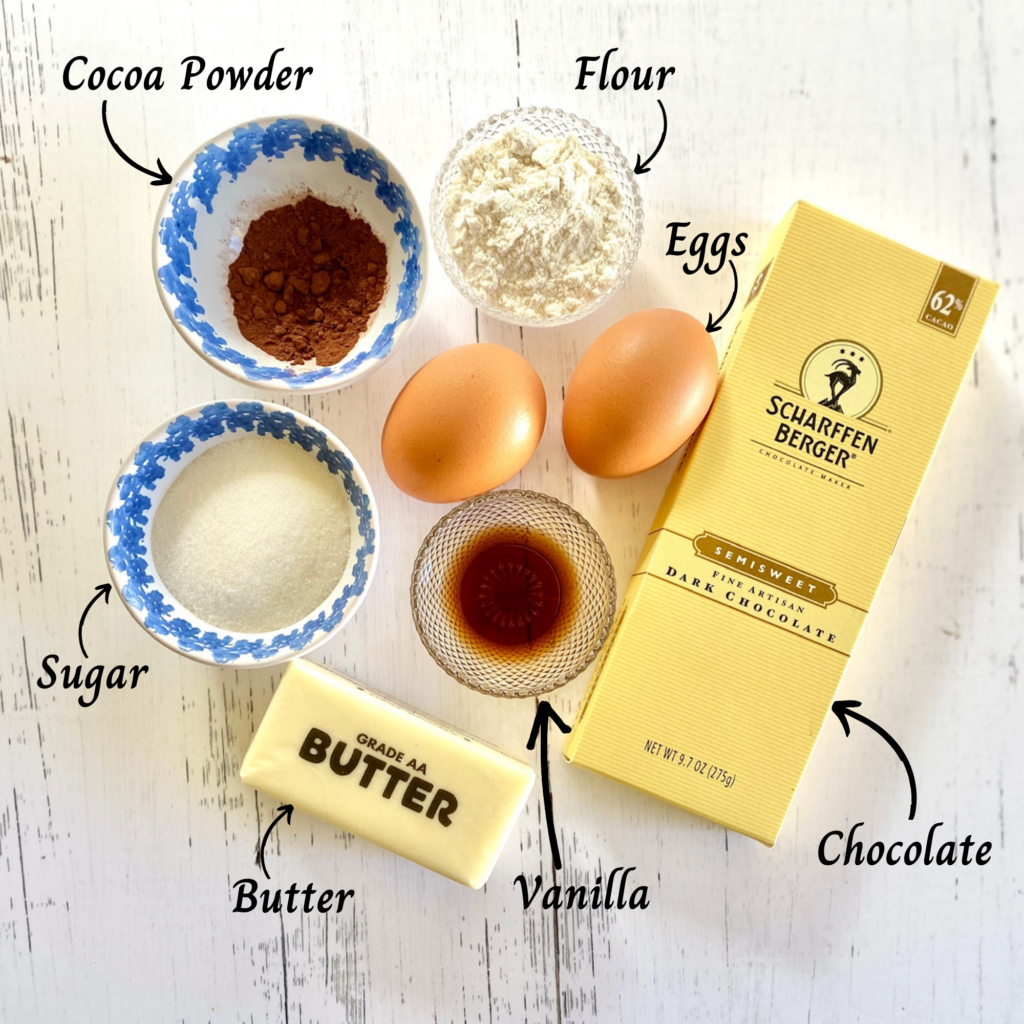
Since there are only 7 ingredients make sure you choose the best quality for the most luxurious cakes!
- Dark Chocolate – we use semi-sweet or bittersweet dark chocolate (unsweetened is not recommended). Since chocolate is the most important ingredient in this recipe we highly recommend a high quality brand such as Scharffen Berger Dark Chocolate, Ghiradelli Chocolate, or Guittard’s All Natural Baking Chocolate. The chocolate should be at least 60% to give the cakes a nice deep rich flavor
- Butter – preferably unsalted, for the cakes, and a little extra for coating the ramekins
- Vanilla Extract – we make our own pure vanilla and it’s easy with just two ingredients, so give it a try!
- Sugar – just regular sugar works perfectly
- Eggs – you will need 2 whole eggs and 2 egg yolks (save the whites for your next omelette or meringue)
- All-Purpose Flour – cake flour will also work, as will 1:1 gluten free flour
- Cocoa Powder – for both the cakes and to dust the ramekins or molds
- Optional: Powdered Sugar – for garnish
How to make Chocolate Lava Cake:
Molten Chocolate Cakes come together pretty quickly so be sure to preheat the oven while prepping the cakes
- Preheat the oven to 400˚F and make sure oven rack is in the center position
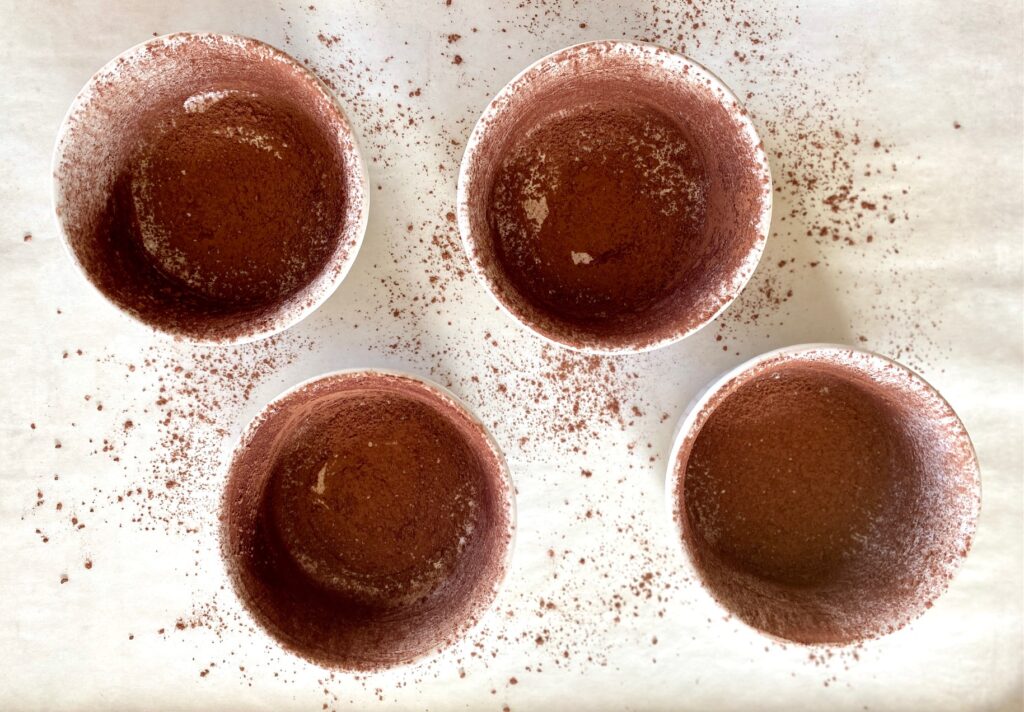
- Generously coat the ramekins with butter and then dust them with a little cocoa powder. (You can also use flour to dust, but cocoa has so much more flavor!)
- Roughly chop the chocolate and butter into pieces
- Melt over a double boiler, or in a glass bowl in the microwave in 30-second increments. Be sure to stir in between increments. Mix until completely melted and blended. (photo #1 below)
- Let cool while making the rest of the cakes and then mix in the vanilla extract
- Beat whole eggs, egg yolks, and sugar until the mixture is pale and thick. The batter should fall in ribbons when you lift the beater blade or whisk (photo #2)
- Slowly whisk in the melted and cooled chocolate and mix until blended (photo #3)
- Add in flour and cocoa powder and blend until combined and no streaks remain (photo #4)
- Divide the batter equally into the prepared ramekins (photo #5)
- Bake for about 11 minutes. The edges should be firm and the center should still be wobbly and a little shiny
- Remove from the oven and let cool for 2 minutes (photo #6)
- Un-mold the cakes by inverting onto a plate or shallow bowl. The molds will still be very hot so the easiest way to hold onto the ramekins is with a kitchen towel
- If the cakes don’t fall out immediately, lightly tap the ramekins to encourage the cakes to un-mold, or gently run a knife around the edges of the ramekins until they release
- Serve warm, dusted with powdered sugar, if desired
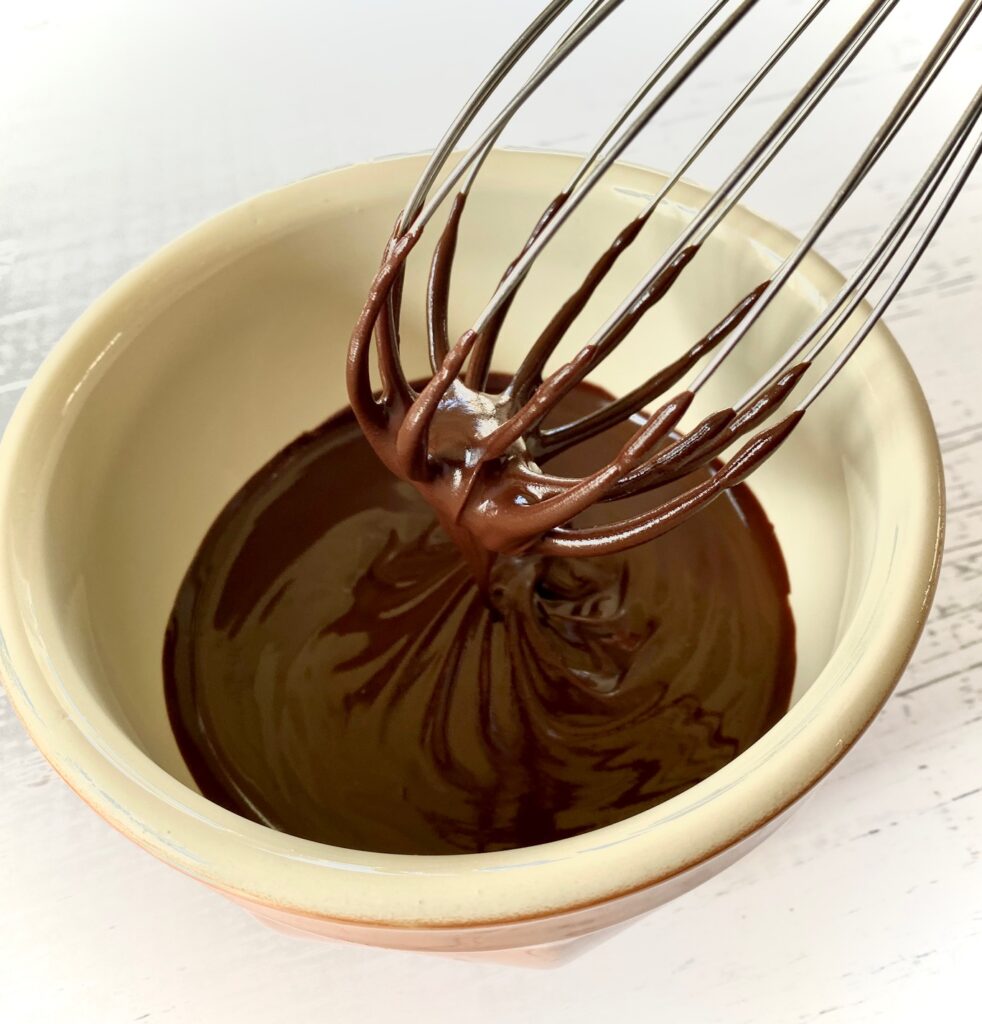
Photo #1 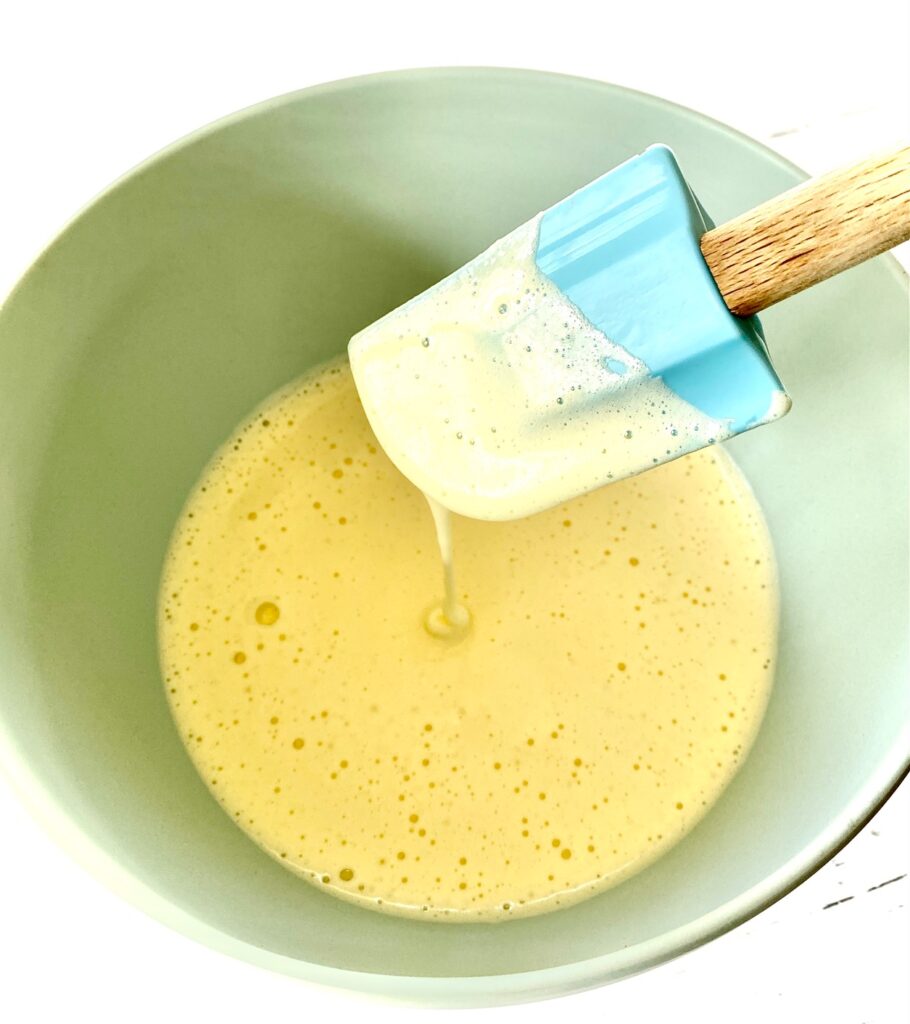
Photo #2
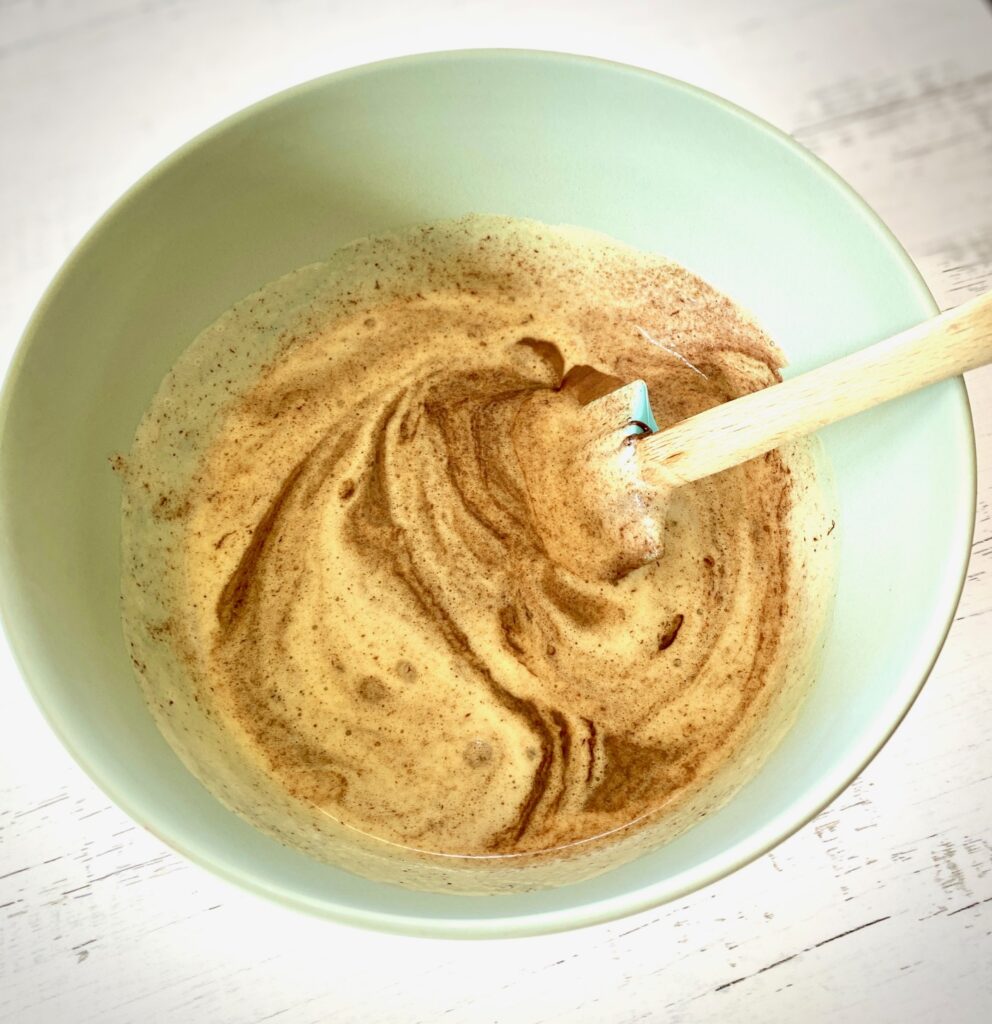
Photo #3 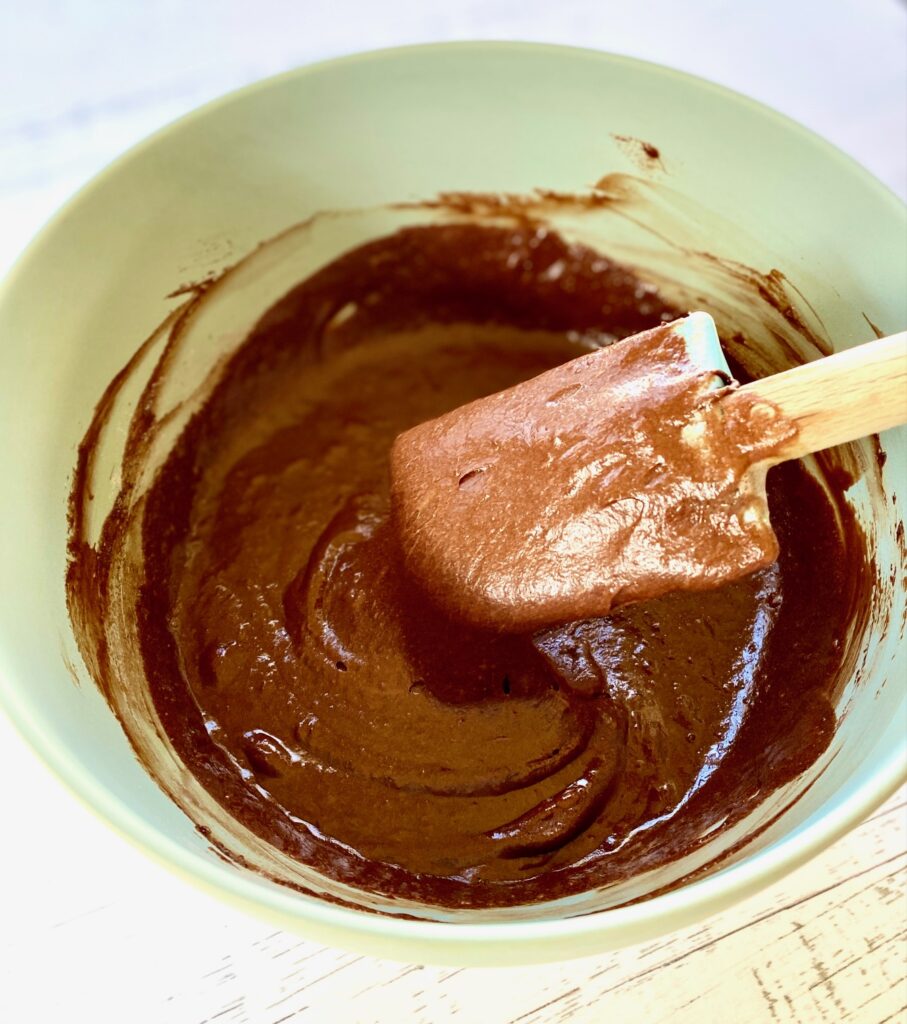
Photo #4
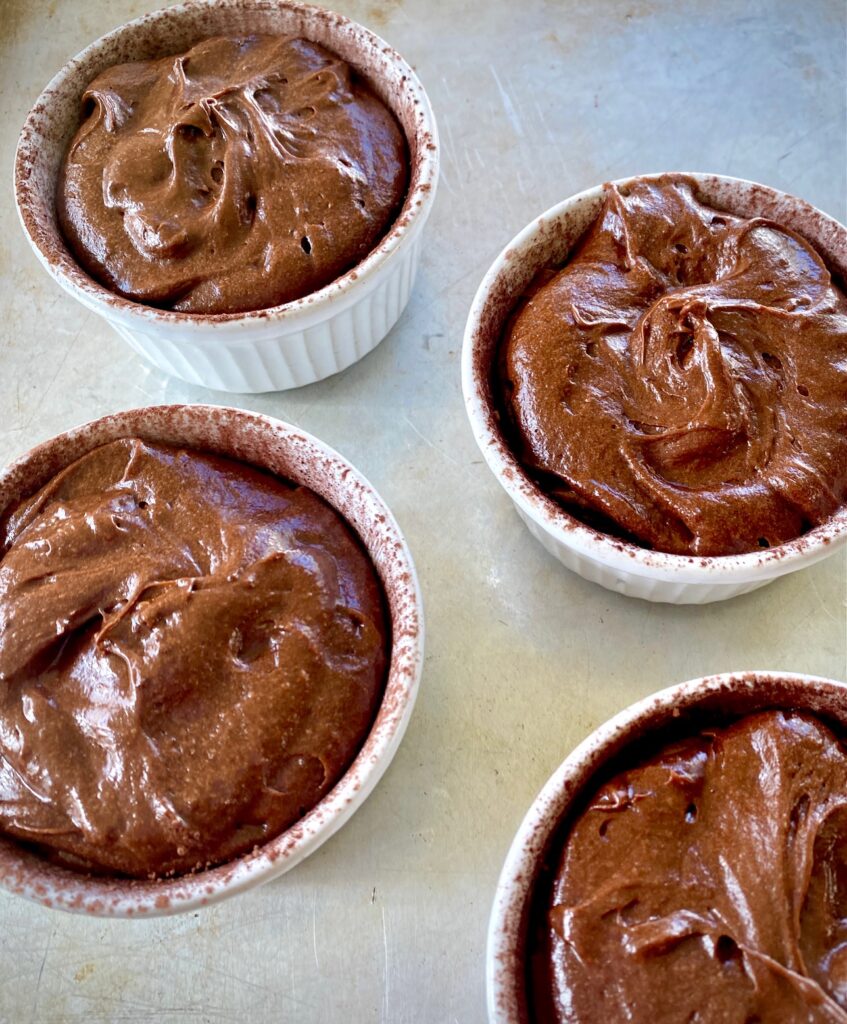
Photo #5 
Photo #6
Best types of molds for Molten Cakes
We like to use four 4-ounce ceramic ramekins with straight sides because they are the perfect size for individual cakes and help them hold their shape during baking.
However, any similar type of ramekins or molds will work, as long as they are more tall than wide, to support the sides of the cakes while baking. A jumbo muffin tin will also work, but be sure to use a paper liner in the wells. Unmolding from a muffin tin can be a little tricky and requires a platter.
If you use smaller molds cut down on the cooking time and if you use bigger sized molds add a little more cooking time.
This recipe can be cut in half to make 2 cakes, as well.
Frequently Asked Questions:
Can Lava Cakes be made ahead of time?
Yes, they can!
REFRIGERATE: If you are baking them the same day you can just prepare them all the way through, cover them, and refrigerate until ready to bake. Be sure to pull them out of the refrigerator and bring to room temperature first though before baking. This dessert is perfect for making ahead and can be made up to 48-hours ahead.
FREEZE: You can also prepare completely in the ramekins, seal well, and freeze for up to 3 months. Once ready to bake thaw out for about an hour and bake according. The previously frozen cakes might need a few extra minutes of baking time.
Can I use chocolate chips for lava cakes?
Yes, technically you can use chocolate chips for molten cakes but the lava will not be nearly as gooey. Chocolate chips are designed to hold their shape during baking and as a result will not be as liquid as baking chocolate once cooked. They will work in a pinch but baking bars are recommended for the best “lava” flow.
Why didn’t my lava cake have enough lava in the center?
If lava cakes are overcooked – even by a minute or two – the inside of the cake will begin to firm up and solidify. Make sure to keep a close eye on the cakes beginning at the 10-minute mark. The outside of the lava cake should be firm but the middle should still be a little shiny and have a wobble to it.
Don’t let the cakes rest longer than about 2 minutes as they will continue to cook from the residual heat of the ramekin, and they will also be harder to un-mold.
The good news is If they are overcooked you still have a delicious chocolatey brownie type cake to eat! Top with some ice cream and dig in!
Additional flavors to add and topping ideas:
Adding extra flavor is easy. Here are some ideas:
- Add espresso powder or instant coffee powder – this really deepens the cocoa flavor
- Mix in a bit of Homemade Irish Cream or Grand Marnier to the chocolate (omit the vanilla)
- In addition to sifting powdered sugar over the top and adding some berries on the side try topping with some vanilla or coffee flavored ice cream
- Drizzle with our Easy Salted Caramel Sauce or quick to make Hot Fudge Sauce
- Sweetened whipped cream is the perfect easy topper
- For more dessert ideas check out all of our Sweets and Treats in our recipe index!
Your Sommelier Suggestions
These rich, beautiful cakes deserve an elegant after dinner drink. A lovely pairing would be a light and fruity Sparkling Rose Wine. Two other favorite matches would be a rich Tawny Port wine or a Madeira from Portugal.
Chocolate Lava Cake
Equipment
- 4 Ramekins 4-ounces each
Ingredients
- 8 ounces chocolate semi sweet or dark (at least 60%)
- 4 ounces butter, (plus 1 teaspoon for buttering ramekins)
- 2 teaspoon vanilla extract
- 5 Tablespoons sugar
- 2 large eggs
- 2 large egg yolk
- 4 Tablespoons all-purpose flour
- 2 teaspoon cocoa powder, unsweetened (plus 1 teaspoon for dusting ramekins)
- 1 teaspoon powdered sugar, optional for garnish
Instructions
- Preheat oven to 400˚F
- Generously butter and then dust with cocoa four 4-ounce ramekins. Place prepared ramekins on a baking sheet.
- Chop the chocolate and butter into pieces and then melt over a double boiler, or microwave in a glass bowl in 30 second increments (stirring between increments) until melted. Stir to combine and let cool slightly then stir in vanilla extract.
- Beat eggs, egg yolks, and sugar until the mixture is pale and thick, about 3 minutes. Batter should fall from the beater blades or whisk in ribbons when thick enough.
- Slowly whisk the cooled chocolate and butter mixture into the egg batter and mix until combined and no streaks remain.
- Add in flour and cocoa powder and blend well until combined.
- Divide the batter evenly into the ramekins.
- Bake in preheated oven for 11-12 minutes until firm and set on the edges but still wobbly in the center.
- Let the cakes cool in the ramekins for 2 minutes and then invert onto a small serving plate or shallow bowl.
- If desired, dust with a sprinkling of powdered sugar and serve warm.
Notes
- The batter can be made ahead and refrigerated for up to 48 hours until ready to bake. Bring to room temperature before baking.
- Freeze for up to 3 months, bring to room temperature and bake as directed
- Top with ice cream, whipped cream, fruit sauce/syrup or cut fresh fruit if desired
- Match a gorgeous Tawny Port or a Sparkling Rose with these cakes for the perfect dessert
Nutrition
These individual cakes are easy to make and are packed with lemon zest, lemon juice, and the surprising enhancement of lemon olive oil
Cake is always perfect to serve for any special occasion, or after a special dinner, for family and friends. These cakes have a unique flavor pairing that is rare to find in most desserts. The olive oil adds flavor and moisture without overpowering the citrus flavors.
The addition of lemon olive oil makes this cake moist and fluffy with an added punch of lemon. This dessert is a wonderful addition to any springtime menu and they are gorgeous to look at too!
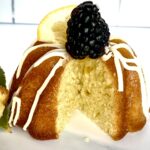
Top with our Easy Lemon Glaze and you’ve got the perfect dessert!
You’ll fall in love with these easy delicious lemony delights!
Jump to Recipe
What is the best type of Olive Oil for baking?
We recommend using good quality olive oils when baking. Try to select an extra-virgin olive oil or pure cold-pressed oil.
Extra virgin olive oil is made exclusively from pure, cold, first pressed olives. Regular olive oil is a blend of cold-pressed and processed oils.
The end result is that the extra virgin oil has a darker color with more enhanced and robust flavors and aromas. The cold-pressed method is effective, but also time consuming for the olive oil maker, but in the end, the result is worth the wait and effort!

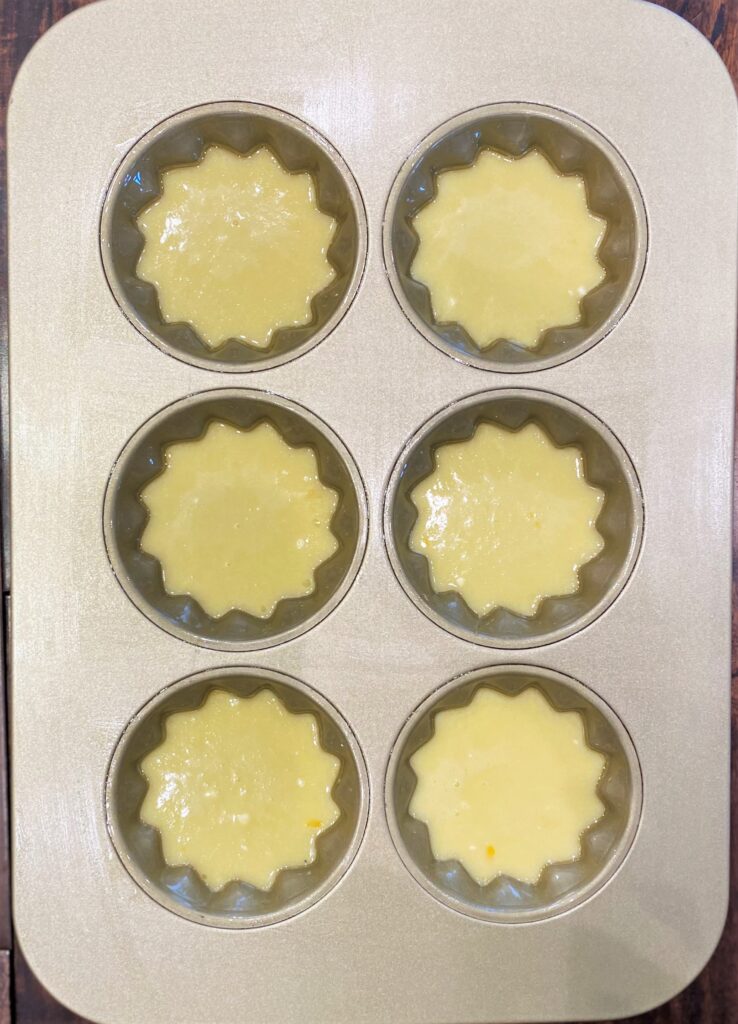
Ingredients for the perfect lemon cake:
Ingredients needed for 6 mini cakes (shown in photos), 12 cupcake cakes or one 9-inch cake. The exact details are in the recipe card at the end of this post.
- 1/2 cup lemon olive oil
- 2 eggs
- 2/3 cup milk
- 2 teaspoons fresh lemon juice
- 2 teaspoons lemon zest
- 1 cup sugar
- 1 cup flour
- 1/2 teaspoon baking powder
- 1/4 teaspoon baking soda
- 1/2 teaspoon salt
Ingredients for Lemon Glaze
- 1 cup powdered sugar
- 1-1/2 Tablespoons fresh lemon juice
- 1 Tablespoon melted butter
- For a sweeter glaze add a little more powdered sugar
- For a more tart glaze add a little more lemon juice or zest
How to make Lemon Olive Oil cakes
The olive oil we used for making these cakes was crushed with fresh lemons. Pure lemon oil olive is easy to find in local grocery stores alongside other olive oils.
If you decide to use regular extra virgin olive oil you can make some substitutions in the ingredients and still get the same results. Please see the NOTES section below the instructions.
Instructions for cakes:
- Preheat the oven to 350˚F
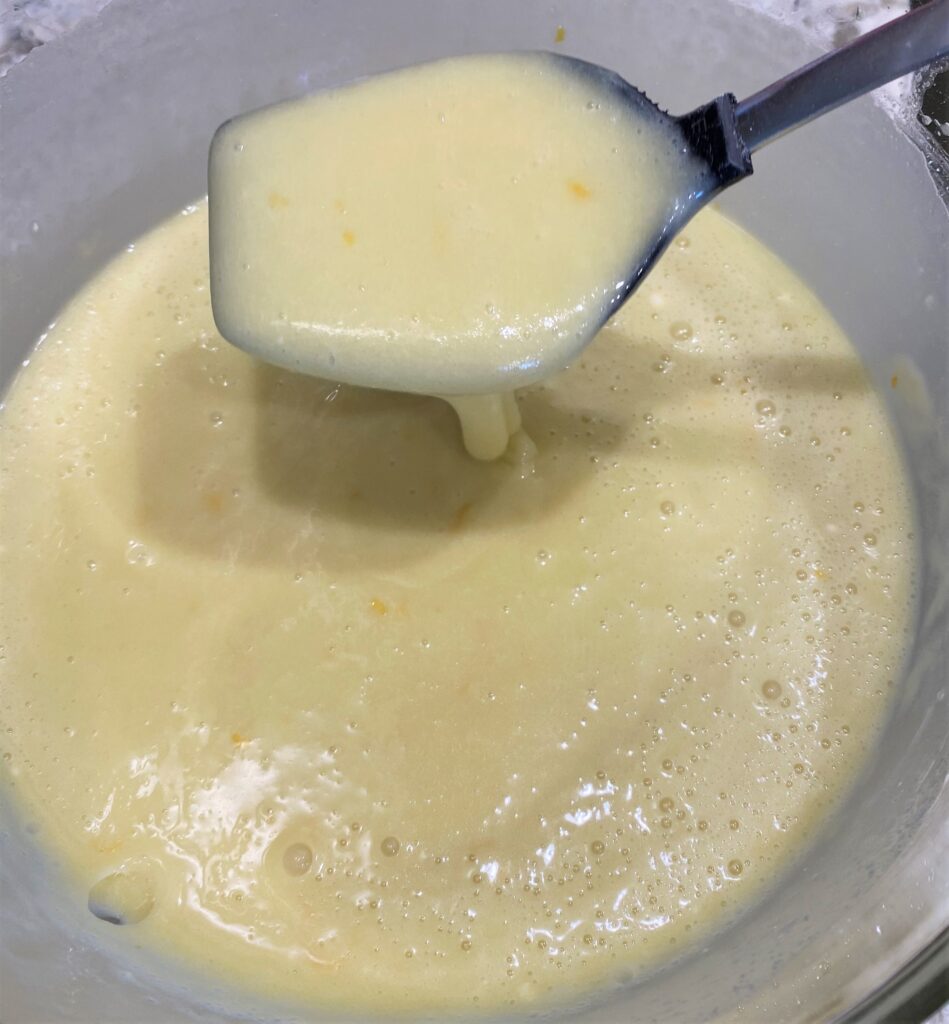
- In a large mixing bowl combine olive oil, eggs, milk, lemon juice, and lemon zest.
- Cream together by mixing on medium-high for 2 to 3 minutes with a hand-held mixer or in a stand mixer
- In large bowl combine sugar, flour, baking powder, baking soda, and salt
- Stir the flour mixture into the egg mixture and gently fold by hand until combined
- Spray cake tins generously with non-stick baking spray
- This recipe makes 6 individual cakelets or one 9-inch round cake
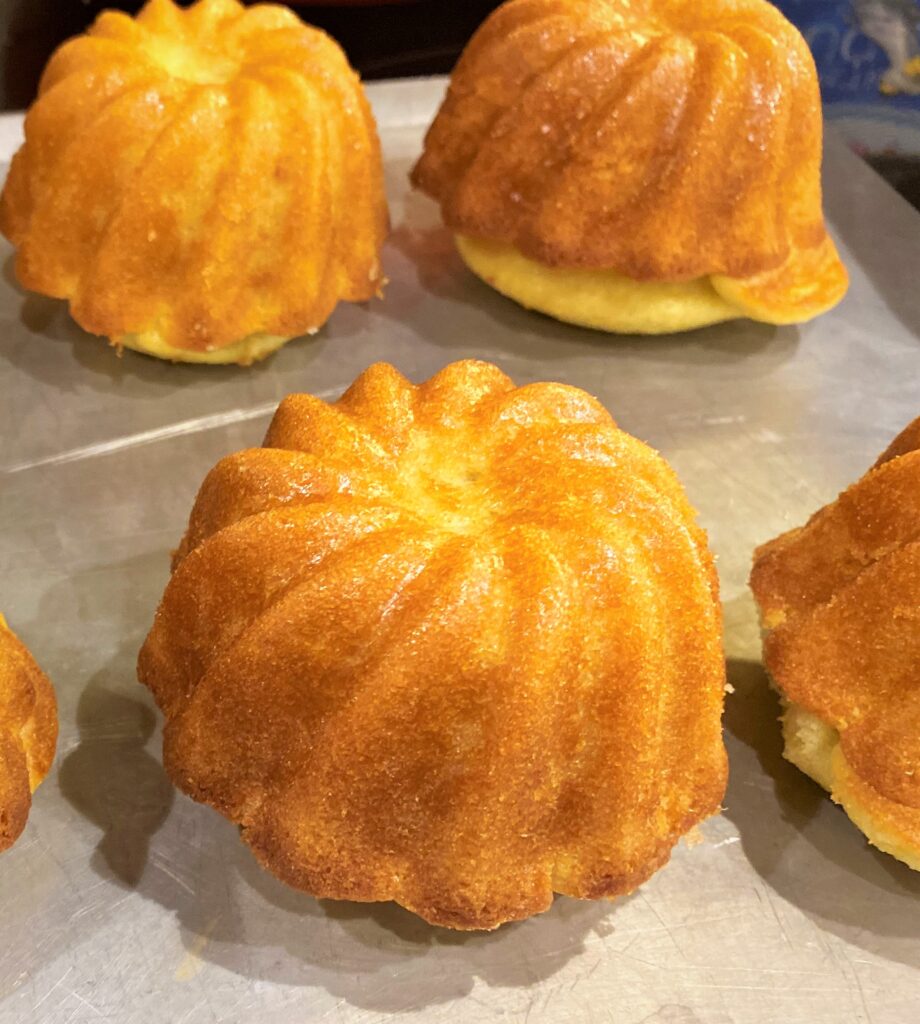
- Bake at 350˚F for 25 minutes
- Remove from oven and leave to cool for about 20 minutes
- Loosen the edges of the cake and flip the pan to remove them. Leave to completely cool on a baking rack.
Instructions for Lemon Glaze
- In a medium bowl whisk together powdered sugar, lemon juice, and melted butter
- Whisk thoroughly until smooth, by hand
- With a spoon or pastry icing bag drizzle evenly over cooled cakes
- Garnish with lemon zest, blackberries, blueberries or a lemon slice. You can also dust the cake with confection sugar. You’re the boss, so you decide!
NOTES:
If you don’t have lemon-flavored olive oil you can make the following substitutions:
- 1/2 cup plain extra virgin olive oil
- 3 Tablespoons lemon juice
- 1-1/2 Tablespoons lemon zest
- 1 additional Tablespoons of flour (total 1 cup + 5 Tablespoons)
What does Lemon Olive Oil Cake taste like?
This Lemon Olive Oil Cake is a light, fluffy flavorful mixture and everything you want in a special cake recipe. The addition of lemon olive oil makes this cake moist, tart, and lemony.
The olive oil provides the cake with a light unique flavor. The fruity overtones of olive oil enhance the other flavors in the cake to give you rich unique results.
Olive oil cakes are light and tender without being greasy or soggy. They stay moist and delicious for days after baking and taste as good as the day you made them.

Take a look at these additional dessert ideas:
Lemon Olive Oil Cake
Equipment
- mini bundt pan, cakelet pan, or muffin tin
Ingredients
Cake Recipe
- ½ cup lemon olive oil
- 2 eggs
- ¾ cup milk
- 1 Tablespoon fresh lemon juice
- 1 Tablespoon lemon zest
- 1 cup plus 3 tablespoons sugar
- 1 cup plus 4 tablespoons flour
- ½ teaspoon baking powder
- ¼ teaspoon baking soda
- ½ teaspoon salt
Lemon Glaze
- 1 cup powdered sugar
- 1 ½ Tablespoon fresh lemon juice equals 1 Tablespoon, 1/2 teaspoons
- 1 Tablespoon melted butter
Instructions
Instructions for cakes
- In large mixing bowl combine olive oil, eggs, milk, lemon juice, lemon zest. Cream for 2 to 3 minutes.
- In large bowl combine sugar, flour, baking powder, baking soda, salt. Stir into egg mixture and fold.
- Spray cake tins with non stick baking spray. Makes 6 cakelets or one 9-inch baking pan.
- Bake at 350° degrees for 25 – 30 minutes.
Instructions for Lemon Glaze
- In medium bowl, mix together powdered sugar, lemon juice, and melted butter. Blend thoroughly.
- With a spoon or pastry icing bag drizzle icing evenly over cakes.
- Garnish with lemon zest, blackberries, blueberries or lemon slice. You"re the boss, so you decide.
Notes
- 1/2 cup olive oil
- 3 Tablespoon lemon juice
- 1-1/2 Tablespoon lemon zest
- 1 additional Tablespoons of flour (total 1 cup + 5 Tablespoons)
- 6 mini bundt cakes
- 12 muffin pan size cakes (1/2 cup volume – and we recommend paper liners for cooking to prevent any sticking)
- 1 – 9″ inch bake pan
Nutrition
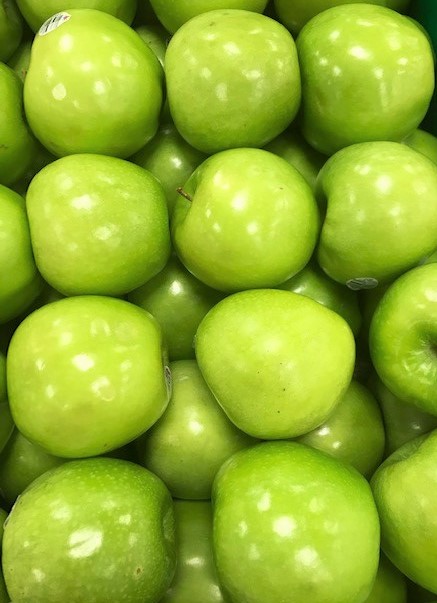
What are the best apples for baking and making this Easy Apple Crisp recipe?
With all the varieties this beautiful fruit has to offer, certain varieties stand up to baking better than others. For our Apple Crisp we used Honeycrisp apples. Other great choices are Golden Delicious, Granny Smith, or Jonagold.
- Honeycrisp – With a crisp texture these apples are guaranteed to hold up firmly during baking. Whether you are looking for a delicious apple to eat or for baking for an apple crisp, cobbler, or tart, this apple is the one!
- Golden Delicious – This beautiful apple has a sweet flavor and lovely yellow skin, it holds up well in the oven making it one of the great baking apples.
- Granny Smith – These apples keep their structure for baking and do not get mushy. They are a great “go-to” baking apple.
- Jonagold – This apple is both tart and sweet at the same time. They hold up well in the heat for baking. You should definitely give them a look for your next bake.
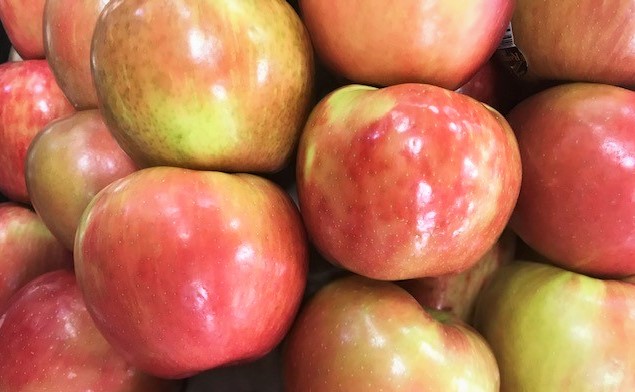
Honeycrisp Apples 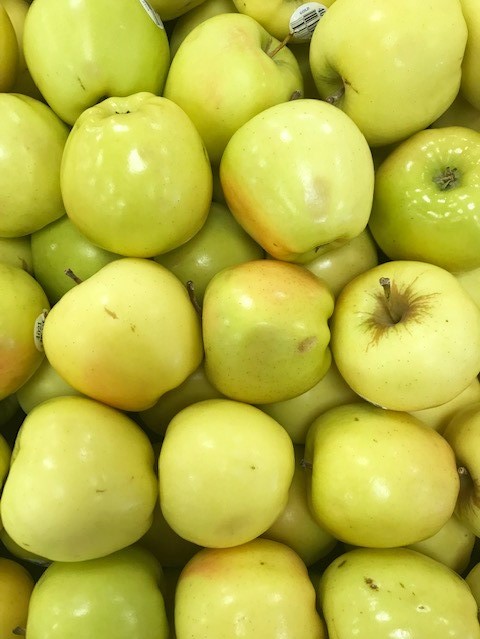
Golden Delicious Apples
Granny Smith Apples 
Jonagold Apples
How to make an Apple Crisp from scratch:
Apple Crisp has two distinct steps prior to baking: the filling and the topping. Make the filling first and then make the topping.
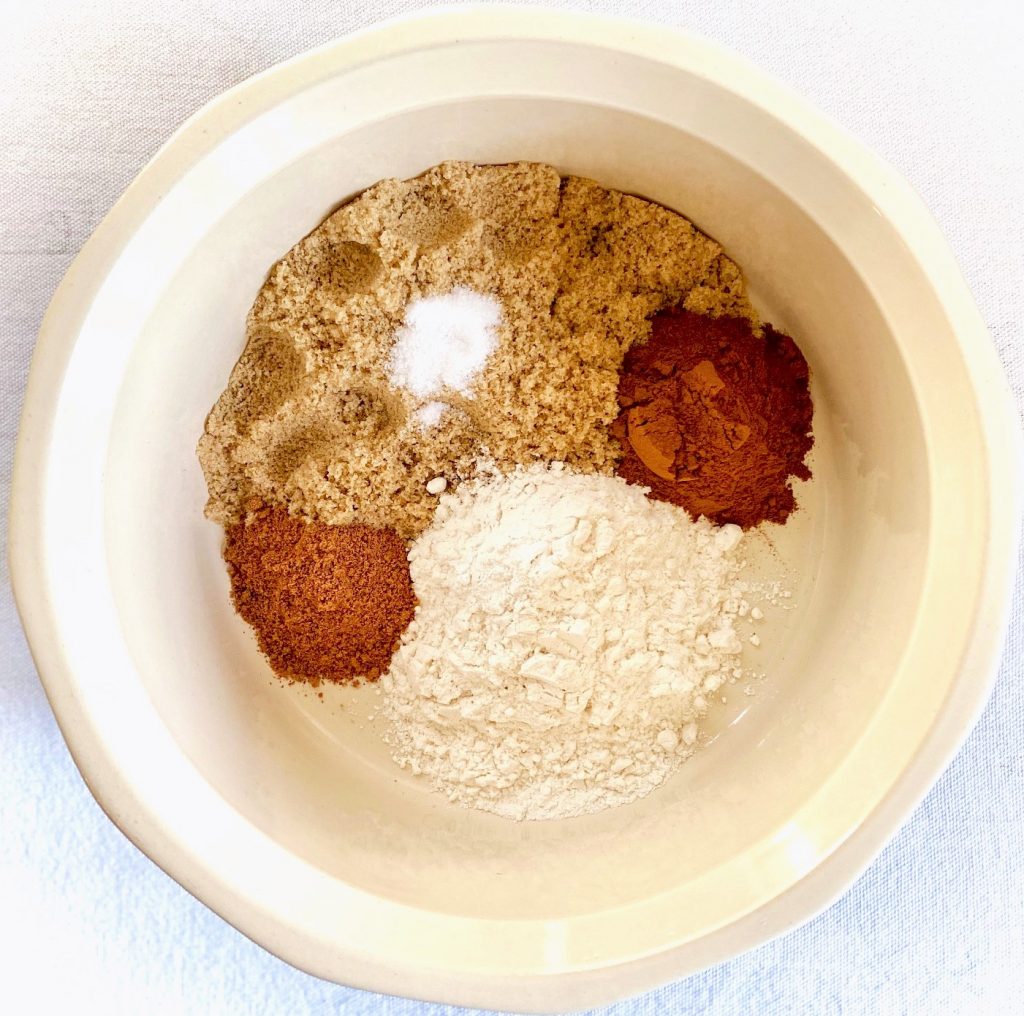
Ingredients for filling:
- 8 Honeycrisp Apples, peeled, cored, and cubed
- 1/2 cup packed light brown sugar
- 1/4 cup all-purpose flour
- 2 teaspoon pure vanilla extract
- 2 teaspoons ground cinnamon
- 1 teaspoon grated fresh nutmeg
- 1/4 teaspoon salt
Crisp Filling Ingredients 
Cubed Honeycrisp Apples 
Finished Filling
Ingredients for topping:
- 1 cup all-purpose flour
- 3/4 packed light brown sugar
- 2 teaspoons ground cinnamon
- 1/2 cup unsalted butter, cubed
- 1 cup old fashioned whole oats, lightly toasted
- 3/4 cups chopped pecans or walnuts, lightly toasted
- 1/4 cup unsalted butter, grated or shaved

Toasting Oats 
Topping ready to bake 
Grated butter on topping
Instructions
- Preheat oven to 350°F
- Lightly butter a 10″ cast iron skillet or a 9″ x 13″ baking dish
- Peel and core apples and then cut into ¼” cubes. Set aside.
- Lightly toast oats and pecans in a dry pan and set aside to cool
- Make the filling:
- In a large bowl add the filling ingredients: Brown sugar, flour, cinnamon, nutmeg, salt, and vanilla. Blend well.
- Add cubed apples to the filling mix and blend gently until the mixture is coated.
- Spread apples and filling evenly into the prepared cast iron or baking dish, set aside.
- Make the topping:
- Whisk together the flour, brown sugar, and cinnamon in a medium bowl. Cut in ½ cup cold unsalted butter (retain ¼ cup for later) using a fork or pastry cutter.
- Blend until the mixture becomes super crumbly.
- Fold toasted oats and pecans into the topping mixture and mix lightly. Sprinkle evenly over apple mixture.
- Bake for 40-45 minutes or until topping is bubbling around the edges.
- Remove from the oven and increase the oven temperature to 425°F.
- Using a cheese grater, shred the remaining ¼ cup cold unsalted butter evenly over the topping. Return to oven.
- Bake for an additional 10 minutes at 425°F. Remove from the oven.
- Let cool for about 15-20 minutes and serve warm.

Easy Apple Crisp 
Finished Crisp with ice cream
What is the difference between a Crisp, a Crumble, and a Cobbler?
There are a million versions of these delicious and amazing easy desserts. They all feature fresh fruit and have easy no fuss ingredients. They are perfect for any season.
- Crisp – A crisp is a baked fruit dessert topped with a crisp and crunchy layer. Ingredients normally include oats, nuts, butter, flour, and spices.
- Cobbler – A cobbler is a deep-dish baked fruit dessert with a light fluffy dropped biscuit or pie dough topping. Our Mixed Berry Cobbler is easy and delicious
- Crumbles – A crumble is very similar to a crisp. They both contain fresh fruit with a streusel like topping. The main difference is a crisp contains oats and a crumble does not.

Easy Apple Crisp Recipe 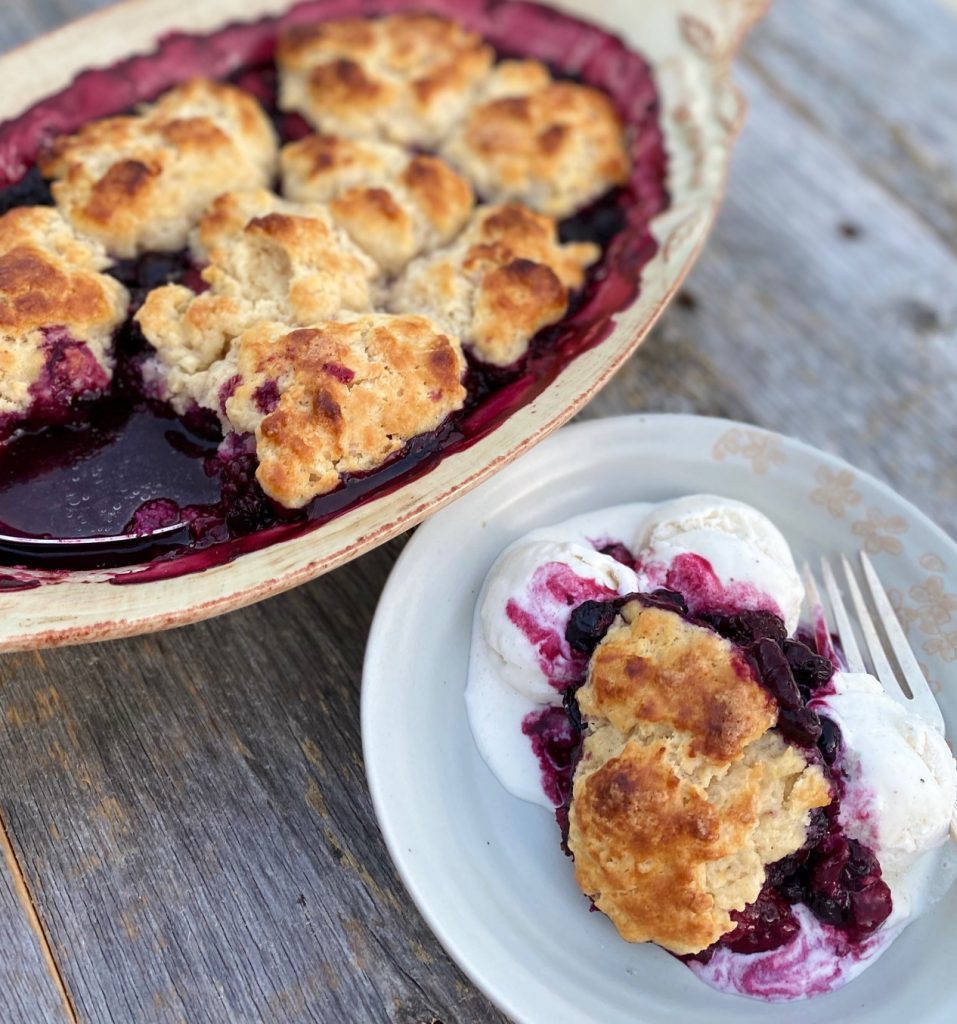
Cobbler with Three Mixed Berries
Does Apple Crisp need to be refrigerated?
Apple Crisp is always best eaten the day it is freshly baked! Baked Apple Crisp will stay good for 2 days at room temperature. However, it’s best to refrigerate because cooked apples and oats can turn bad after sitting at room temperature for 2 days.
Cover your Apple Crisp with wrap and refrigerate for 2 to 3 days after cooking. The topping can get soggy after refrigeration, however, when you warm it in the oven it will become crisp again.
Enjoy these additional easy desserts on our site:
- Mixed Berry Cobbler using 3 fruits
- Pear and Walnut Cake is a Fall favorite
- Cinnamon Baked Pears are an easy 5-ingredient dessert
- Love apples? Try our easy Cinnamon Apple Coffee Cake
- Add a scoop of vanilla ice cream to this Apple Crisp and drizzle with our Easy Salted Caramel Sauce

Easy Apple Crisp Recipe
Ingredients
FILLING
- 8 whole Honey Crisp Apples
- ½ cup packed light brown sugar
- ¼ cup all purpose flour
- 2 tsp vanilla
- 2 tsp ground cinnamon
- 1 tsp freshly grated nutmeg
- ¼ tsp salt
TOPPING
- 1 cup all purpose flour
- ¾ cup packed light brown sugar
- 2 tsp ground cinnamon
- ¾ cup cold unsalted butter
- 1 cup lightly toasted old fashioned whole oats
- ½ cup toasted chopped pecans (optional)
Instructions
- Preheat oven to 350°F
- Lightly butter a 10" cast iron skillet or a 9" x 13" baking dish
- Peel and core apples and then cut into ¼" cubes. Set aside.
- Lightly toast oats and pecans in a dry pan and set aside to cool
FILLING:
- Make the filling: In a large bowl add the filling ingredients: Brown sugar, flour, cinnamon, nutmeg, salt, and vanilla. Blend well.
- Add cubed apples to the filling mix and blend gently until mixture is coated.
- Spread apples and filling evenly into the prepared cast iron or baking dish, set aside.
TOPPING:
- Make the topping: Whisk together the flour, brown sugar, and cinnamon in a medium bowl. Cut in ½ cup cold unsalted butter (retain ¼ cup for later) using a fork or pastry cutter. Blend until the mixture becomes super crumbly.
- Fold toasted oats and pecans into the topping mixture and mix lightly. Sprinkle evenly over apple mixture.
- Bake for 40-45 minutes or until topping is bubbling around the edges. Remove from the oven and increase the oven temperature to 425°F.
- Using a cheese grater, shred the remaining ¼ cup cold unsalted butter evenly over the topping. Return to oven.
- Bake for an additional 10 minutes at 425°F. Remove from the oven. Let cool for about 15-20 minutes and serve warm.
Nutrition
Growing up in Northern California I spent my summers packing pears and the Fall usually meant picking walnuts. On special family occasions, we would head down a country road to the Oak Barrel Restaurant. Their tasty cake blended two locally grown products to showcase the best of the area.
I remember my time at the restaurant with fond memories because of the wonderful owners, the amazing food, and the warm family feeling. Sometimes I would drop in just for a piece of this Pear and Walnut Cake and a cup of coffee. The owners were gracious enough to share the recipe. In fact, it was published in a 1988 issue of Bon Appetit magazine.

Freshly Baked Pear Cake 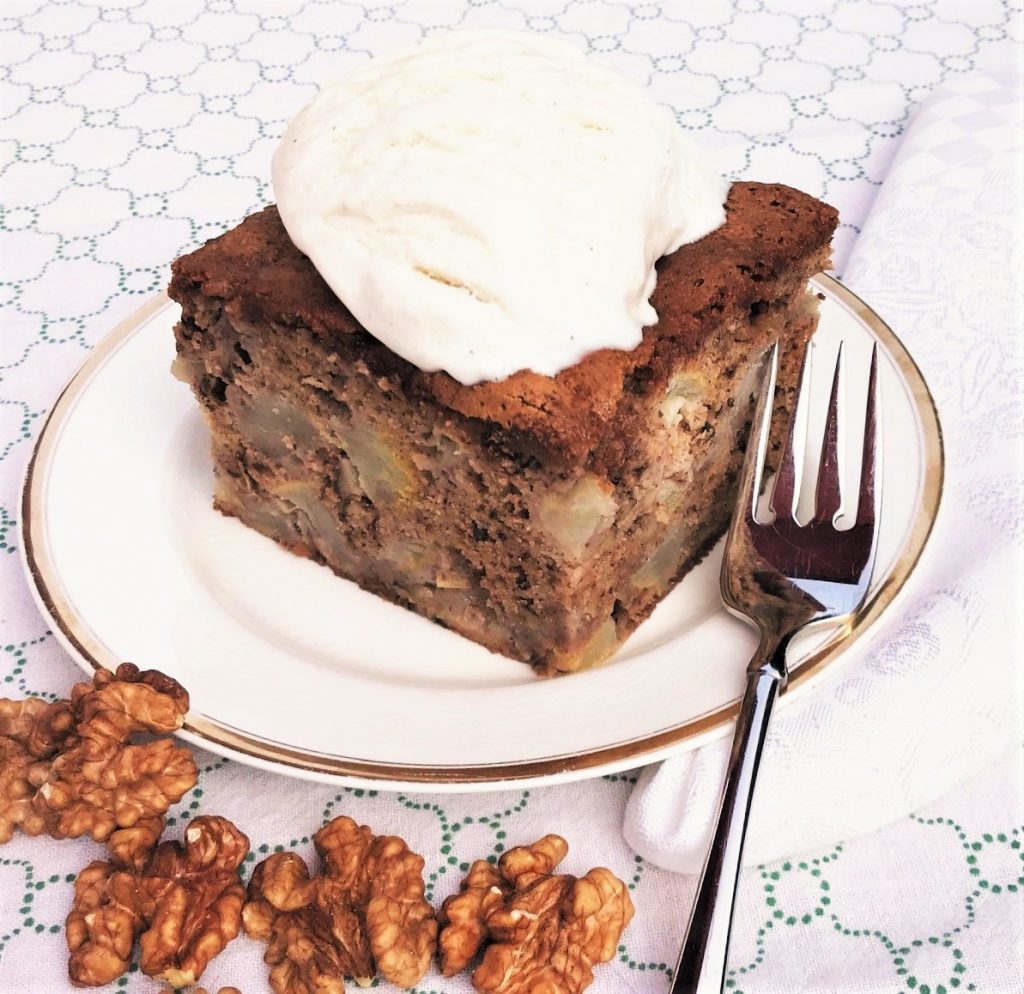
Cake with Ice Cream 
Cake with Cinnamon Whipped Cream
Ingredients for Pear and Walnut Cake Recipe
- All-purpose Flour
- Cinnamon
- Baking Soda
- Freshly Grated Nutmeg
- Salt
- Vegetable oil
- Eggs
- Sugar
- Water
- Vanilla Extract
- 5 ripe firm Bartlett Pears, unpeeled
- Walnuts
- Vanilla Ice Cream or Fresh Whipped Cream (my father’s favorite was always “a la mode”)
What pears should you use for baking?
With all the different varieties on the market, it can be confusing to select the best pears for baking. For this recipe, we recommend Bartlett Pears or Anjou Pears because they soften but hold their shape while baking.
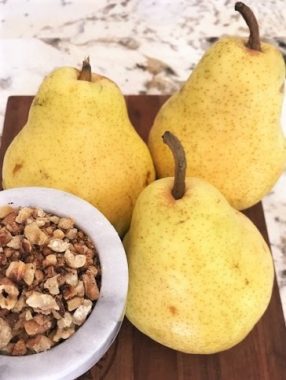
Bartlett Pears and Walnuts 
Toasted Walnuts
How to toast nuts for baking on the stovetop:
If possible buy the nuts whole, toast them quickly in a saute pan and grind or chop them yourself for the freshest flavor. Toasted nuts are the key to a rich flavor for this Pear Walnut Cake. For this recipe, the nuts were toasted after they were chopped.
- Place nuts in a heavy saute pan over medium heat
- Shake the pan frequently until the nuts begin to smell fragrant and look lightly browned, about 4-5 minutes
- Remove from pan and cool completely
- Grind with a nut grinder or small food processor, or put in a ziplock bag and use a rolling pin to crush. You can also roughly chop with a large knife on a cutting board.
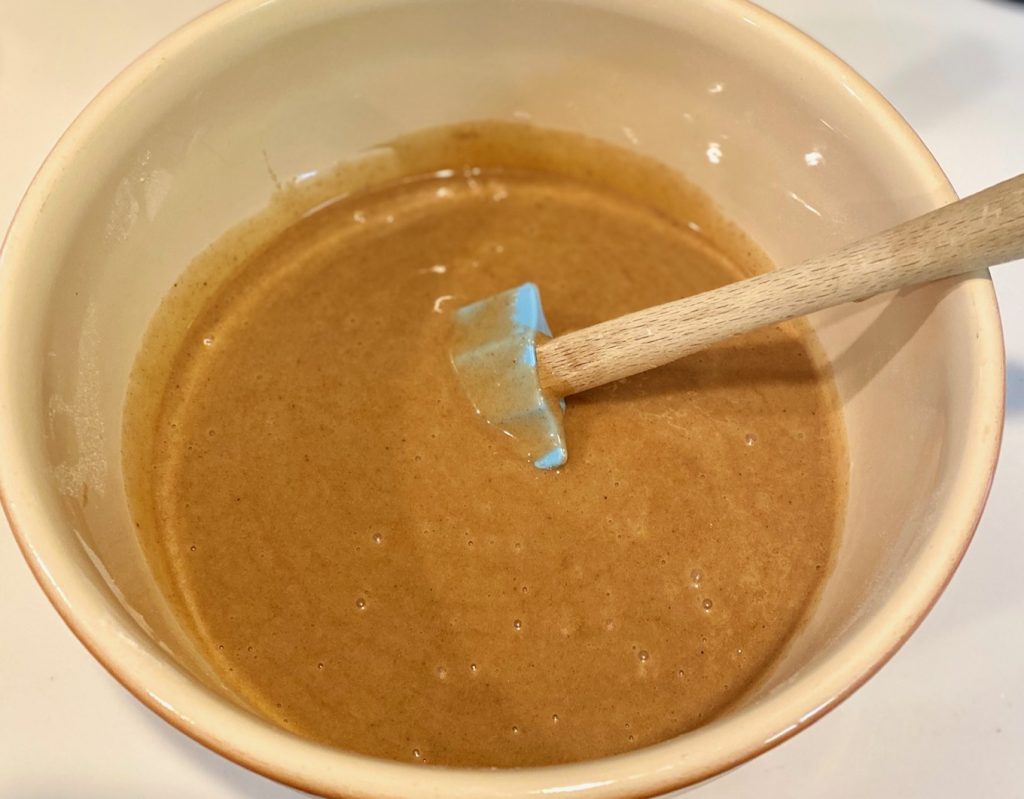
Smooth Batter for cake 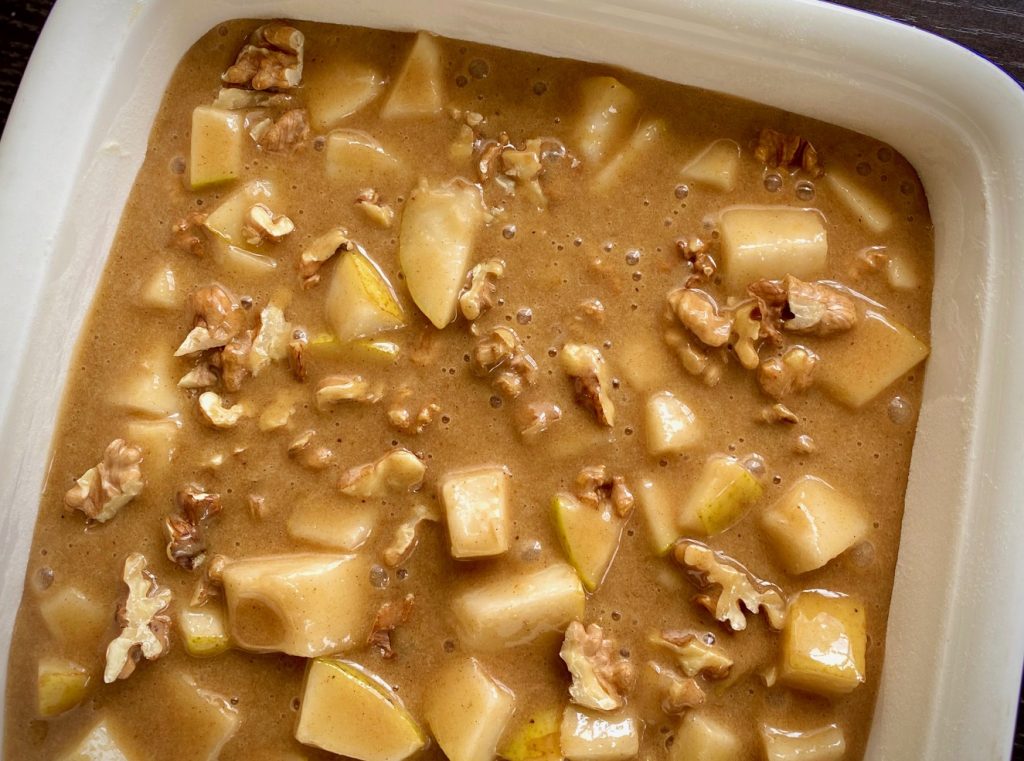
Pear Walnut Cake mix ready to bake Freshly Baked Pear Cake
How to make Pear and Walnut Cake:
- Preheat oven to 350°F
- Butter and flour a 9″ x 13″ baking pan
- Chop and then toast walnuts, set aside
- Sift together flour, cinnamon, baking soda, nutmeg, and salt in a medium-size bowl
- Using an electric mixer beat together the brown sugar, oil, eggs, sugar, water, and vanilla until it is very smooth
- Add in the dry ingredients. Mix until combined
- Core pears and cut into 1/2 inch unpeeled cubes
- Hand stir in pears and walnuts – the batter will be lumpy but do not overmix
- Pour batter into prepared baking pan
- Bake until the top is medium brown and a toothpick comes out clean, about 55 minutes.
- Cool completely and cut into squares
- Serve with vanilla ice cream or freshly whipped cream once cooled
Ideas for additional sweets and treats on our site:
- Mixed Berry Cobbler
- Cinnamon Baked Pears
- Mexican Wedding Cakes
- Our Easy Salted Caramel Sauce would be fantastic drizzled on top of this cake!
The Oak Barrel Restaurant closed many years ago but by passing on this incredible cake recipe you too can enjoy it in your home. We hope you will enjoy it as much as we do.
Cake with Cinnamon Whipped Cream

Pear and Walnut Cake Recipe
Ingredients
- 2 cups all purpose flour
- 2 tsp cinnamon 1 tsp in original recipe
- 1 tsp baking soda
- 1½ tsp freshly grated nutmeg ½ tsp in original recipe
- ½ tsp salt
- 1½ cups firmly packed brown sugar
- ½ cup vegetable oil
- 3 whole eggs
- ¼ cup sugar
- ¼ cup water
- 2 tsp vanilla 1 tsp in original recipe
- 5 ripe firm Bartlett Pears – unpeeled
- ½ cup chopped toasted walnuts
Instructions
- Preheat oven to 350°F
- Butter and flour 9" x 13" inch baking pan – set aside
- Chop and toast walnuts, set aside
- Sift together flour, cinnamon, baking soda, nutmeg, and salt in a medium-size bowl
- Using an electric mixer beat together brown sugar, oil, eggs, sugar, water, and vanilla in a large bowl until it is very smooth
- Add in the dry ingredients. Mix well.
- Core pears and cut into 1/2 inch cube unpeeled pieces
- Hand stir in pears and walnuts – batter will be lumpy
- Pour batter into prepared baking pan. Bake until the top is medium brown and a toothpick comes out clean, about 55 minutes.
- Cool completely and cut into squares.Serve with vanilla ice cream or whipped cream.
Nutrition
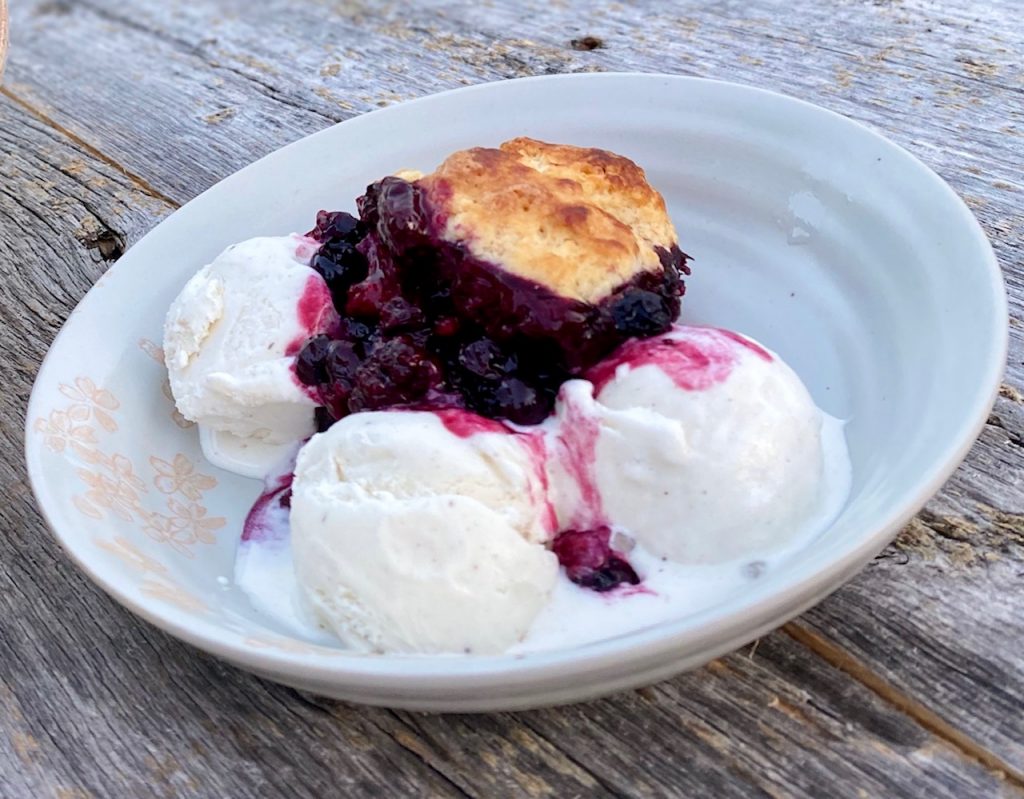
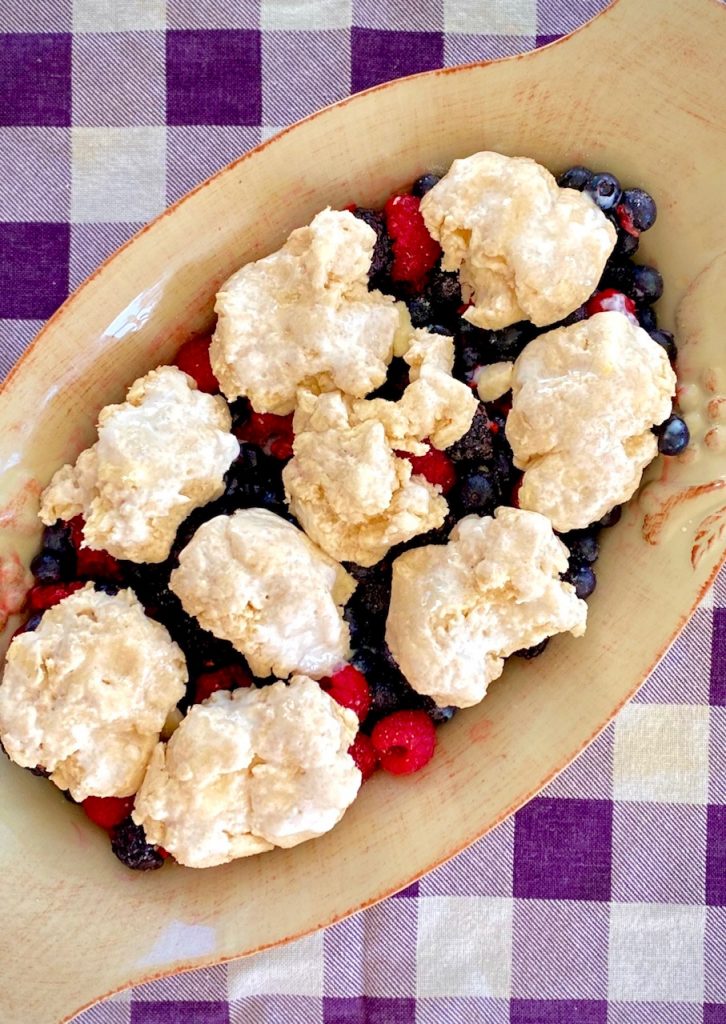
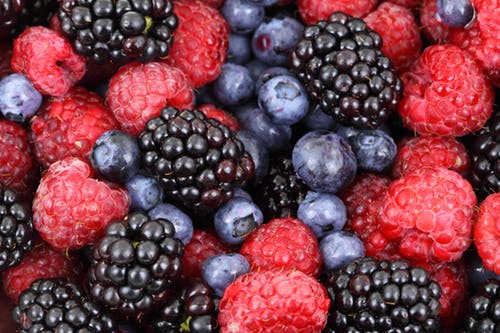
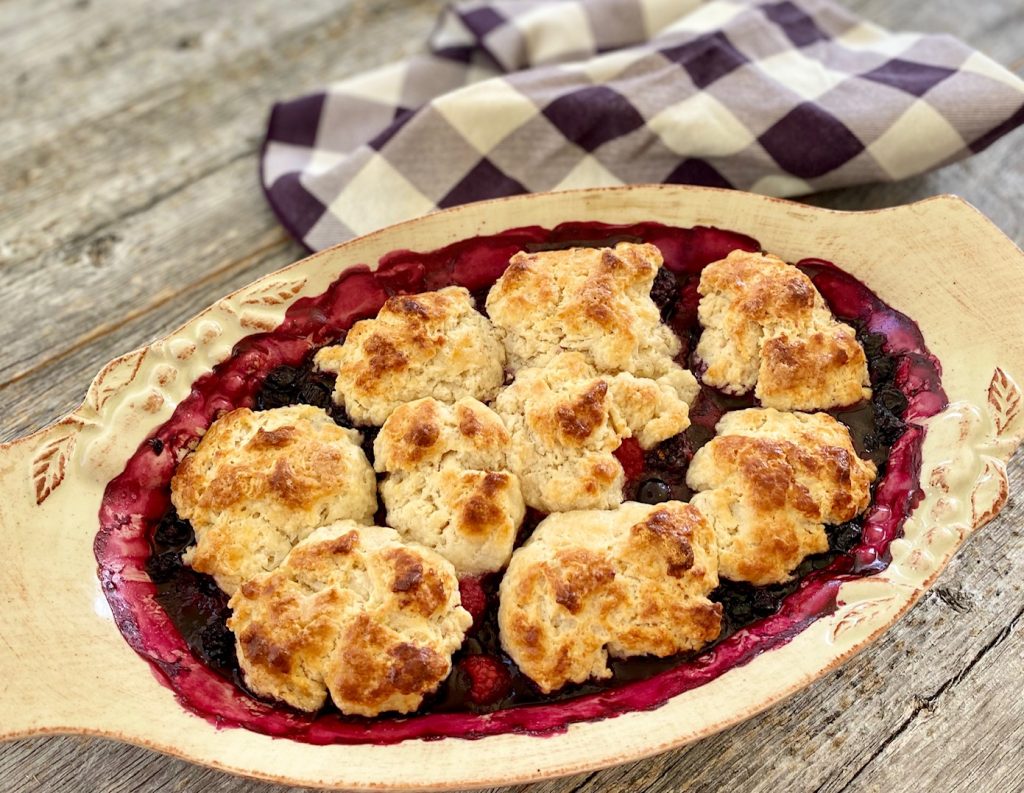
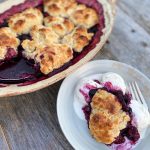
With just a few simple ingredients – including blackberries, raspberries, and blueberries – this berry cobbler recipe is bursting with fresh berry flavor and topped with a buttery biscuit topping
You’ll love the fact that you can prepare this dessert in just 15 minutes and have a sweet treat on the table in less than an hour with no fussy ingredients
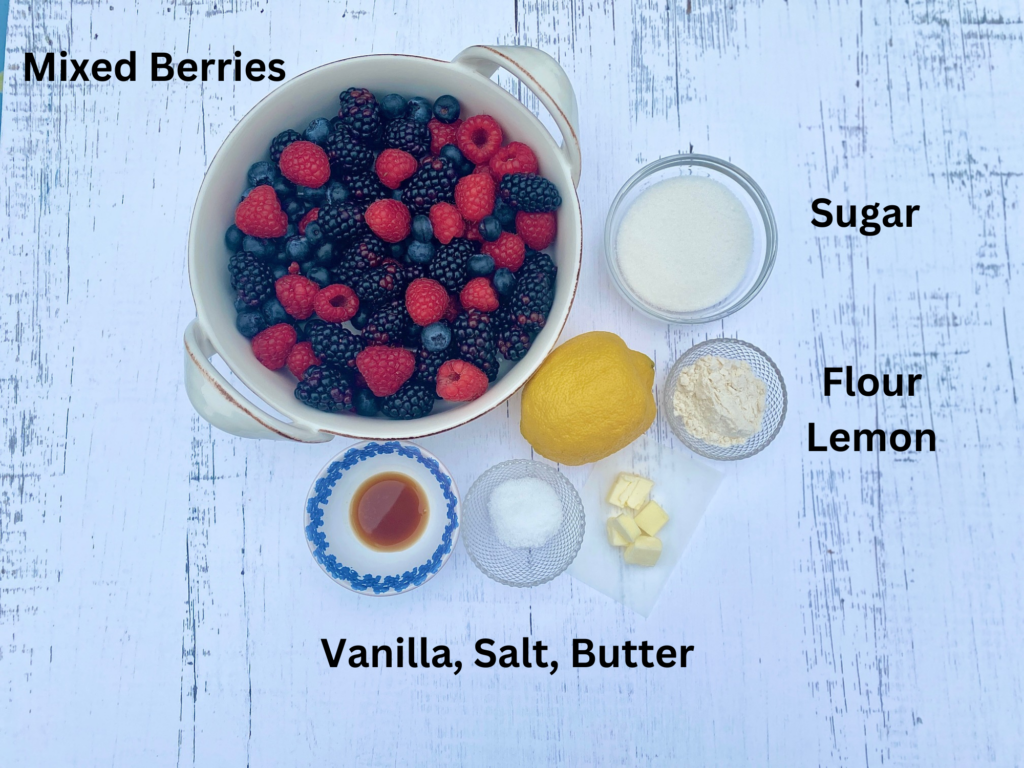
Ingredients for Triple Berry Cobbler
There are 2 parts to any cobbler – the fruit mixture and the cobbler dough
1: The Fruit Mixture
- Berries – we chose a blueberry, raspberry, and blackberry combo but any berries or stone fruits (peaches, apricots, plums) will work
- Sugar – this is dessert, after all!
- Flour – helps to thicken the berries when cooking
- Lemon Juice – the tartness in lemon juice helps balance the sweetness of the berries. Just a little adds a lot of brightness!
- Vanilla Extract – you could also use almond extract
- Salt
- Unsalted Butter – cold butter bits help create a velvety sauce once the cobbler is baked
- Optional: Cornstarch – if your berries are very juicy, or if using frozen berries, add 1 Tablespoon to the mixture
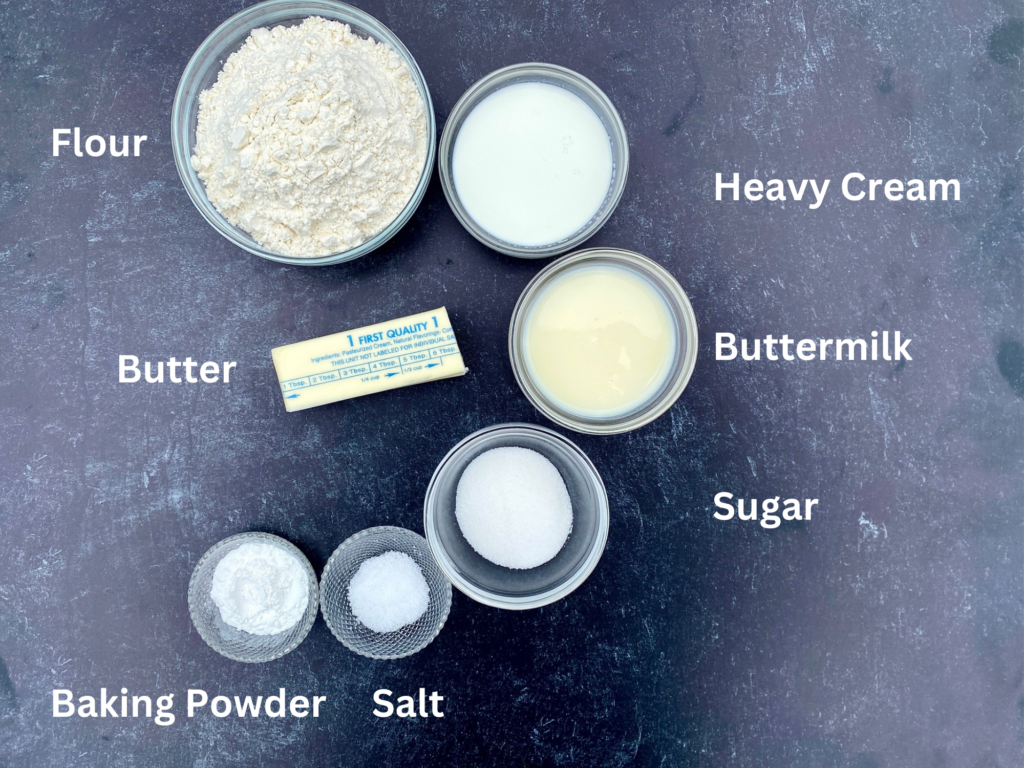
2: The Cobbler Dough
- Flour – all-purpose works best
- Sugar – just a pinch
- Baking Powder – makes the cobbler light and fluffy
- Salt – helps balance the flavor of the dough
- Unsalted Butter – salted will work but omit the other salt in the dough
- Heavy Cream and Buttermilk – we like a combination of both because buttermilk adds a very subtle tang and tenderness to baked goods. If you don’t have any buttermilk just use cream. This dough is forgiving and I’ve substituted half and half for the cream on occasion with great success.
How to Make Berry Cobbler from Scratch
- Preparing the Berry Filling:
- Wash and dry fresh berries. If you use frozen berries, thaw and add a Tablespoon of cornstarch to the berry mixture to help thicken as they cook
- Preheat oven to 375°F while preparing the dough
- Lightly butter a gratin or baking dish, about 9″ x 13″ in size
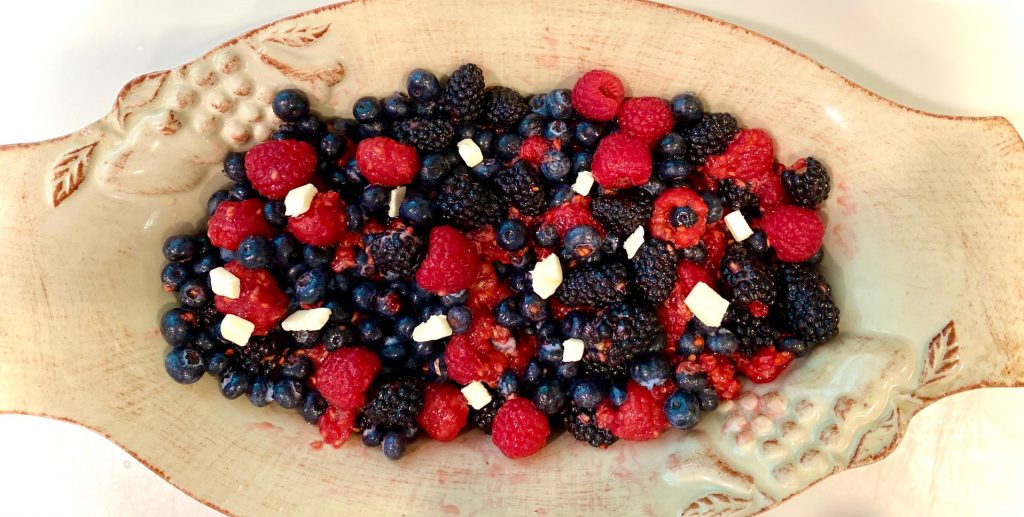
- Toss berries, sugar, 1 Tablespoon flour, lemon juice, vanilla extract (or almond extract), and salt together in the buttered baking dish
- Place small pieces of cold butter (1 tsp total) on top of the berry mixture
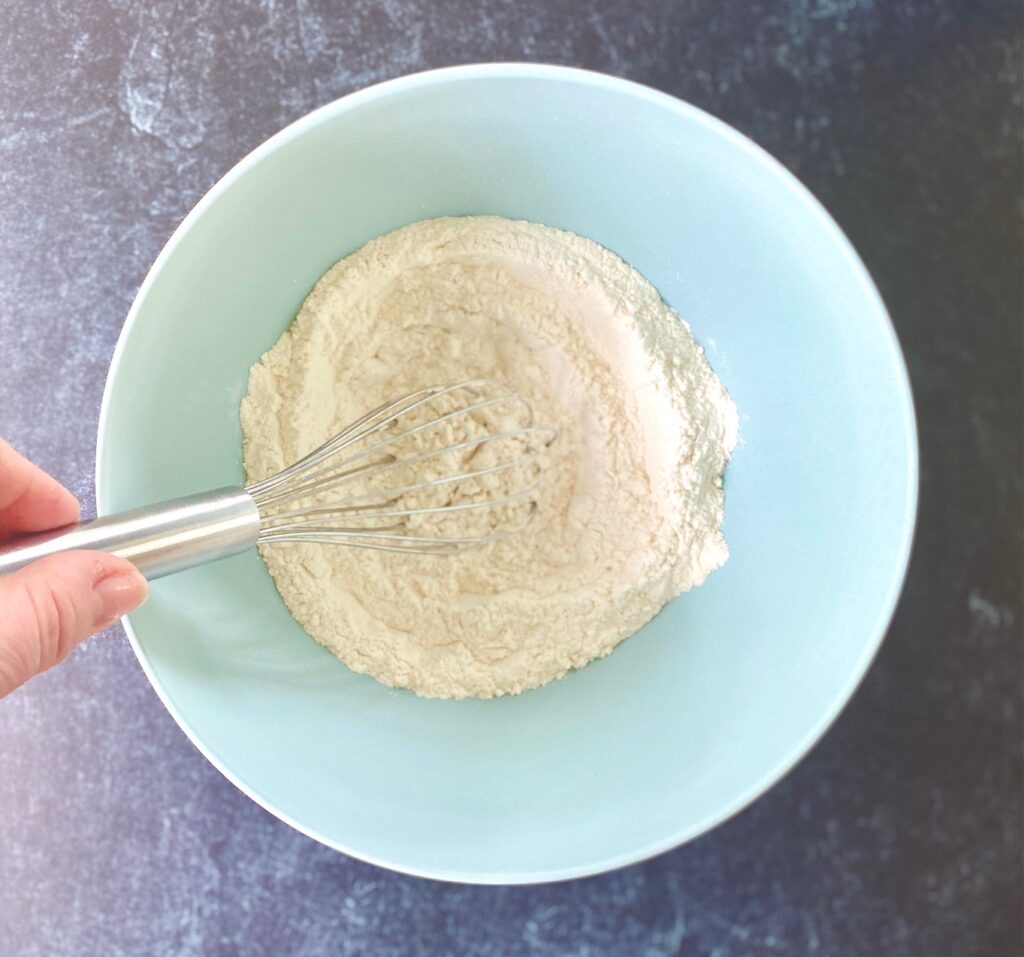
- PREPARING THE DOUGH:
- Make sure the butter, cream, and buttermilk are VERY cold
- In a large bowl combine flour, sugar, baking powder, and salt and whisk together
- Cut in the butter with a pastry blender or two forks. You want the mixture to resemble coarse meal, with pea-sized pieces of butter.

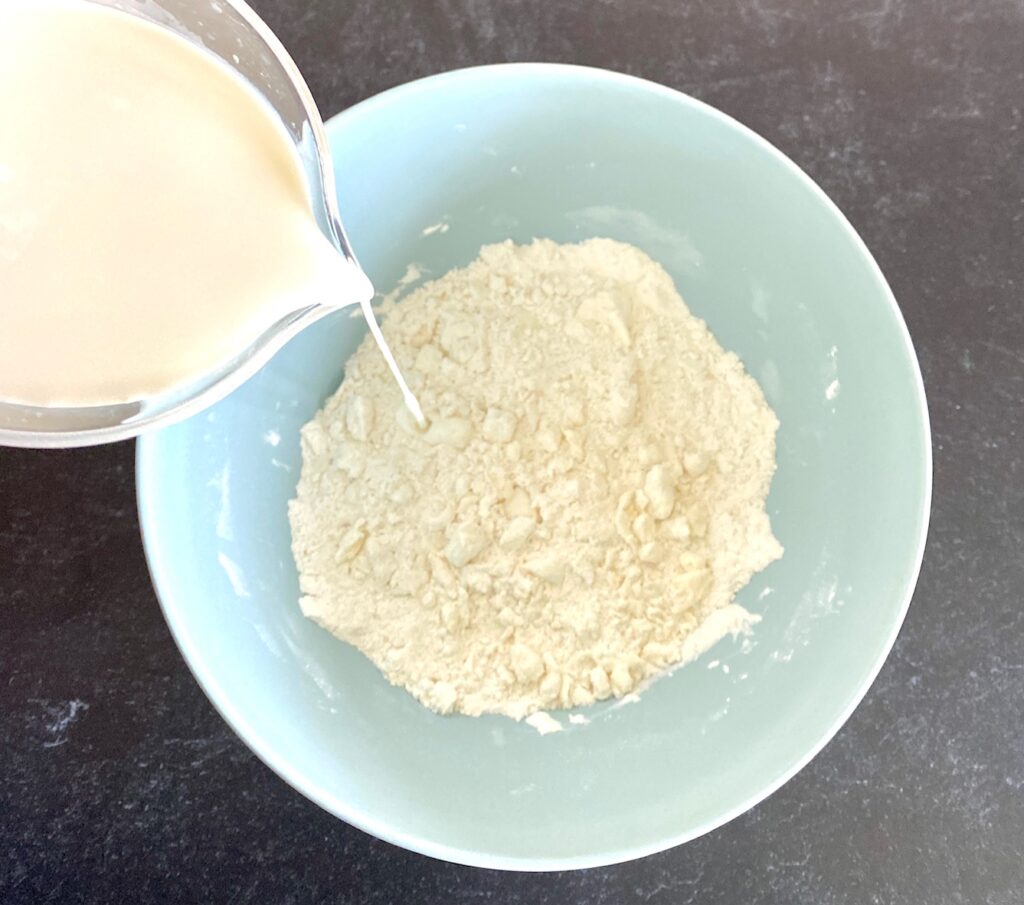
- Add the cream and 1/4 cup of buttermilk.
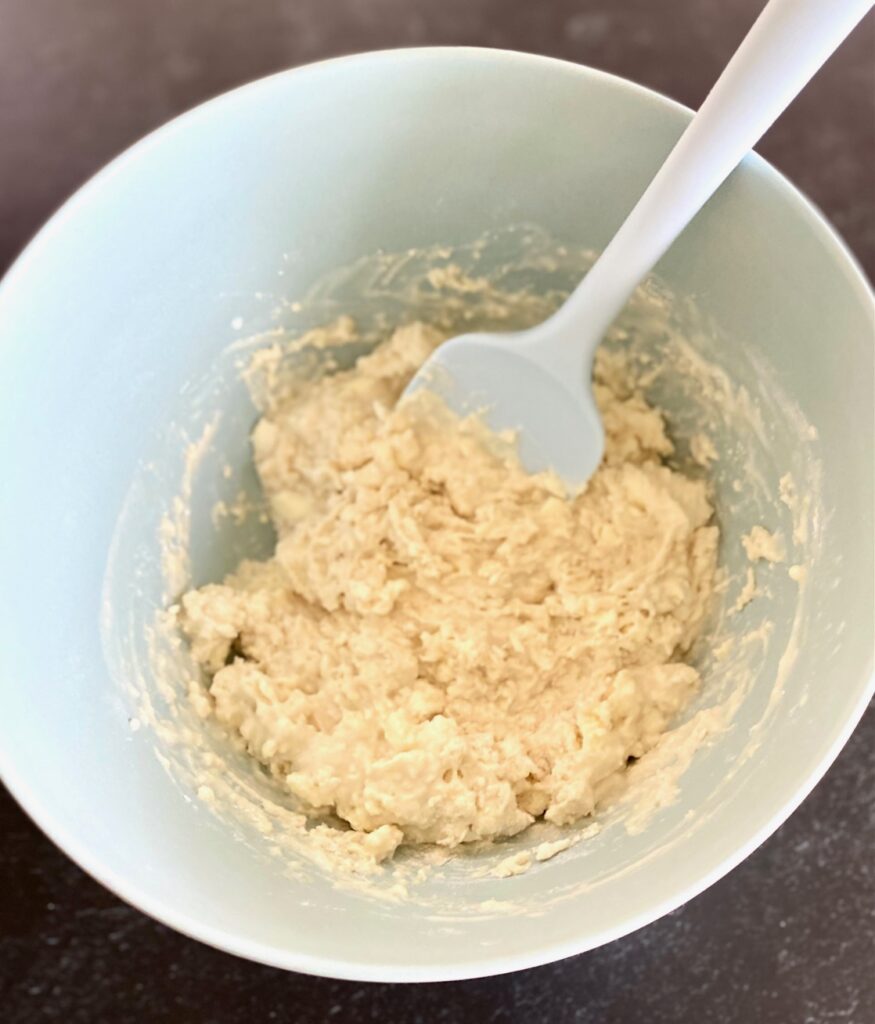
- Gently mix until just combined. Be careful not to overmix at this point, as this will ensure a fluffy biscuit during cooking.
- ASSEMBLING:
- Form small biscuit-shaped dough pieces with your hands and drop them gently onto the berry mixture. Drop about 8-10 pieces depending on the shape of your baking dish.
- Don’t cover the whole top of the berries. You want some of the beautiful berries to peek out!
- Brush the top of the dough with the remaining buttermilk and sprinkle with white or brown sugar.
- Bake 35-40 minutes. The cobbler is done when the berries are bubbly and the dough is deep golden brown on top.
- Let cool for 10-15 minutes before serving. This gives the syrup from the berries a chance to cool and thicken.
Best Berries for Berry Cobbler:
- Fresh berries are hard to beat, but we’ve used frozen berries, so this fruit cobbler works year-round.
- We use a combination of blueberries, blackberries, and raspberries, but any combo of mixed fresh berries or frozen mixed berries will work. Try it with cherries, strawberries, or whatever you have on hand. Make sure the pieces are all about the same size for even baking.
Why is fruit cobbler called cobbler? And what is a fruit crisp?
There are hundreds of mixed berry cobbler recipes and fruit crisp recipes but what is the difference? The one thing they have in common is that they both feature fruit as the “star of the show“!
- A cobbler has light fluffy biscuit-style dough plopped on top of the fruit with a bit of the fruit peeking out. The cobbler topping doesn’t cover all the fruit.
- A Fruit Crisp has a topping that includes oats, nuts, butter, flour, and usually cinnamon. Our Easy Apple Crisp is a great example.
- Both are easy desserts with no fussy ingredients or steps. And the best part is there is no rolling of dough. Perfect for summer!
Can you make a cobbler ahead of time?
- YES! You can prepare the cobbler, cover it with foil, and store it in the refrigerator overnight.
- When you’re ready to cook remove the baking dish from the refrigerator about 30 minutes ahead of time and bake as directed.
Serving this Cobbler
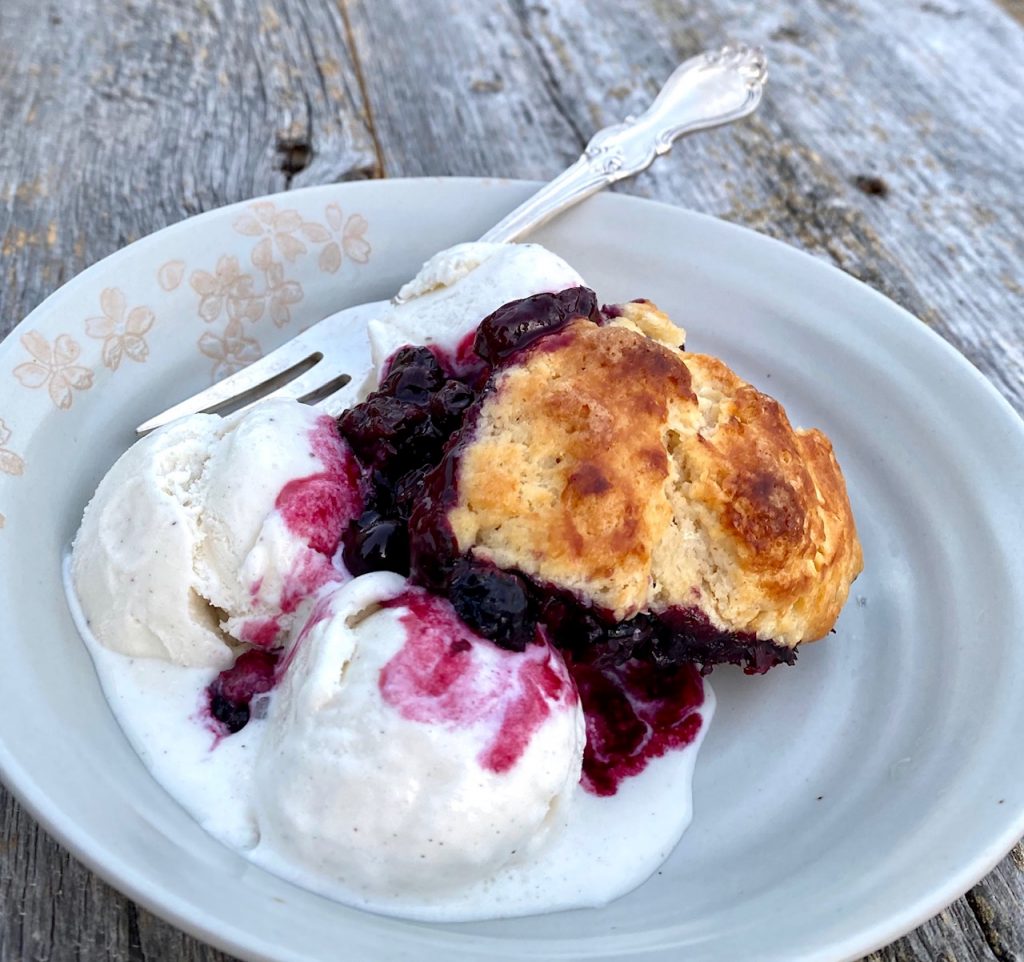
- Cobbler is perfect on its own, but serving it over a scoop of vanilla ice cream is amazing! The juices from the cobbler make the perfect syrup to top the ice cream.
- Or serve it with a dollop of whipped cream!
How to Store Cobbler
- Fruit Cobbler can be stored, covered with foil, at room temperature for one day, or in the refrigerator for up to 3 days.
- The biscuits will start to soften but you can pop the pan back in the oven at 300°F for about 10 minutes to reheat and firm the biscuits up again.
Love this Mixed Berry Cobbler Recipe? Here are some other fun desserts to try:
- Blueberry Lemon Scones
- Orange Olive Oil Cake
- Cinnamon Baked Pears
- Baked Churro Donuts
- Cinnamon Apple Coffee Cake
Mixed Berry Cobbler
Ingredients
Berry Mixture:
- 6 cups mixed berries – such as blueberries, raspberries, blackberries
- ¼ cup sugar
- 1 Tablespoon all-purpose flour
- 1 teaspoon lemon juice, freshly squeezed
- ½ teaspoon vanilla extract
- ½ teaspoon salt
- 1 teaspoon unsalted butter, very cold, cut into little pieces
Dough Mixture:
- 1½ cup all-purpose flour
- 1½ Tablespoon sugar, plus 1 Tbsp more for sprinkling
- 2 teaspoons baking powder
- ½ teaspoon salt
- 6 Tablespoons unsalted butter, very cold cut into ½" cubes
- ½ cup heavy cream, very cold
- ¼ cup buttermilk, very cold plus 1-2 Tablespoons more for brushing top of biscuits
Instructions
- Preheat oven to 375°F. Butter a 9"x13" baking dish
Berries:
- Toss berries, sugar, flour, lemon juice, vanilla, and salt together in the prepared baking dish. Dot with butter.
Making the Dough:
- In a large bowl whisk together flour, sugar, baking powder, and salt.
- With a pastry cutter or two forks, cut in the butter and mix until the mixture resembles coarse meal (pea-sized pieces)
- Slowly drizzle in cream and buttermilk and gently mix until just combined. Do not overmix.
Assembling the Cobbler:
- Using a large spoon scoop small biscuit sized balls and drop onto the berry mixture. Continue with all of the dough, scattering evenly across the top of the berries, until mostly covered, spacing about 1" apart.
- Brush the top of the biscuit dough with the remaining 1-2 Tbsp buttermilk and sprinkle generously with sugar.
- Bake the cobbler for 35-40 minutes. The filling should be bubbly and the biscuits should be deep golden brown.
- Remove from oven and cool for about 15 minutes before serving.
- Serve with whipped cream or ice cream
Notes
- Store any leftover cobbler for up to 3 days, covered, in the refrigerator. You can reheat in the oven at 300°F for about 10-15 minutes
- If you don’t have buttermilk you can use all cream
- The ratio: 1 Tablespoon of white vinegar or lemon juice to every 1 cup of regular milk. Mix together and let stand for a few minutes
Nutrition
It’s hard to resist the beautiful color and they taste like sunshine in a glass!
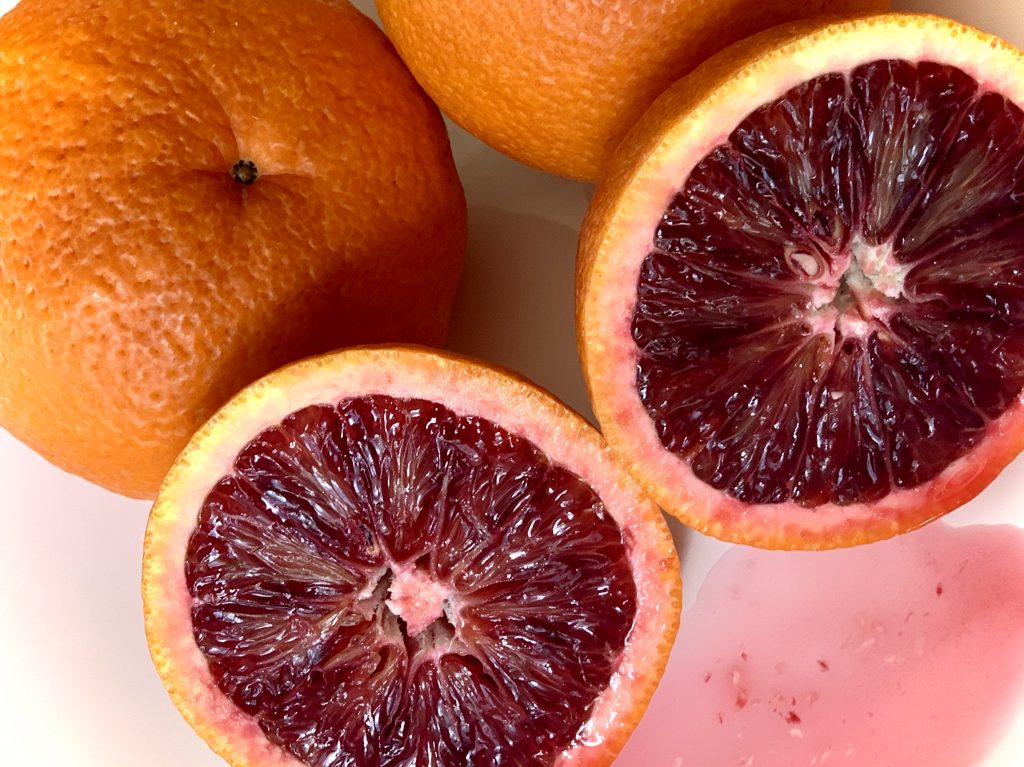
You can make them with regular oranges, for a traditional color, which will remind you of an orange creamsicle popsicle, or choose gorgeous blood oranges for a stunning pink frothy drink
These fun orange creamsicle cocktails are easy to make and have such a wow factor. Perfect for parties!
This post may contain affiliate links. Please see our affiliate disclosure policy for more details.

Ingredients for Orange Creamsicle Martinis
Because you really taste every element of this cocktail always use the best ingredients available to you.
Here’s what you’ll need for this drink:
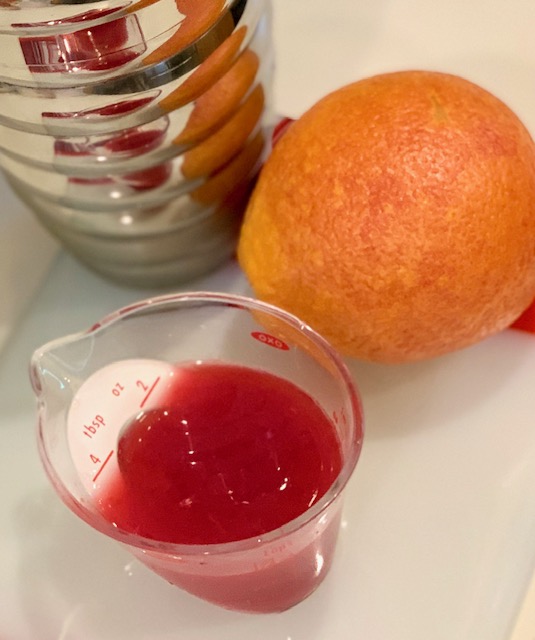
- Blood Orange or Navel/Valencia Orange Juice – freshly squeezed
- Vodka – plain or use vanilla vodka for even more flavor
- Simple Syrup – here is our easy recipe to make your own. Or use Triple Sec or Grand Marnier liqueur which will add even more orange flavor
- Half & Half – or heavy cream
- Sparkling Soda Water or Champagne – depending on the alcohol level you want
- Orange Zest or Orange Slice – optional garnish
How to make an Orange Creamsicle Martini
In order to make these drinks super frothy, you will need to use a cocktail shaker. Here’s the link to the shaker we use because it’s the ideal size.
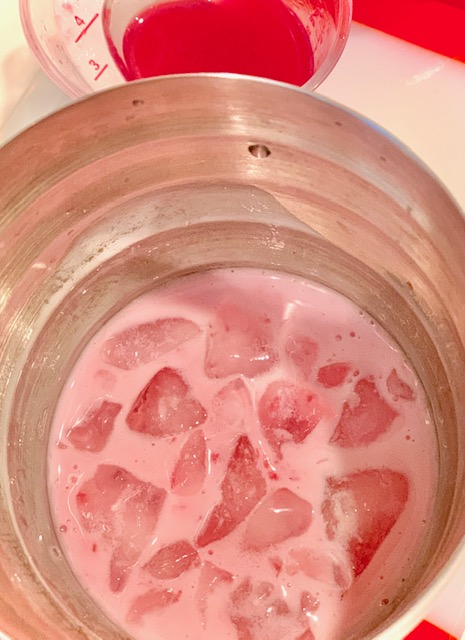
- Add about 1/2 cup of ice to the shaker.
- Zest the orange before squeezing or cut a thin slice, for optional garnish, and reserve.
- Add vodka, half & half (or cream), orange juice, and simple syrup
- Shake vigorously for 15-20 seconds.
- Make sure you shake enough to really chill the drink and get the cream frothy. The shaker will feel very cold in your hand.
- Strain frothy drink into a martini glass or an old-fashioned cocktail glass.
- Slowly add sparkling soda water or Champagne to fill the drink to the top of the glass
- Sprinkle with reserved zest, or garnish with an orange slice on the side of the glass.

Variation Ideas and Tips
The great thing about this alcoholic orange creamsicle drink recipe is that you can swap out a few ingredients to make your favorite version.
- Vanilla vodka is perfect in this drink but it also tastes great with plain vodka. Be sure to use cold vodka for the best frothy results.
- This recipe can easily be doubled with no changes.
- Shake vigorously for big frothy results!
- I use half & half in this recipe (because I always have that on hand in my refrigerator) but it’s even more delicious, creamy, and decadent with heavy cream.
- Simple Syrup is easily swapped out for Triple Sec or Grand Marnier. Both are orange-flavored sweet liqueur.
- Swap the sparkling soda water for Champagne, sparkling wine, or Prosecco. Be sure to pour it in slowly so your bubbly doesn’t overflow!

Types of Oranges to Use
- Blood oranges will give a version of this recipe that is pink in hue. These oranges have a limited season and are best from December through April. They are slightly less sweet and tart than other types of oranges. Perfect for Valentine’s Day or Galentine’s Day!
- Valencia and Navel oranges are always available and have a more tart flavor.
Looking for more cocktails? We’ve got you covered!
- Check out our complete guide and recipes for making a Mimosa Bar
- Our Blackberry Champagne Cocktail is easy and elegant
- This Blueberry Vodka Cocktail is a reader favorite
- Moscow Mules are easy and refreshing
- This Classic Bellini is like a trip to Venice, Italy in a glass
- Love citrus cocktails? Check out this perfect Lemon Drop Martini or a refreshing grapefruit Paloma


Orange Creamsicle Drink
Equipment
- Cocktail Shaker
- Zester
Ingredients
- 1 oz orange juice, freshly squeezed, see note
- 1 oz Vodka, vanilla or unflavored, cold
- 1 Tablespoon Half and Half or heavy cream
- ½ tsp simple syrup, or triple Sec or Grand Marnier
- 4-6 oz sparkling soda water, Champagne, or Prosecco, cold, amount depends on size of glass
- Orange zest or orange wedge, optional garnish
Instructions
- Zest half of the orange, or cut a thin slice, and set aside
- Add 1/2 cup ice to a cocktail shaker
- Add orange juice, vodka, half & half, and simple syrup to the shaker
- Shake vigorously for about 20 seconds. The shaker should feel VERY cold
- Strain into a martini, old-fashioned, or champagne glass
- Slowly fill to the top with sparkling soda water, Champagne or Prosecco
- Garnish with a sprinkle of zest or an orange wedge and serve
Notes
- Blood Oranges will give you a pink drink, whereas Valencia and Navel oranges will give you the traditional orange color.
- Calories based on using soda water
- Recipes can be doubled with no changes