You’ll love the simplicity of this 4 ingredient quick bread
In just one hour you can have warm, fluffy, buttery, soft bread. You can also make dinner rolls with this recipe.
This is comfort food at its best! It’s great for dinner because the ingredients are usually something you have in your pantry and it’s nearly fail-proof.
For this recipe, there is no rise, no kneading, and no yeast needed which is a huge time saver in my book!
Jump to Recipe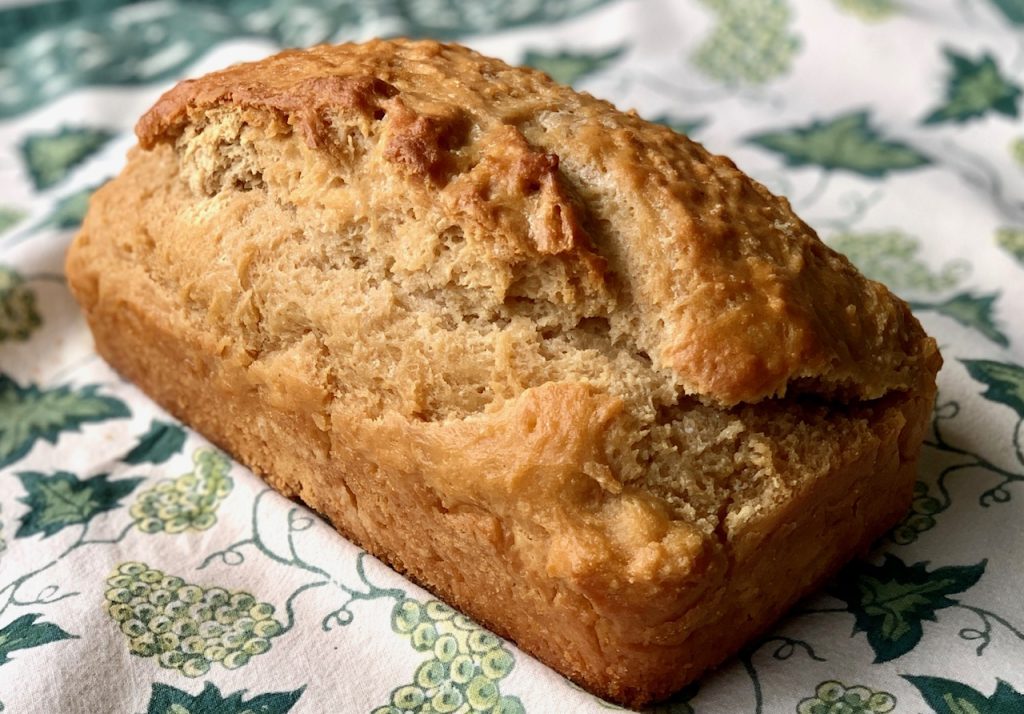
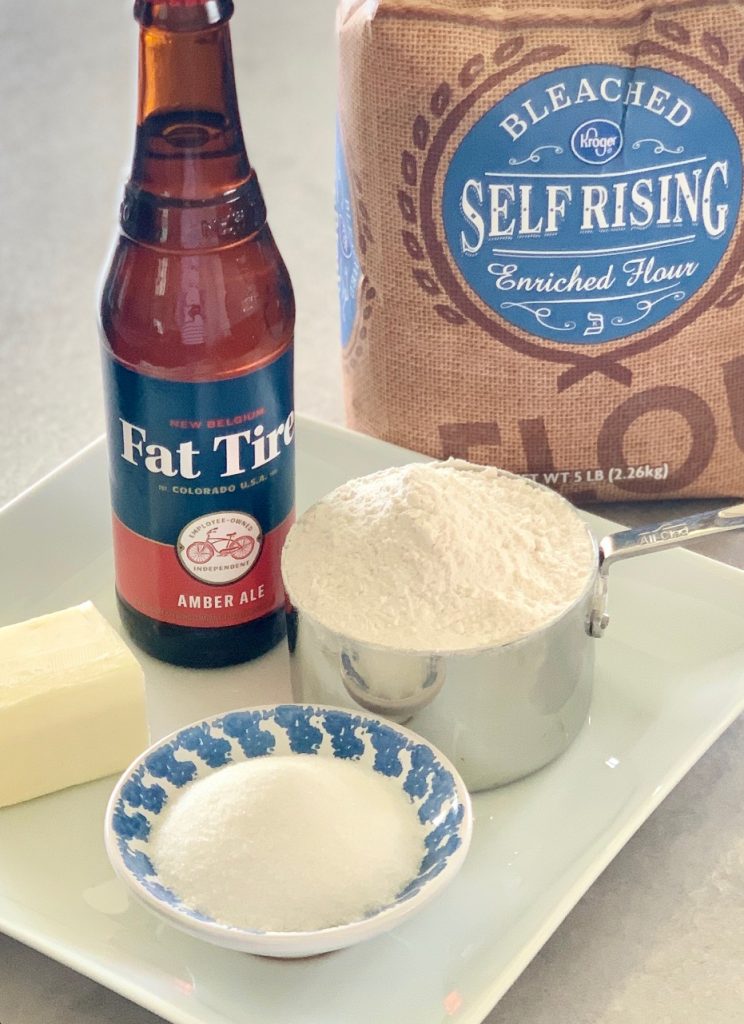
4 ingredients for easy Beer Bread
- Self Rising Flour – Don’t have any on hand? No problem! See below for the formula to make your own
- Sugar – This bread needs just a touch to balance the flavors
- Beer – Choose your favorite kind of beer or you can use non-alcoholic beer
- Butter – This is actually optional, but makes it so much tastier!
What is self-rising flour?
Self-rising flour is essential for many baked goods. It is actually just regular all-purpose flour with baking powder and salt already mixed into the final product. The baking powder acts as a leavening agent, in conjunction with the sugar and the beer, in this bread recipe. It’s easy to find self-rising flour on the shelves but I make my own most of the time.
How to make self-rising flour
Here is the master formula:
One cup all-purpose flour + 1-1/2 teaspoons baking powder + 1/2 teaspoon fine salt
(For this recipe you will need: 3 cups flour + 4 1/2 teaspoons baking powder + 1 1/2 teaspoons salt)
Stir vigorously together to make sure everything is well blended before using the mixture in any recipe. Fine salt works best because it’s easier to blend.
Make sure your baking powder is fresh and active for the best results. Need to test it? Try this trick.
How to make Beer Bread
- Lightly coat a loaf pan with non-stick spray or butter (8.5″ x 4.5″ or 9″x5″, or 3 mini loaf pans). Preheat the oven to 350˚F and make sure the oven rack is in the middle of the oven for best results
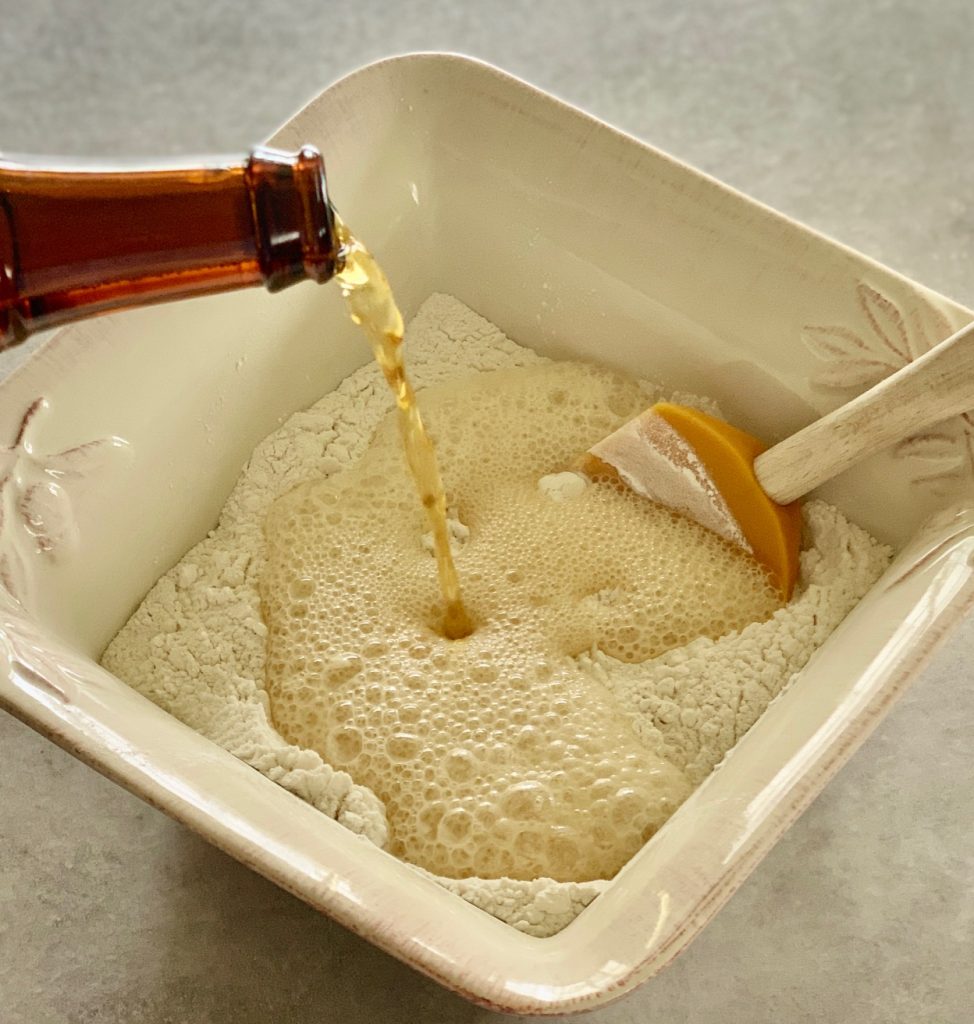
- Combine self-rising flour and sugar in a large bowl
- If including any additional herbs or flavorings add them in now (see list of suggestions below)
- Slowly pour in your favorite beer and let the mixture sit for 1 minute (important: don’t skip this step)
- Mix gently until all of the flour is absorbed. Use a light touch and do not overmix
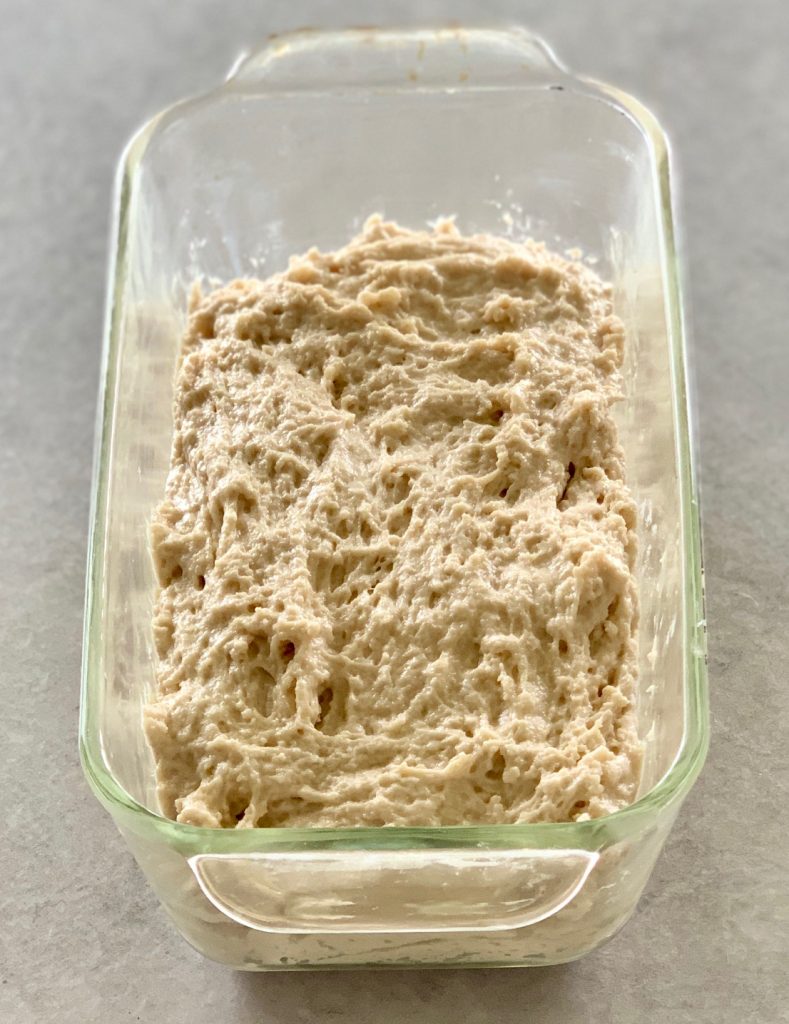
- Note: The mixture will be very sticky
- Add to the prepared loaf pan
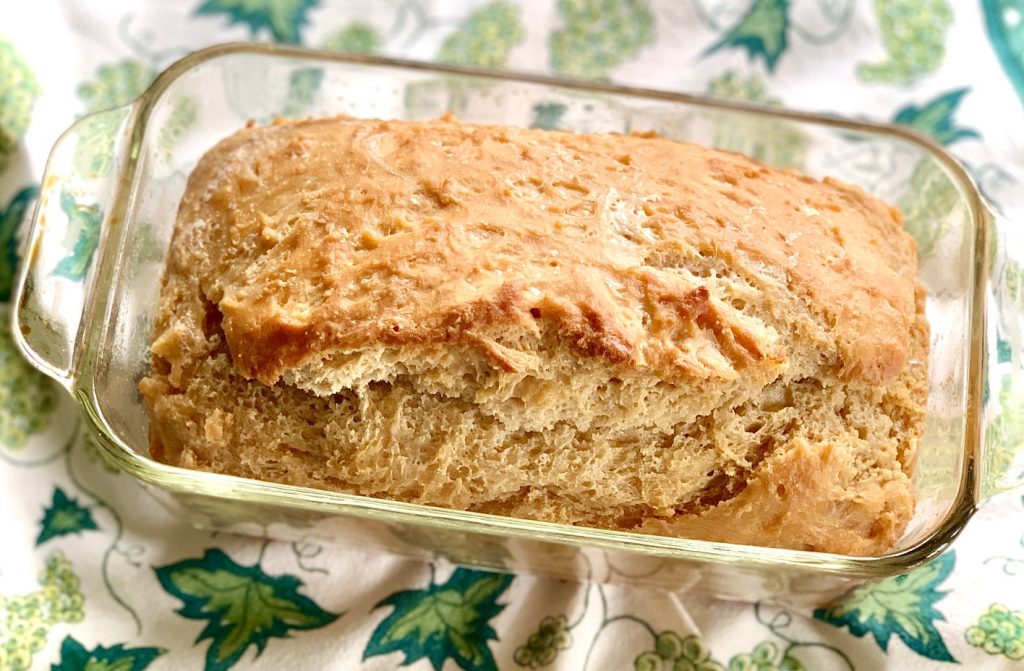
- Cook for 45 minutes. Remove from the oven and pour melted butter over the top. Return to the oven and bake for another 15 minutes
- Adding the butter is optional, or you can decrease the amount added if you prefer, but the baking time remains one hour in total
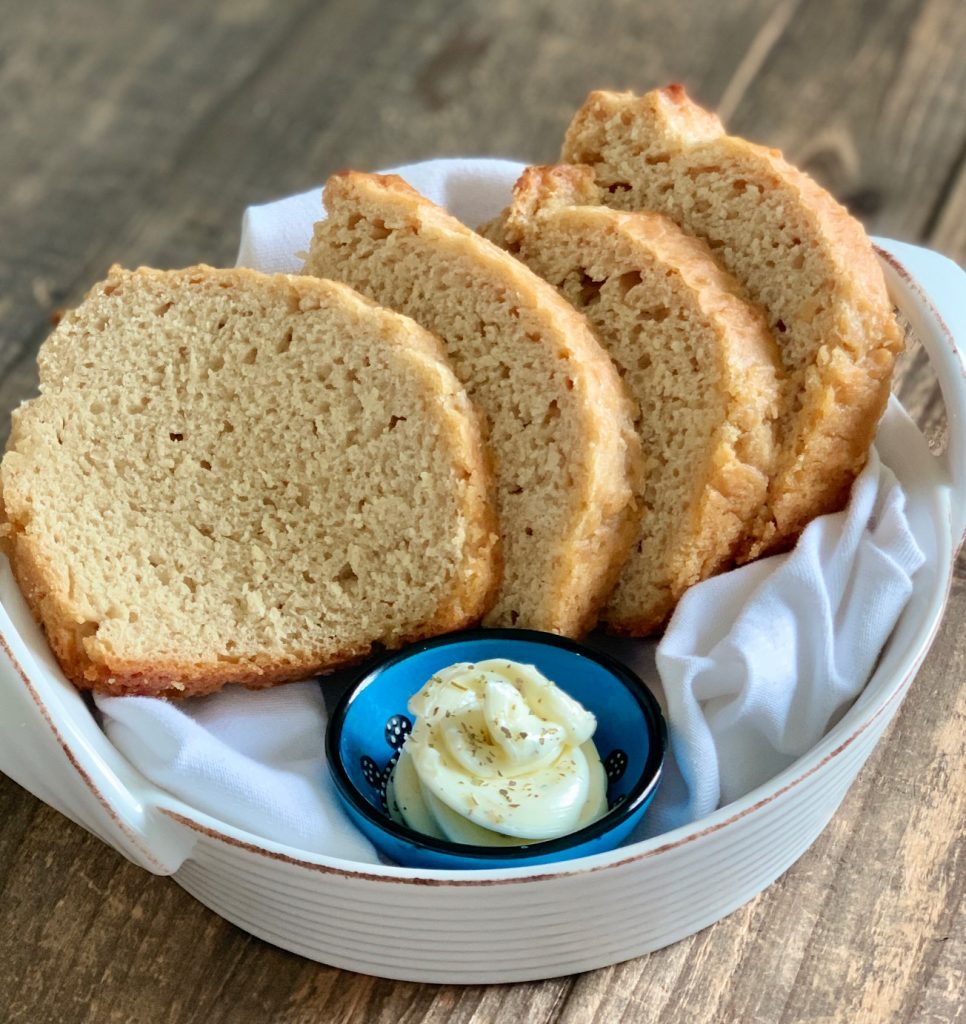
- Let the bread cool for at least 15 minutes before removing it from the pan and slicing
- Store tightly wrapped for about 3 days at room temperature

What beer is best for Beer Bread?
When deciding which beer to use for the bread think about what type of beer you like. I recommend an ale type of beer but anything will work.
The more yeast in your beer the more the bread will rise during baking. The end result of the bread depends on the type of beer. Try something fun like honey ale, brown ale, or pumpkin ale if you have it on hand.
Can you use non-alcoholic beer in beer bread?
YES! The yeast in the beer is needed for the bread to rise, but not the alcohol. We’ve made it with Beck’s non-alcoholic beer and it tasted fantastic. It’s worth noting that you generally cannot taste the alcohol in beer bread and the majority of it cooks off during baking.
Adding other flavors to the bread
The great thing about this simple bread recipe is how many add-ins you can use. I suggest using about 1 Tablespoon of dried herbs or 3 Tablespoons of fresh herbs, cheese, or bacon. Here are some of our favorite ideas:
- Chives or scallions
- Fresh dill
- Italian seasonings or any dried herb
- Garlic, minced, or garlic powder
- Cheddar, Gruyere, or Parmesan – shredded
- Small pieces of cooked bacon
- Adding small pieces of green chiles or some red pepper flakes will spice it up!
How to Make Beer Bread Rolls:
Beer Bread Rolls could not be simpler! Using the same recipe take these few additional steps:
- Grease a round, square, or rectangle oven-proof pan
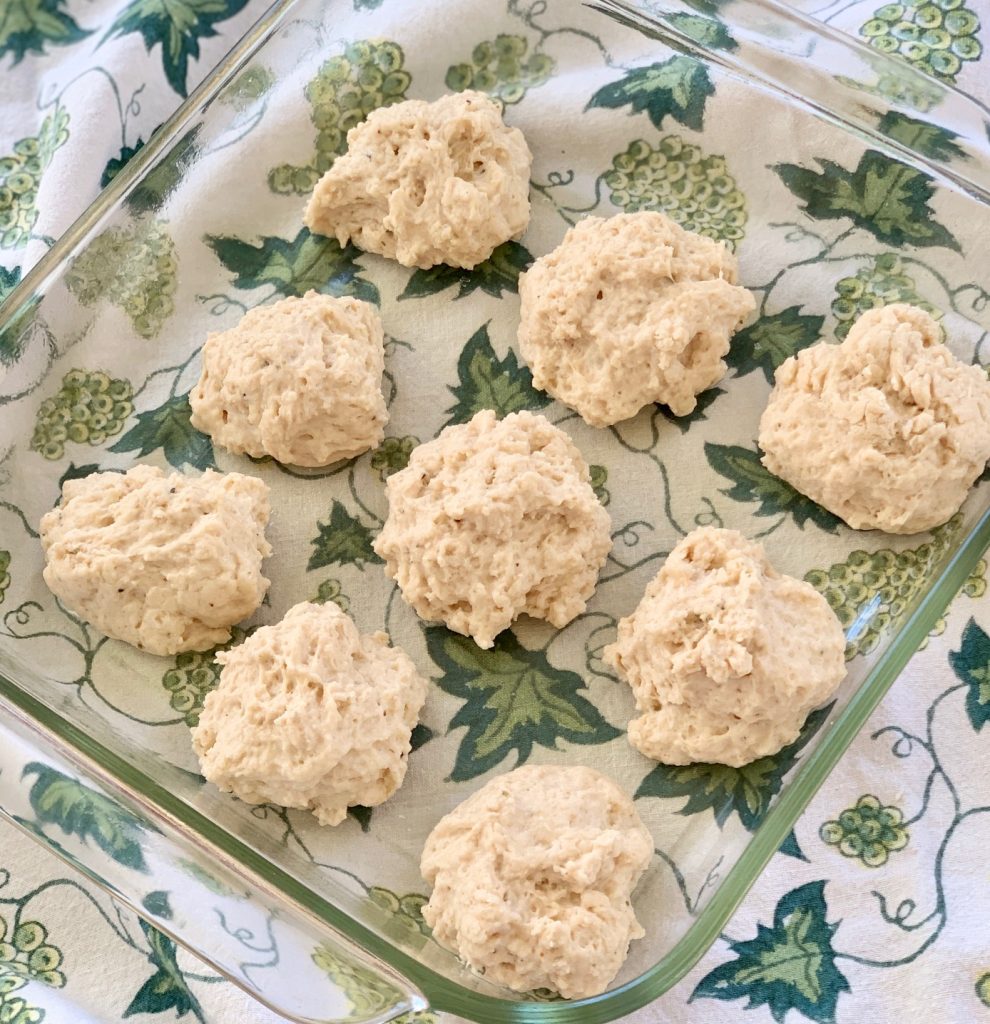
- With floured hands form the rolls with about 3 tablespoons of dough
- Drop into prepared pan. It’s OK if the rolls are touching each other
- Bake for 20 minutes
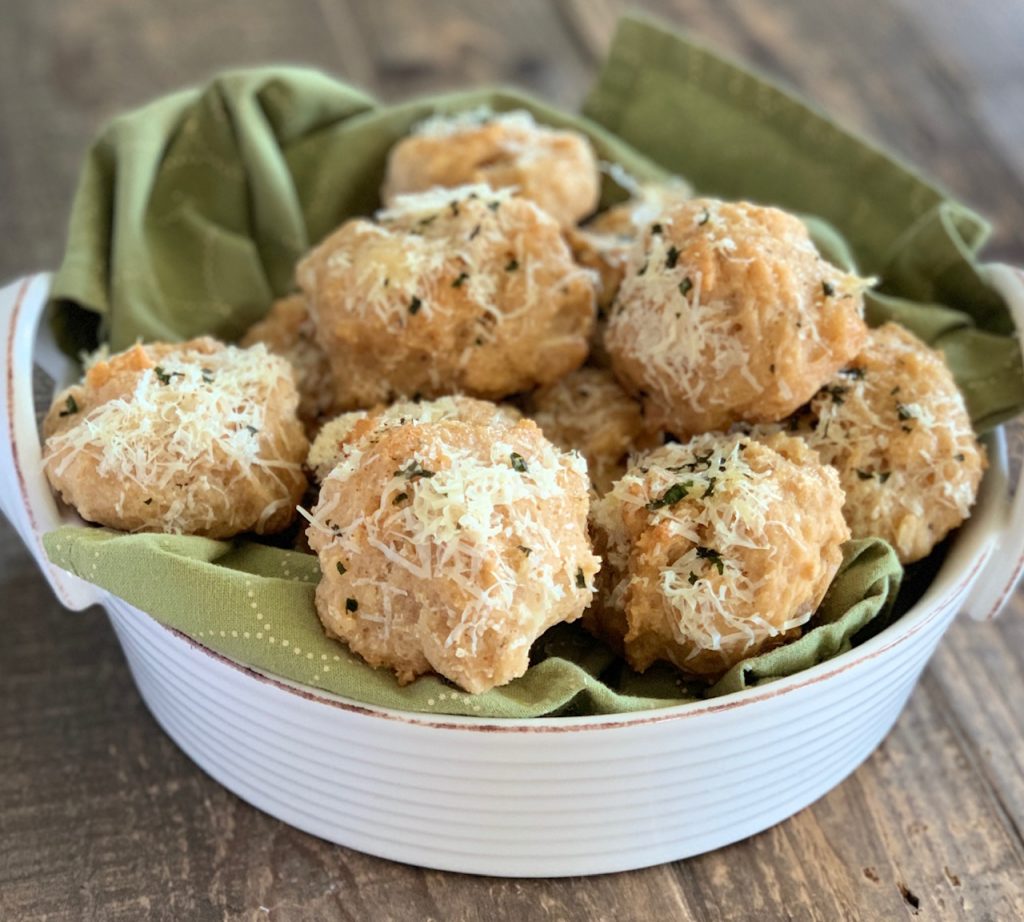
- Remove pan from oven and drizzle rolls with melted butter
- Sprinkle with add-ons such as shredded Parmesan and parsley
- Bake for additional 15 minutes and cool for 10 minutes in the pan before serving


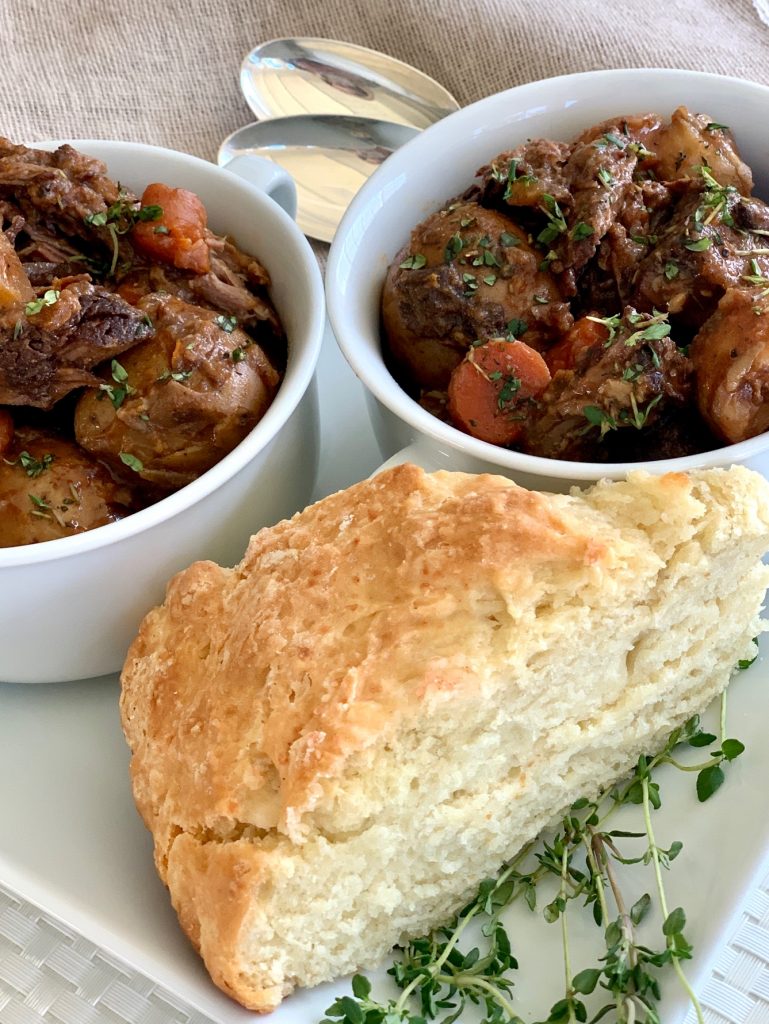
Pair with these delicious soups and stews:
- Butternut Squash Soup
- Slow Cooker Irish Pot Roast
- Chicken Tortilla Soup
- Spicy Pumpkin Soup
- Instant Pot Beef Stew
Other easy bread recipes:
- Buttermilk Banana Bread
- Pumpkin Nut Bread
- Blueberry Apple Bread
- Baking Powder Biscuits
- Irish Soda Bread
Delicious served with our flavored compound butters
Beer Bread with 4 Ingredients
Equipment
- Loaf Pan, 8.5" x 4.5" or 9"x5", or 3 mini loaf pans
Ingredients
- 3 cups Self Rising Flour
- 4 Tbsp Sugar
- 12 oz Beer, (or Non-alcoholic Beck's beer)
- ¼ cup butter, melted
Optional add-ins for Rolls
- 3 Tbsp shredded Parmesan
- 1 Tbsp parsely leaf, roughly chopped
Instructions
Instructions for Bread:
- Preheat oven to 350°F. Place oven rack in middle of oven.
- Lightly coat loaf pan with non-stick spray or butter
- Blend self-rising flour and sugar together. If using any other add-ins (like herbs or cheese) mix them in now.
- Slowly pour in the beer. Allow mixture to sit for one minute
- Mix to combine until just blended. Do not overmix.
- Melt butter and set aside.
- Add batter to prepared pan. Cook for 45 minutes.Remove bread from the oven and pour melted butter over the top of the bread.Return to oven and bake for 15 more minutes.
- Remove from the oven and allow to cool on a wire rack for at least 15-minutes before removing from pan and slicing.
- Store at room temperature, tightly wrapped, for about 3 days.
Instructions for Beer Bread Dinner Rolls:
- Grease 2 round, 2 square or 1 large rectangle baking dish with non-stick spray or butter.
- Make rolls by dropping rounds of about 3 tablespoons into pan. It's ok if the rolls are touching. The dough is sticky so you may need to flour your hands to shape rolls.
- Bake for 20 minutes. Remove from oven and drizzle melted butter over the rolls.Sprinkle shredded parmesan and chopped parsley.
- Bake for an additional 15 minutes.
- Remove from the oven and let cool for 10 minutes before serving.
Notes
- 1 cup all-purpose flour + 1.5 teaspoons baking powder + 1/2 teaspoon salt
- 3 cups flour + 4 1/2 teaspoons baking powder + 1 1/2 teaspoons salt)
- Shredded cheese
- Dried herbs
- Fresh herbs
- Crumbled bacon
- Chopped chives or scallions
- Garlic powder or minced fresh garlic
Nutrition
No yeast, no kneading, and no rise time means piping hot bread from the oven to the table in just an hour!
This delicious quick bread recipe is soft on the inside with a golden crust on the outside. Serve it for breakfast with warm Irish butter and jam, or for dinner, with herbed butter and a warming soup or stew
Perfect for St. Patrick’s Day with our Guinness Irish Pot Roast
This post may contain affiliate links. Please see our Affiliate Disclosure Policy for more details. We only recommend products we love and use.
Simple Ingredients for Irish Bread
This easy recipe gets its name from its key ingredient, baking soda. Combining the baking soda with buttermilk “activates” the baking soda (also called sodium bicarbonate or bicarbonate of soda), resulting in beautifully leavened bread without yeast.
This traditional Soda Bread recipe uses basic ingredients, like most Irish recipes. There is a good chance you have all of the ingredients on hand, which makes it ideal for baking any time.

- All-Purpose Flour – we use white flour, but in Ireland, it is often made with whole wheat flour
- Baking Soda – the key ingredient for leavening
- Baking Powder – an additional leavening agent
- Sugar – we use just a touch of sugar
- Salt – fine sea salt or table salt
- Buttermilk – the lactic acid in buttermilk is what activates the baking soda and gives the bread its lift and fluffy inside texture. See below for DIY buttermilk.
- Butter – we use unsalted butter however salted works fine too
- Sea Salt – optional for the top of the bread
Optional add-ins: (any combination totaling no more than 1 cup)
- Raisins – we like golden raisins but any type will work
- Currants – another traditional Irish add-in
- Caraway Seeds
- Orange Zest – zest gives the bread a bright tangy touch
- Cranberries – a sweet and tart addition

How to make Irish Soda Bread
- Choose the type of pan you want to use. We recommend:
- 9″ – 10″ Cast iron pan or other heavy-bottomed pan, 9″ pie dish, 8″-10″ Dutch oven
- Preheat the oven to 350˚F and make sure the oven rack is in the middle of the oven.
- Select the pan you want to use and lightly grease it or line it with parchment paper.
- For the best results: start with very cold butter and buttermilk. Cut butter into small pieces and measure the buttermilk. Then put both in the freezer while you gather your other ingredients.
- Whisk all of the dry ingredients together in a large bowl: Mix flour, baking powder, baking soda, sugar, and 2 teaspoons of salt.
- Add the very cold butter pieces and lightly blend into the flour mixture using two forks or a pastry blender. Make sure all the pieces are coated in flour because this step helps give a flaky texture to any baked goods.


- Add cold buttermilk in 3 batches, blending lightly with a sturdy silicone or wooden spoon after each addition.
- If adding any add-ins (raisins, caraway, etc.) add them now.
- Be sure to mix gently just until combined. DO NOT OVERMIX.
- You will have a shaggy dough, that is also sticky. It should have small pieces of butter visible.
- Put a little flour on your hands and place the dough on a lightly floured surface.
- Bring the dough together into a ball. Then flatten it slightly into a large disk.


- Transfer from the floured work surface to the prepared pan, baking dish, or Dutch oven.
- Using a sharp knife, score an X on top of the dough, cutting about one-third of the way through the dough.
- Top with coarse sea salt, optional but highly recommended.


Baking the bread
- Bake the bread for 25 minutes and check to make sure it isn’t getting too dark. If it is then tent loosely with aluminum foil.
- Bake about another 20 minutes. The top should be golden brown and no longer shiny. A test skewer should come out clean and the internal temperature should be 205˚F.
- Remove from the oven and let rest for 10 minutes.
- Remove bread from the pan and cool completely on a cooling rack. It’s important to cool on the rack (instead of in the pan) to prevent steam from softening the bottom of the bread.


- Serve warm, sliced, or torn into wedges alongside our savory Flavored Butters.
How to tell if Soda Bread is done
- Bread is done when the X area has lost its shiny raw look and the crust is medium golden brown.
- If you tap the bread it should have a hollow sound.
- Use an instant-read thermometer. This type of quick bread should be baked to an internal temperature of 200˚f – 210˚f. We’ve found that 205˚f is ideal for quick breads.
Tips for the best results
- Quick breads benefit from very little mixing and kneading. Be sure to combine just until the bread comes together otherwise, you will overactivate the glutens.
- Be sure the oven is ready to go and hot! The lactic acids and baking soda begin to react immediately and the best bread rise will occur quickly in a hot oven, providing even cooking and a crispy crust. Waiting to bake the bread can result in a denser, less airy bread.
- Let the bread cool for at least 10 minutes on a cooling rack before serving. Slice into individual slices with a serrated knife or cut the loaf into wedges.
- The X on the top of the loaf isn’t just for looks! It also helps guarantee even cooking.
How to store Irish Soda Bread?
- ROOM TEMPERATURE: Cool completely, wrap the whole loaf (or remaining loaf), and store it at room temperature for about 2 days.
- FREEZER: This bread freezes well, tightly wrapped in plastic wrap and an airtight container, for about 3 months. Thaw to room temperature before serving.

Need a tangy buttermilk substitute?
In case you don’t have buttermilk on hand it’s easy to make a substitution using the formula below. Also, real buttermilk freezes well, so if you have leftovers (since this recipe only uses 2 cups of buttermilk) freeze it in freezer trays for next time.
- The ratio: 1 Tablespoon of white vinegar or lemon juice to every 1 cup of regular whole milk.
- Mix and let stand for a few minutes. Stir again before using.
Does Irish Soda Bread come from Ireland?
- Research suggests that Soda Bread was first made in Ireland during the Irish potato famine, around the 1840s, when baking soda, which is a leavening agent, was initially introduced to Ireland. The round loaf was cooked over an open fire and marked with a deep cross or X slashed in the center of the loaf, which was believed to provide protection for the household.
- This traditional Irish Soda Bread recipe was handed down by my Irish maternal great-grandmother who usually added golden raisins to her bread. It’s always been my favorite Irish Soda Bread recipe.
Looking for more quick bread recipes?
Quick breads are so easy to make that you can have fresh bread, sweet or savory, anytime.
- Buttermilk Banana Bread is perfect for an easy snack and the chips are optional
- Blueberry Apple Bread is chock full of sweet berries
- Classic Zucchini Bread is a great on-the-go snack
- Pumpkin Bread brings all of the Fall flavors we love in one loaf!
- Our easy Beer Bread Recipe needs just 4-ingredients!


Irish Soda Bread Recipe
Ingredients
- 4 cups all purpose flour
- 1 Tablespoon baking powder
- 1 Tablespoon sugar
- 2 teaspoons salt
- 1½ teaspoons baking soda
- 8 Tablespoon butter, cold cut into small cubes (1 stick)
- 2 cups buttermilk, chilled
- 1 teaspoon coarse sea salt, optional for top of the bread
Optional Add-Ins – add up to 1 cup total
- 1 cup raisins, regular or golden
- 1 cup dried cranberries, cherries, or craisins
- 1 cup currants
- ⅓ cup caraway seeds
Instructions
- Preheat oven to 350°F. Make sure oven rack is in the middle of oven.
- Choose a pan:– 9-10" Cast Iron Skillet or other heavy bottomed pan– 9" Pie Dish– 8"-10" Dutch Oven panLightly grease the pan and sides of the pan
- In a large bowl whisk together flour, baking powder, sugar, baking soda, and 2 teaspoons salt.
- Cut very cold butter into small chunks and add to the flour mixture. Mix with a pastry cutter or 2 forks until crumbly. Do not overmix but be sure all of the pieces of butter are coated in flour.
- Add cold buttermilk in 3 batches and mix very gently with a rubber spatula or your hands each time. Again, do not overmix. Add raisins (or any other add-ins), if using. Dough should be shaggy and will be sticky.
- Sift a light amount of flour onto a cool flat surface, such as the counter or a large cutting board. Turn dough out and pat into a round ball. Flatten slightly with floured hands until you have a disk shape.
- Add dough to the prepared baking pan. With a serrated knife cut a large X across the top. Cut about 1/3 to 1/2 way through the bread.
- Sprinkle the top with optional coarse sea salt, if using.
- Bake for about 45 minutes. Check at the 25 minute mark and if bread is getting too dark on top tent loosely with foil.
- Bread is done when the X on top has lost its shiny look, a test skewer comes out clean, and the crust is dark golden brown. The internal temperature should be 200-205℉. Also, tap on the bread and if you hear a hollow, drum-like sound, your soda bread is done.
- Remove bread from the pan and let rest on a cooling rack for about 10 minutes. Slice bread with a serrated knife.
Notes
- Irish Soda Bread keeps, tightly wrapped, at room temperature for about 3 days, or frozen for 2-3 months. Be sure to cool completely before freezing and thaw at room temperature.
- Serve warm with herb butter
Nutrition
This quick bread is extra moist, easy to make, and will become one of your fall favorites!
Ready to get started? Just click the “jump to recipe” button just below or keep reading for more tips and ideas. This post may contain affiliate links. Please see our affiliate disclosure for more details. We only recommend products we love and use.
Jump to RecipeThis Pumpkin Bread recipe has been a family tradition for years. It takes me straight back to my mother’s kitchen. It warms the house with all the spicy aromas of your fall favorites.
The recipe has several steps and we always make sure to blend each ingredient as we go along. It will add to the process and take extra time but the end result is well worth the investment of your time.
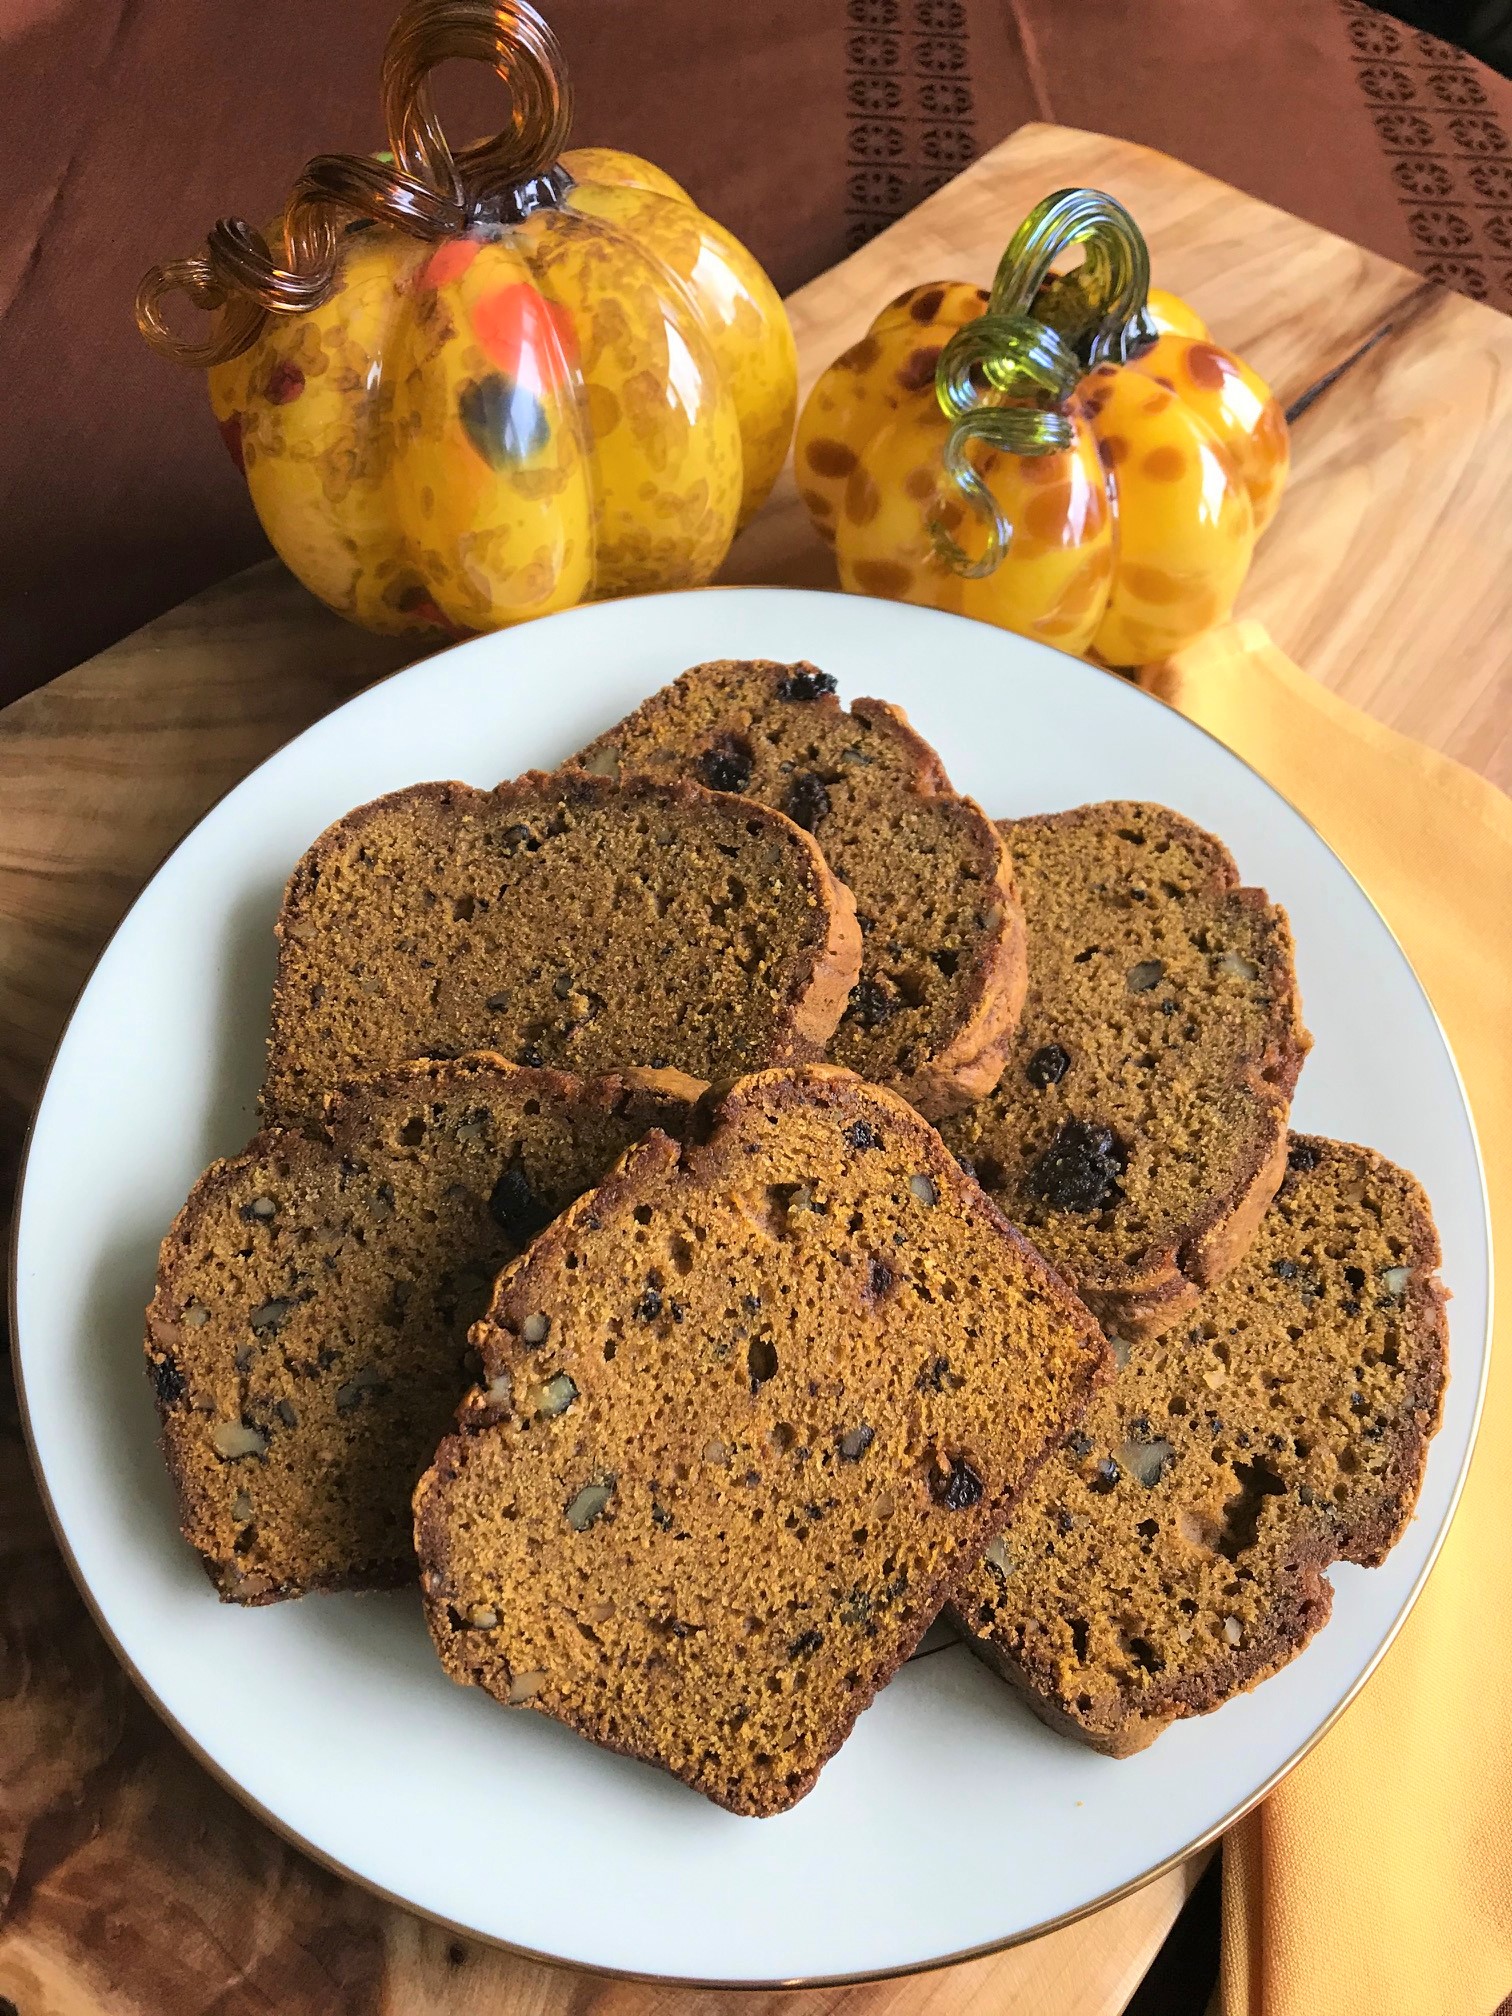
Ingredients for making our Pumpkin Bread Recipe
- Flour
- Baking Soda
- Allspice
- Cinnamon
- Salt
- Eggs
- Granulated Sugar
- Vegetable Oil
- 100% Pumpkin Puree
- Walnuts (optional)
- Raisins (optional)
How to make Pumpkin Bread Recipe from scratch
Step One:
- Grease and flour loaf pans, or line them with parchment paper. Grease and flour muffin tins, or use paper liners.
- In a large mixing bowl mix together flour, salt, baking soda, allspice, and cinnamon and set aside


Step Two:
- In a 5-6 quart mixing bowl beat the eggs.
- Add in sugar 1/3 at a time and blend completely before adding more sugar.
- Add vegetable oil 1/3 at a time and blend completely before adding more.
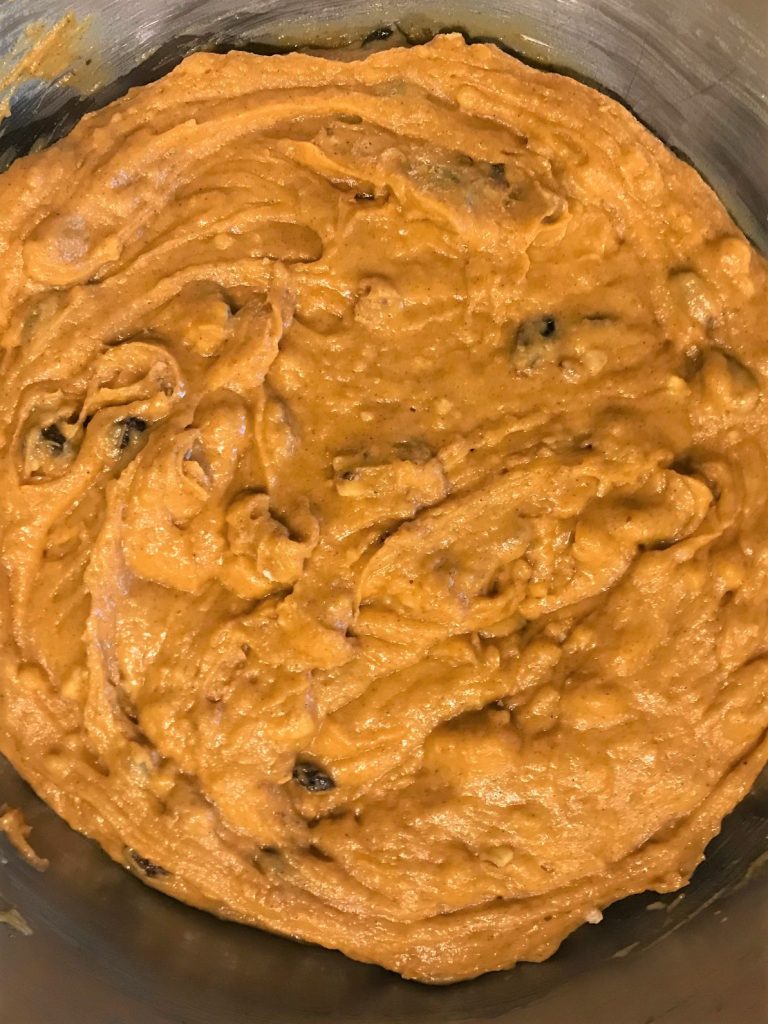
- Lastly, add pumpkin mixture 1/2 at a time, and blend thoroughly.


Step Three:
- Add flour mixture to pumpkin mixture 1 cup at a time.
- Blend thoroughly before adding the next cup of flour mixture.
- Repeat this step until both mixtures are well blended.
Step Four:
- Now you have the option of adding in the walnuts and raisins. Both are optional ingredients. We like them both and always add them. This is a personal preference.

This is where this recipe gets fun!
There are so many size options that everyone will find their favorite.
From large and small loaves to cakes or muffins, there is something for everyone!
This recipe will make these sizes:
- 3 regular-size loaves, plus 6 muffins
- 2 regular loaves, 3 mini loaves, plus 6 muffins
- The options are endless and it’s up to you as to what you want to make. I like making mini loaves to bring as hostess gifts. The muffins make a great breakfast on the run or afternoon snack.
How much batter to use:
- Regular size loaves – use 3 cups of batter
- Mini loaves – use 1 cup of batter
- Muffins – use 2 large tablespoons of batter


Bake all sizes at 350°F.
- Regular size loaves bake for 1 hour and 15 minutes
- Mini loaves bake for 45 minutes
- Muffins bake for 25 minutes
How do you know when the bread is done?
Test the loaves and muffins to make sure they are done cooking by using a wooden toothpick inserted into the center of the loaves. The toothpick should be clean when removed, but if not, add additional time to the baking process, a few minutes at a time until done.


What pairs well with Pumpkin Bread?
Wondering what to serve with your Pumpkin Bread? We like to mix it up depending on the time of day you serve the bread.
In the morning, we love to serve it next to our Pumpkin Spice Latte and spread on butter or cream cheese.
In the evening try serving with vanilla ice cream or with a touch of whipped cream. Spreading on some buttercream frosting would be delicious. Serve alongside our Pumpkin Spice Latte or Irish Coffees. They are excellent to serve all day long!


What is the best way to store Pumpkin Bread?
To Refrigerate:
- Once bread has fully cooled you should wrap the bread in plastic wrap.
- Bread can be stored at room temperature for up to 5 days.
- If you want to extend the life of the bread refrigerate it after 3 days.
- Store bread in the refrigerator for up to 7 days.
To Freeze:
- When freezing Pumpkin Bread double wrap the bread first with aluminum foil and then place it in a resealable freezer bag or air-tight container.
- Bread can be frozen for up to 3 months.
- When you are ready to serve let the bread rest on the counter to defrost. Once you have defrosted the bread unwrap it and bring to room temperature.
- Serve and enjoy.
How to serve Pumpkin Bread?
We love to serve our Pumpkin Bread with these spreadable sides.
- Salted butter
- Buttercream frosting
- Cream Cheese spread
- Orange Honey Butter
Need the perfect loaf pans? Here are the links to see the full-size loaf pan or the mini loaf pans that we use and love.
Other Easy Quick Bread Recipes:

Pumpkin Bread Recipe
Equipment
- regular size muffin tins, loaf pans – large (9"x5"x3") or Mini (5"x3")
Ingredients
- 5 ¼ cups flour
- 1 Tablespoon baking soda
- 1 Tablespoon ground allspice
- 1 ½ Tablespoon cinnamon
- 1 ½ teaspoon salt
- 6 large eggs
- 4 ½ cups sugar
- 1 ½ cups vegetable oil
- 1 29 oz can 100% pure pumpkin puree, (not pumpkin pie filling)
- 1 ½ cups walnuts, chopped, optional
- 1 cup raisins, optional
Instructions
- Preheat oven to 350° F.
- Grease and flour, or line with parchment paper, loaf pans. Grease and flour muffin tins, or use paper liners.
- In a large bowl combine flour, salt, baking soda, ground allspice, and cinnamon. Mix well and set aside.
- In a separate 6-quart bowl, beat eggs. Add in the sugar 1/3rd at a time and blend completely before adding more sugarAdd oil 1/3rd at a time and blend completely before adding more oil Next, add pumpkin 1/2 at a time and blend thoroughly.
- Add the flour mixture 1 cup at a time to the pumpkin mixture. Blend thoroughly between each addition and repeat until flour mixture is gone.
- Add in walnuts and raisins, if desired, and gently stir until well blended.
- Fill large loaf pans with 3 cups of batterFill mini loaf pans with 1 cup of batterFill muffins with about 2 Tablespoons of batter
- Bake the large loaves for 1 hour, 15 minutes. Bake mini loaves for 45 minutes. Bake muffins for 25 minutes.
- Test loaves or muffins with a wooden toothpick by inserting toothpick into the middle of each loaf, and make sure the toothpick is clean when removed. If not, add additional baking time, checking every few minutes until done, and toothpick comes out clean.
Nutrition
This blueberry bread is a quick bread that’s perfect for a delicious snack or an easy sweet breakfast. You can also easily make muffins using this recipe.
Quick breads, unlike regular breads, do not use yeast so you can prepare and have fresh bread in about an hour!
Ready to get started? Just click on our “Jump to Recipe” button just above. For tips, processes, and substitutions keep reading. This post may contain affiliate links. Please see our affiliate disclosure policy for details. We only recommend products to you that we love and use.
Ingredients needed

Dry Ingredients:
- Flour – regular all-purpose flour works best
- Baking Soda – needed to create soft and airy baked goods
- Baking Powder – provides the lift needed for a nice rise
- Cinnamon – optional, but highly recommended
- Salt – salt always balances the sweetness in baked goods
Wet Ingredients:
- Apples – Granny Smith or Honeycrisps are our top choice
- Sugar – Adds the sweetness needed for the perfect balance
- Vegetable Oil – or liquid coconut oil
- Egg – room temperature egg works best for even blending
Fruit and Nuts:
- Blueberries – fresh blueberries are our first choice but frozen fruit can be used (don’t thaw)
- Walnuts – optional, or use any sturdy nuts, such as pecans

How to make Blueberry Quick Bread
When you are mixing this blueberry bread recipe together the batter will seem quite thick, but this is normal (trust us!). The moisture from the apples will be released during cooking and will create a great texture and plenty of moisture.
- Preheat oven to 350˚F.
- Prepare a 9″ x 5″ loaf pan by coating it well with non-stick spray, and lining it with parchment paper if desired. (See below for tips on lining a pan with parchment paper)
- Roughly chop the nuts, if using (note: our photos do not include nuts)
- Whisk dry ingredients together and set aside – flour, cinnamon, baking soda, baking powder, and salt
- Whisk sugar, oil, and egg together in a large bowl
- Peel the apples and cut them into 1/2-inch pieces – they don’t need to be perfectly cut


- Add peeled, chopped apples to the bowl and mix to coat
- Add dry ingredients to the bowl and stir just until combined. Do not overmix!
- Gently stir in blueberries (and nuts, if using)


- Pour the batter into the prepared loaf pan. It will be about 3/4 full. Alternately, fill greased, lined muffin tins 3/4 full


Baking
- Bake the bread for about 50-60 minutes at 350°F.
- Check bread at 35-minute mark and if the top of the bread is beginning to brown too quickly loosely cover it with aluminum foil
- NOTE: Loaf breads are dense and can take a while to bake in the oven. Baking times can vary, so keep an eye on the bread. The bread is done when a toothpick inserted in the center comes out mostly clean. A few moist crumbs are okay.
- Quick bread is done when the internal temperature on a thermometer reaches 200-205 ˚F
- Muffin cooking time will vary depending on the size of your muffin tins. Start with 18 minutes and test from there. Cool in the pan for 10 minutes and then remove from the tins.
- Cool bread for about 1 hour in the pan and then remove to finish cooling on a cooling rack.

Add-in Ideas
- This blueberry quick bread can also be made with cranberries instead of blueberries, which is beautiful for the holidays.
- Any berry can be substituted 1:1 for the blueberries, so feel free to make your own special version with blackberries or raspberries. If you use strawberries be sure to cut them into smaller pieces. Try a combination of berries for a fun version.
- Sprinkle coarse sugar on top of the bread halfway through cooking for a sparkly crunchy top coat.

Best Apples for Blueberry Loaf Bread
- We recommend using Granny Smith or Honeycrisp apples because they have a balance of sweet and tart flavors that won’t break down in the cooking process. They hold up well in the heat.
- Try mixing in Fuji or Gala apples if you like a sweeter taste.
Storing and Freezing
- STORING: The apples in Apple Blueberry bread will keep it moist for nearly a week but it’s best within 4 days. Keep the bread tightly sealed. You can also store it in the refrigerator.
- FREEZER: Once cool wrap tightly with foil and place in an airtight container or bag. Can be frozen for up to 3 months. To thaw, remove from freezer and allow to come to room temperature before serving.
How to line a loaf pan with parchment paper
If you line your loaf pan with parchment paper it will be so much easier to remove the whole loaf, once it is cooled. Parchment paper is magical!
Spray the pan well with non-stick spray or brush with oil before putting the parchment inside.
- Measure your loaf pan lengthwise
- Cut a piece of parchment paper to match the length of the pan
- The rectangular pieces should be long enough to cover the bottom of the pan and hang over the sides of the pan. These are the “handles” to use when you want to pull the bread out of the pan
- Coat the parchment with non-stick spray again
- See below for a photo of the pan lined with parchment

How to make individual small loaves or muffins
- INDIVIDUAL: Grease and line each pan with parchment paper just as you would do with a full-size pan. Fill each pan 3/4 full and cook 25-35 minutes, depending on the size of your pan
- MUFFINS: Grease pans or line with cupcake papers. Fill tins 3/4 full. Check for doneness at 18 minute mark
Other easy bread recipes to try
- Classic Zucchini Bread
- Pumpkin Quick Bread
- Blueberry Lemon Scones
- Beer Bread and Beer Bread Dinner Rolls
- Irish Soda Bread with no Yeast
- Buttermilk Banana Bread


Blueberry Apple Bread
Equipment
- Loaf pan or muffin tin
Ingredients
- 1½ cup flour
- 1 teaspoon baking soda
- 1 teaspoon cinnamon
- ½ teaspoon baking powder
- ½ teaspoon salt
- 2 cups apples, peeled and chopped into 1/2" dice Honey Crisp or Granny Smith recommended
- ¾ cup sugar
- 2 Tablespoon vegetable oil
- 1 large egg
- 1 cup fresh blueberries, or cranberries
- ½ cup walnuts or pecans, roughly chopped, optional
Instructions
- Preheat oven to 350°F. Place oven rack in center of ovenGrease a 9" x 5" loaf pan by coating it well with non-stick spray, and line it with parchment paper, if desired.
- In a medium bowl whisk together flour, baking soda, baking powder, cinnamon, and salt. Set aside
- In a large bowl mix sugar, oil, and egg until smooth. Stir in apples and gently mix well to coat the apples.
- Add flour mixture, stirring just until combined and no streaks of flour remain. The batter will be thick, like a scone batter. This is normal because the apples will give off moisture during baking.
- Gently stir in blueberries and nuts (if desired), just to coat. Do not overmix.
- Spread batter evenly into the prepared pan.If using small individual pans fill about 3/4 full.
- Bake for 50-60 minutes, or until a toothpick inserted in the center comes out clean. Check at the 30-minute mark and if the top of the bread is browning too quickly in the oven, loosely cover it with aluminum foil.The internal temperature of finished quick bread is 200-205 ℉
- Remove from the oven and cool completely before cutting and serving.
Notes
- If making muffins, fill tins about 3/4 full.
- Baking time will vary depending on the size of your muffin pan. Begin to check for doneness at 18 minutes.
- Fill each pan 3/4 full and cook 25-35 minutes, depending on the size of each pan
- Cool the bread completely
- Wrap tightly in plastic wrap or store in an airtight container on the counter for 3-4 days
- To Freeze – wrap and store in a freezer bag or airtight container for up to 3 months. Thaw at room temperature.
Nutrition
Like many baked goods the addition of buttermilk is the secret ingredient
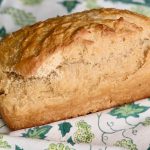
There are so many banana bread recipes out there but this one is my all-time favorite go-to recipe because it’s easy, super moist, and full of flavor. This perfect banana bread stays moist for days, although it’s usually eaten sooner in my house!
This post may contain affiliate links. Please see our affiliate disclosure for more details.
Ingredients for Buttermilk Banana Bread
Banana bread is a “quick bread”, meaning no yeast or rise is necessary. The addition of buttermilk in this recipe makes a moist banana bread but is also necessary because the acid in the buttermilk reacts with the baking soda and baking powder to give the bread a lift. The tang of the buttermilk gives it extra flavor, as well.
- Sugar – we use white sugar, but you can sub in brown sugar too
- Eggs (2) – room temperature eggs work best
- Bananas (3) – use ripe, spotty bananas because overripe bananas have more flavor
- Buttermilk – none on hand? No problem because you can make your own (see below)
- Vegetable Oil – just 1 Tablespoon is all you need – you can also use coconut oil
- Vanilla Extract – every baked good is better with pure vanilla extract, right? We make our own homemade vanilla with just 2 ingredients
- All-purpose Flour – gluten-free 1:1 works if needed
- Salt – just a pinch but it helps balance the sweetness
- Baking Powder and Baking Soda – both for a lighter fluffier bread
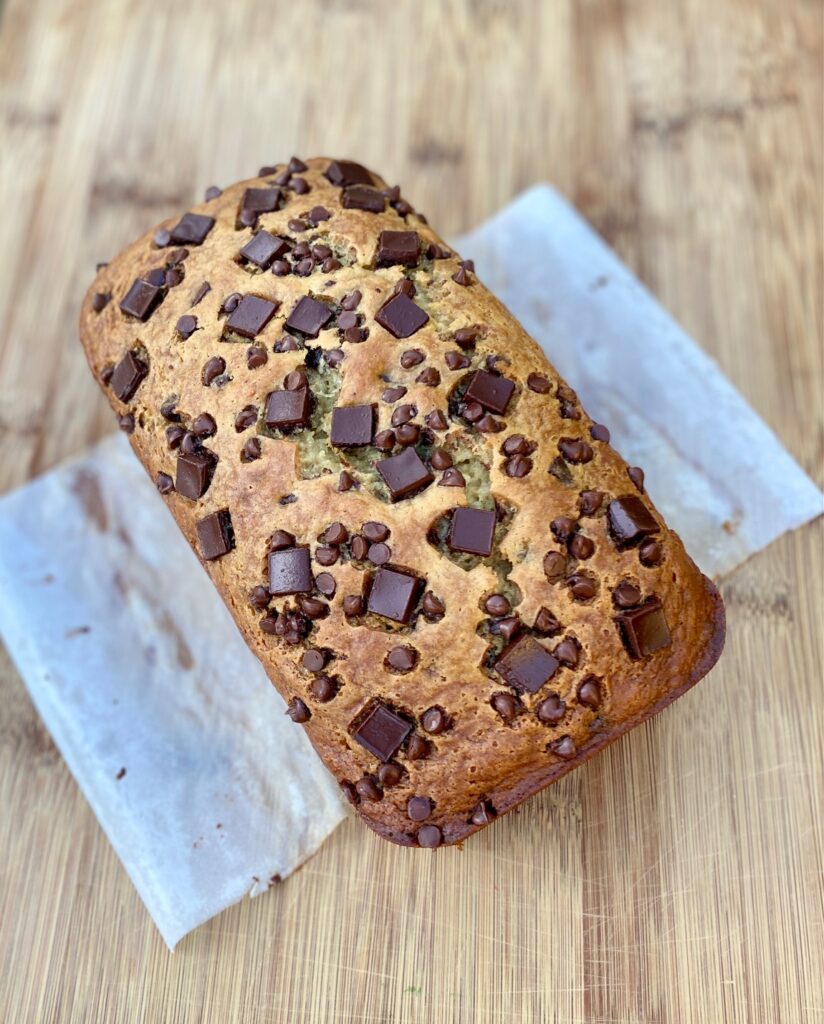
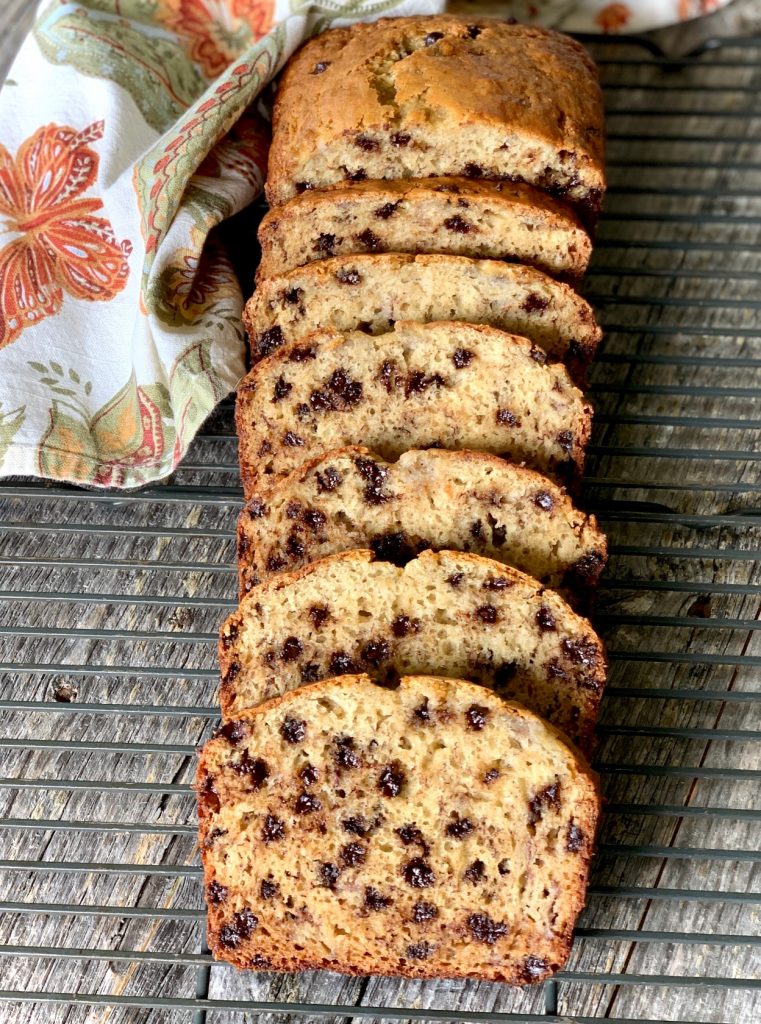
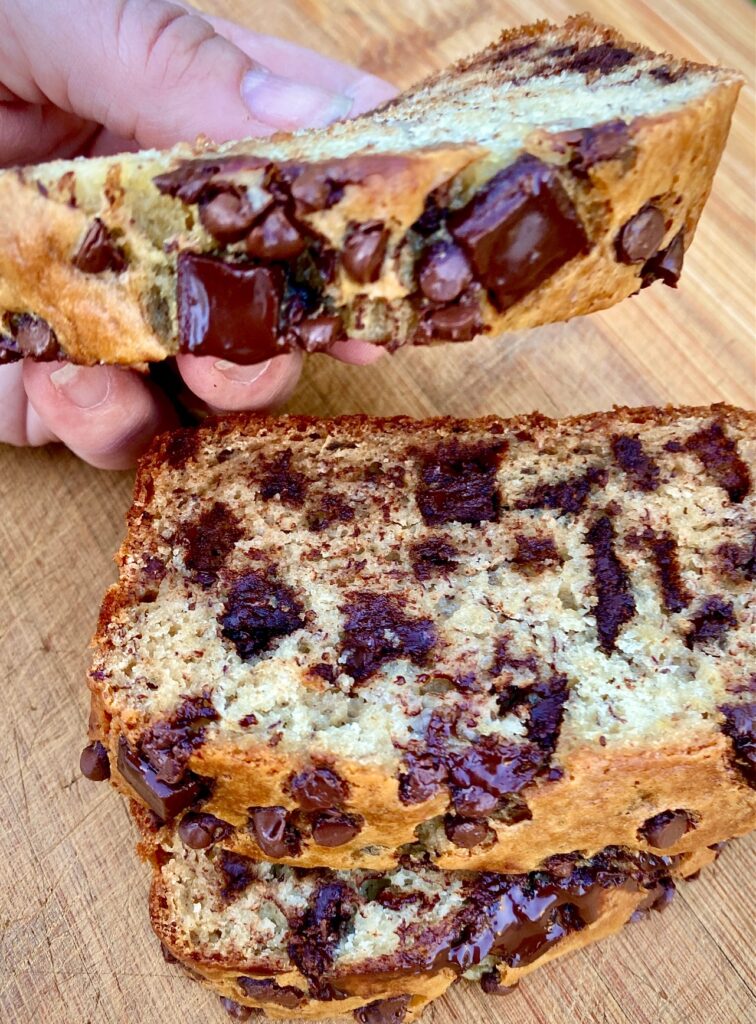
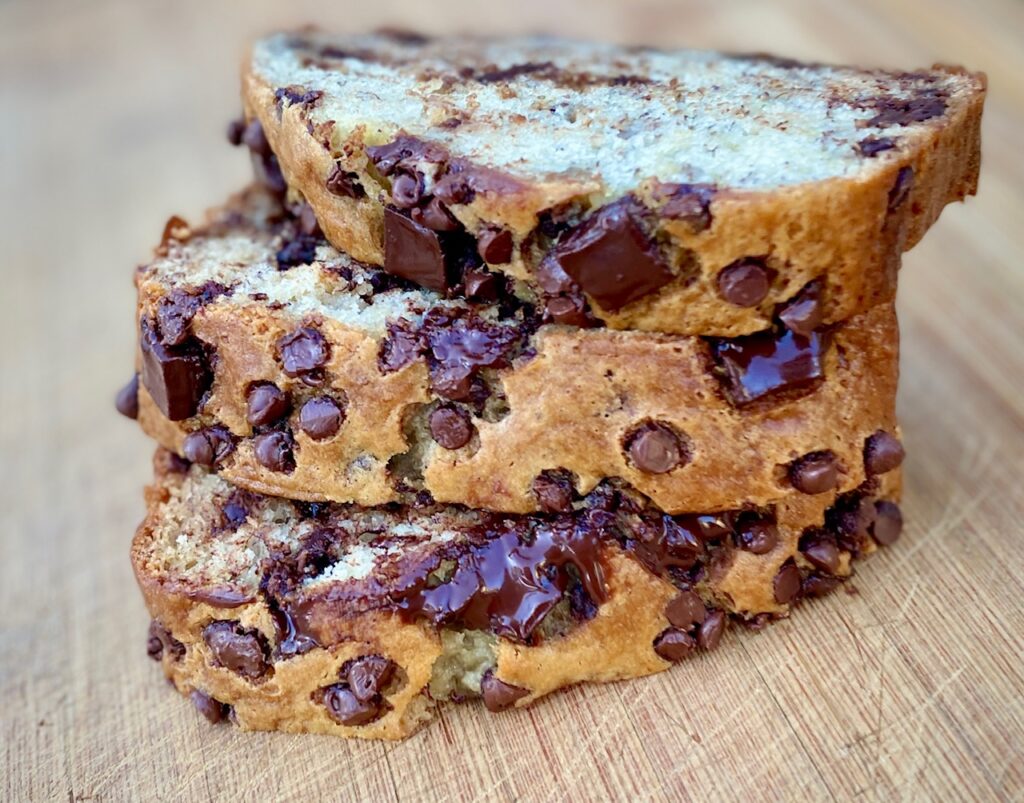
- Chocolate Chips or Chunks – or both! Optional, but delicious!
- Pecans or Walnuts – optional
How to make Banana Bread
- The key to making fluffy quick breads is do not overmix or overbake. Mix just enough to combine all of the ingredients. Otherwise, you will develop too much gluten, which can result in less tender bread.
- When adding extras, like nuts or chocolate chips, add them at the end and gently mix to combine.
The steps for quick bread recipes are nearly always the same and this bread is no exception:
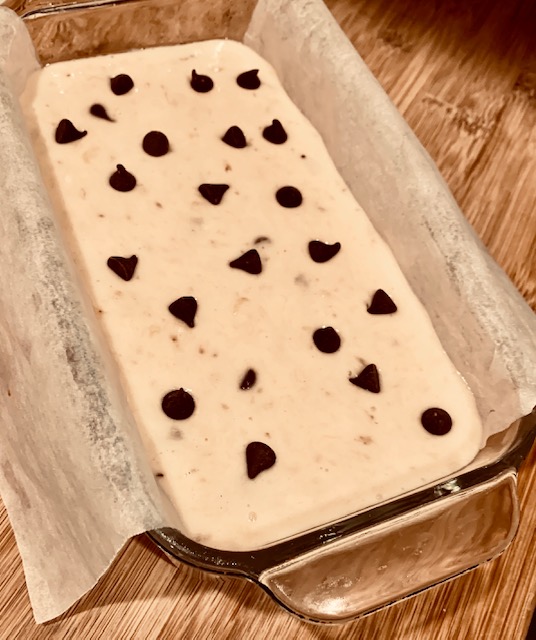
- PREHEAT OVEN: Preheat oven to 325°F. Lightly grease a 9″x5″ loaf pan. Line with parchment paper with sides overlapping, if desired.
- MIX: Combine sugar and eggs in a large bowl and beat until light and creamy with an electric mixer. This will take about 5 minutes and it’s important that you don’t skip this step
- DRY INGREDIENTS: Sift all of the dry ingredients together in a separate bowl
- BLEND: To the butter-sugar mixture add mashed bananas, buttermilk, oil, and vanilla extract
- FOLD: Gently fold in the dry ingredients into the wet ingredients and mix just until blended
- OPTIONAL CHIPS AND NUTS: Add in additional optional ingredients
- BAKE: Pour batter into the prepared bread pan and bake until the top springs back when touched and a skewer inserted in the middle of the bread comes back clean, about 55-65 minutes. The top should be golden brown.
- COOL: Allow the bread to cool in the pan on a wire rack for 30 minutes before removing it. If the pan was lined with parchment it’s easy to remove by grasping the parchment paper handles and gently pulling the bread out. Let cool completely before slicing
Tips for prepping the pan
- Lining the pan makes it easy to remove the cooled bread. Use a strip of non-stick parchment paper to line the pan and overlap it to use as a handle. You can easily pull the whole loaf out once cooled. See below for example.
- If you don’t have parchment paper generously grease the pan with non-stick spray, canola oil, or coconut oil.
Add-In Ideas for Banana Bread
- Chocolate Chips or Chunks – regular or mini chips, chocolate chunks, or a combo of all of these for variety
- Walnuts or Pecans – lightly chopped
When my kids were small I started adding chocolate chips as an enticement to get them to try my original recipe for banana bread and it was an instant hit. Even though my boys are teenagers now they still want chocolate chip banana bread, so the chips aren’t really optional in our house!

Need a buttermilk substitute?
In case you don’t have buttermilk on hand it’s easy to make a substitution:
- The ratio: 1 Tablespoon of white vinegar, cider vinegar, or lemon juice to every 1 cup of regular whole milk.
- Mix together and let stand for a few minutes to make 1 cup buttermilk
The best type of bananas to use
- SPOTTY, RIPE, BROWN BANANAS: One of the great things about buttermilk banana bread is that you can use up bananas that have passed their prime. In fact, the bread is better with overripe spotty bananas because they mash perfectly and have a deep sweet banana flavor.
- CHEFS TIP: peel and freeze bananas when they’ve reached the spotty stage and defrost before using them. I store them in quantities of 3 so they are already ready for this recipe.
Tips for making the best banana bread
- Do not over-mix the batter. The more you mix the more the gluten develops. Overmixing will result in a dense, rather than a fluffy loaf.
- Test for doneness by inserting a skewer in the center of the bread. If the skewer comes back clean the bread is cooked. If you have an instant-read thermometer the bread should have an internal temperature between 200-205℉.
- If the top begins to brown too quickly loosely cover it with aluminum foil as it finishes baking.
- Let the bread rest for 30 minutes before removing it from the pan to let it cool completely.
- Most “quick breads” will crack on the top during baking, which is OK!
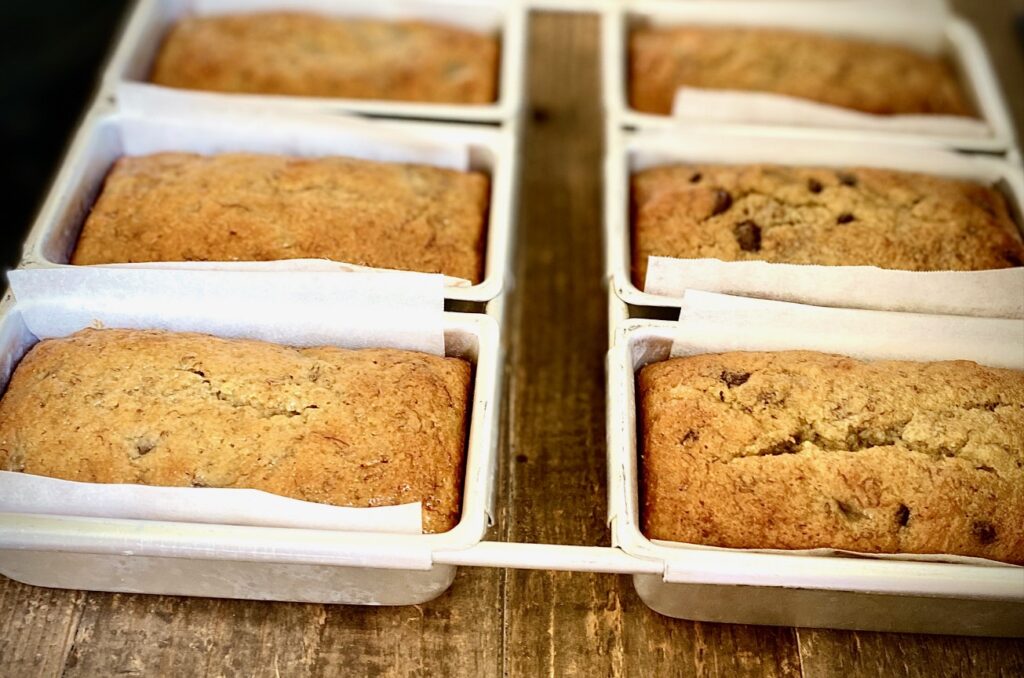
How to make small Banana Bread loaves
- All “quick breads” are perfect for mini loaf pans. The only adjustment you will need to make is the baking time.
- We used a pan that makes 6 small loaves and the baking time is 30-35 minutes.
- Mini bread loaves freeze beautifully (see below for freezing instructions)
How to Store Banana Bread
- Cool the bread completely
- Wrap tightly in plastic wrap
- ROOM TEMPERATURE: Store on the counter for up to 4 days
- FREEZE: tightly wrap and store in a sealed bag or airtight container, for up to 6 months. Allow bread to thaw on the counter before slicing and serving
- We don’t recommend storing it in the refrigerator, as that will dry the bread out quicker
Looking for other quick bread recipes to try?
- Blueberry Apple Bread
- Classic Zucchini Bread
- Pumpkin Nut Bread
- 4 Ingredient Beer Bread & Dinner Rolls
Buttermilk Banana Bread with Chocolate Chips
Equipment
- 9" x 5" Loaf pan
Ingredients
- ¾ cup sugar
- 2 large eggs
- 3 medium ripe bananas, well mashed
- ⅓ cup buttermilk (room temperature)
- 1 Tablespoon vegetable oil
- 4 teaspoons vanilla extract
- 1 ¾ cups All-purpose flour
- 2 teaspoons baking powder
- ½ teaspoon baking soda
- ¼ teaspoon salt
- ¾ cup chocolate chips or chunks
- ½ cup pecans, roughly chopped, optional
Instructions
- Preheat oven to 325°F. Lightly grease a 9"x5" loaf pan. Optional: Line with parchment with sides overlapping.
- Sift together flour, salt, baking powder, and baking soda. Set aside
- In the bowl of an electric mixer; add sugar and eggs and beat for about 5 minutes until thick and light in color.
- Mix in mashed bananas, buttermilk, oil, and vanilla. Blend until well combined.
- Add flour mixture and mix until just combined. Do not overmix. Gently fold in chocolate chips and nuts, if using, with a rubber spatula.
- Transfer batter to prepared pan. Bake bread on the middle rack of the oven, until golden brown on top, for about 1 hour. Test for doneness by inserting a toothpick into the center. If it comes out clean the bread is done. If you have an instant-read thermometer the bread should have an internal temperature between 200-205℉.
- Let the bread cool on a cooling rack for about 1 hour. Lift the bread from the pan by using the parchment paper as handles. Cut into 12-14 slices.Store, covered, at room temperature for up to 3 days.
Notes
- Calorie count does not include optional nuts
- Use chocolate chunks, chips, and mini chips for a variety
- This bread blends best if the buttermilk is close to room temperature
- Store at room temperature for up to 4 days, or freeze, tightly wrapped for up to 6 months
- If making mini loaves be sure to adjust the baking time accordingly