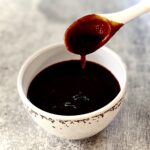
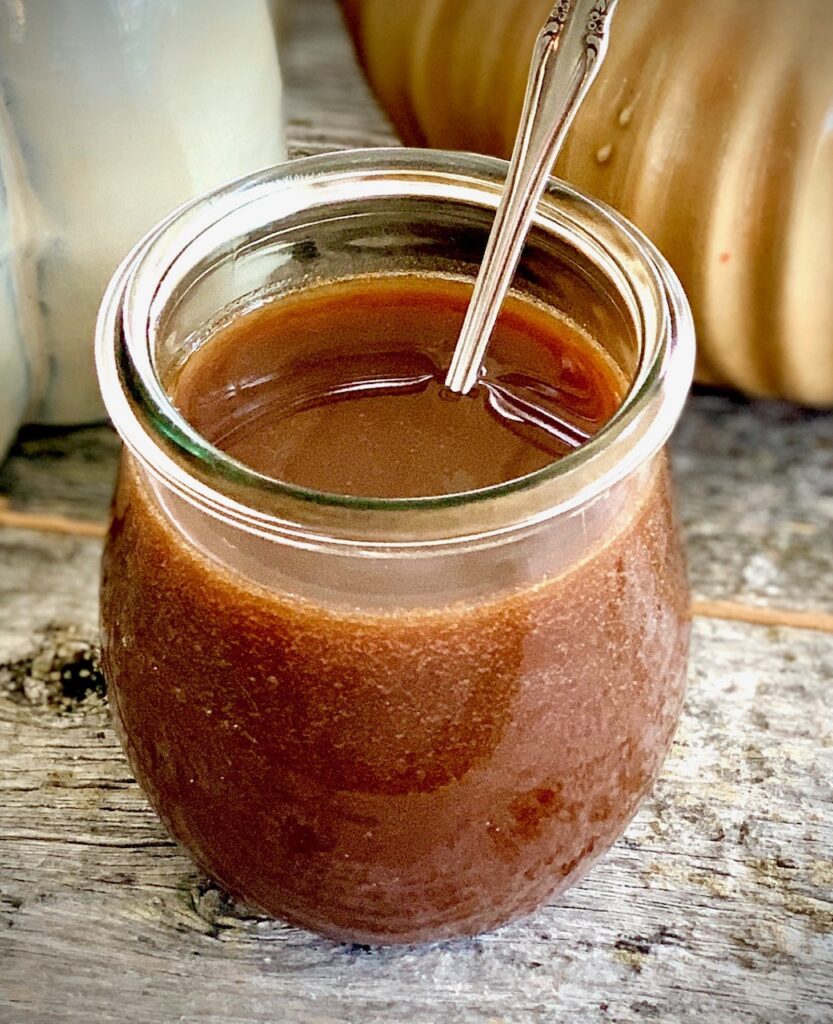
Quickly make your own BBQ sauce with (mostly) basic pantry staples. It only takes 15 minutes from start to finish to create a big, sweet, sassy sauce!
We love to slather this sauce on EVERYTHING including our fall-off-the-bone Oven Baked Ribs, Slow Cooker Ribs, Oven Baked Chicken Wings, and Slow Cooker Pulled Chicken
This post may contain affiliate links. Please see our affiliate disclosure for more details.
Ingredients Needed
The beauty of homemade sauce is that you know what’s in it and it’s a great way to steer clear of added preservatives. Even the best grocery store sauces have high fructose corn syrup. This zesty sauce is prepped in 5 minutes!
You don’t need a lot of ingredients or a secret ingredient for the best BBQ sauce.
For the full recipe, ingredient quantities, and nutritional information refer to the printable recipe card below.
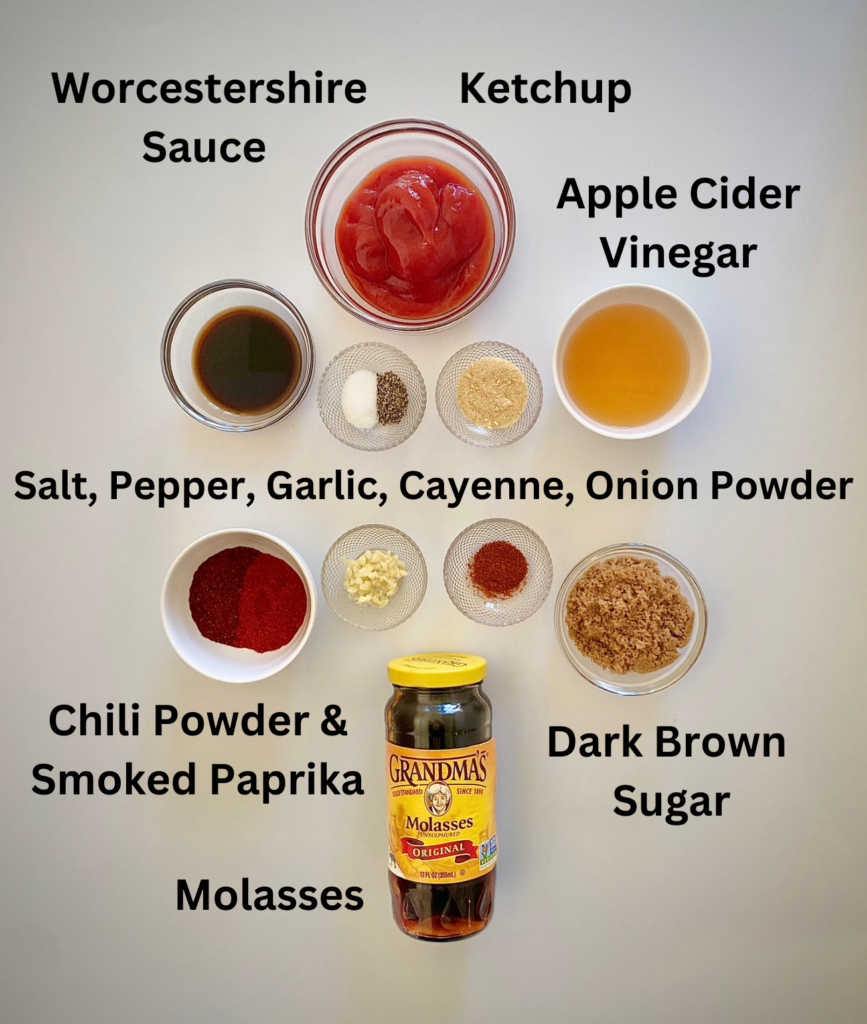
- Ketchup – this is the tomato base for the sauce
- Molasses – we like unsulphered molasses, and use it in our Easy Baked Beans too. It adds sweetness but also a warm, earthy, and slightly smokey flavor. If needed, substitute maple syrup which will lend a lighter flavor, no smokiness, and produce a sweeter sauce.
- Dark Brown Sugar – adds a caramel note to the sauce.
- Apple Cider Vinegar – gives the sauce a slightly fruity and tangy flavor that pairs well with the smoky savory elements of barbecue sauce
- Worcestershire Sauce – you could substitute soy sauce if needed
- Spices: chili powder, smoked paprika, onion powder, salt, and black pepper
- Garlic – freshly minced (garlic powder works in a pinch)
- Cayenne Pepper or Hot Sauce – optional, if you want medium heat in your sauce
- Liquid Smoke – an optional ingredient if you want a bigger smoky barbecue sauce. (We don’t use it but that’s just our personal taste)
How to make Homemade BBQ Sauce
This is an easy one-pan sauce that takes so little time and comes together quickly.
- In a medium saucepan whisk together all of the ingredients: ketchup, molasses, dark brown sugar, apple cider vinegar, Worcestershire sauce, chili powder, minced garlic, paprika, onion powder, salt, pepper, and if using, add liquid smoke and/or hot sauce.


- Once blended cook over medium heat until the sauce comes to a simmer. (Taste to see if you want to add more hot sauce or cayenne for a spicy BBQ sauce).
- Cover and cook for 5 minutes.
- Uncover, whisk, cover, and cook for an additional 7-8 minutes or until the sauce reaches a thick but pourable consistency.
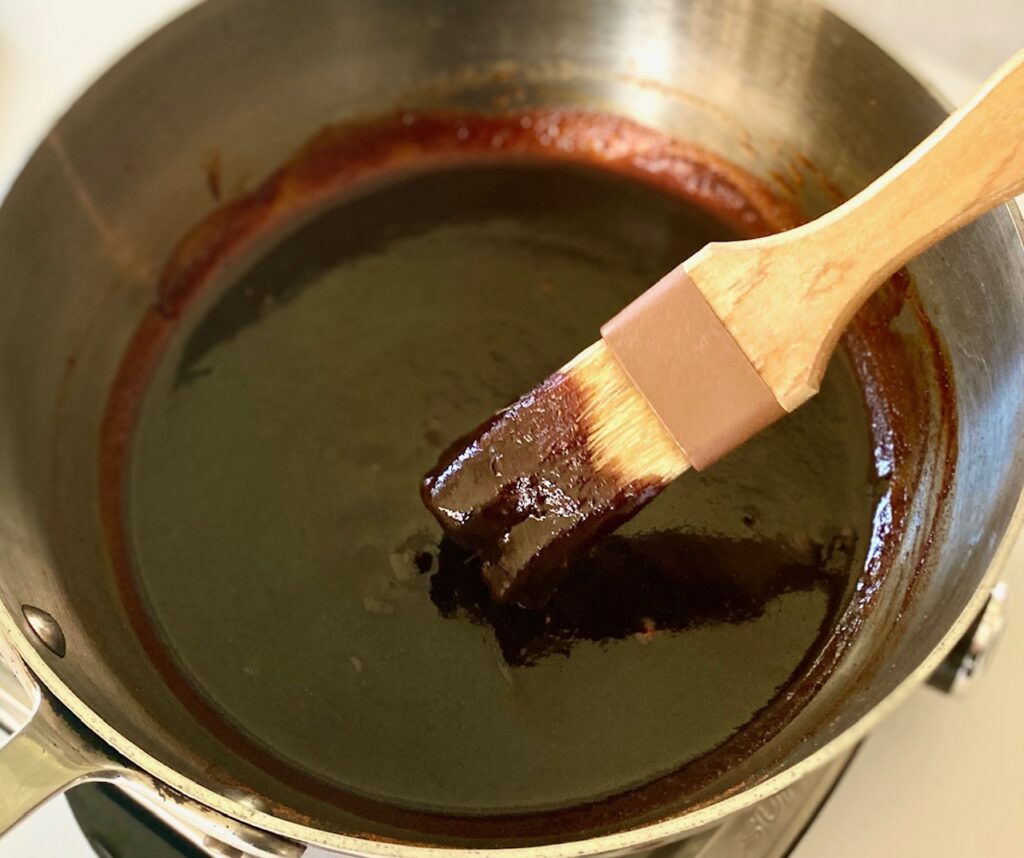
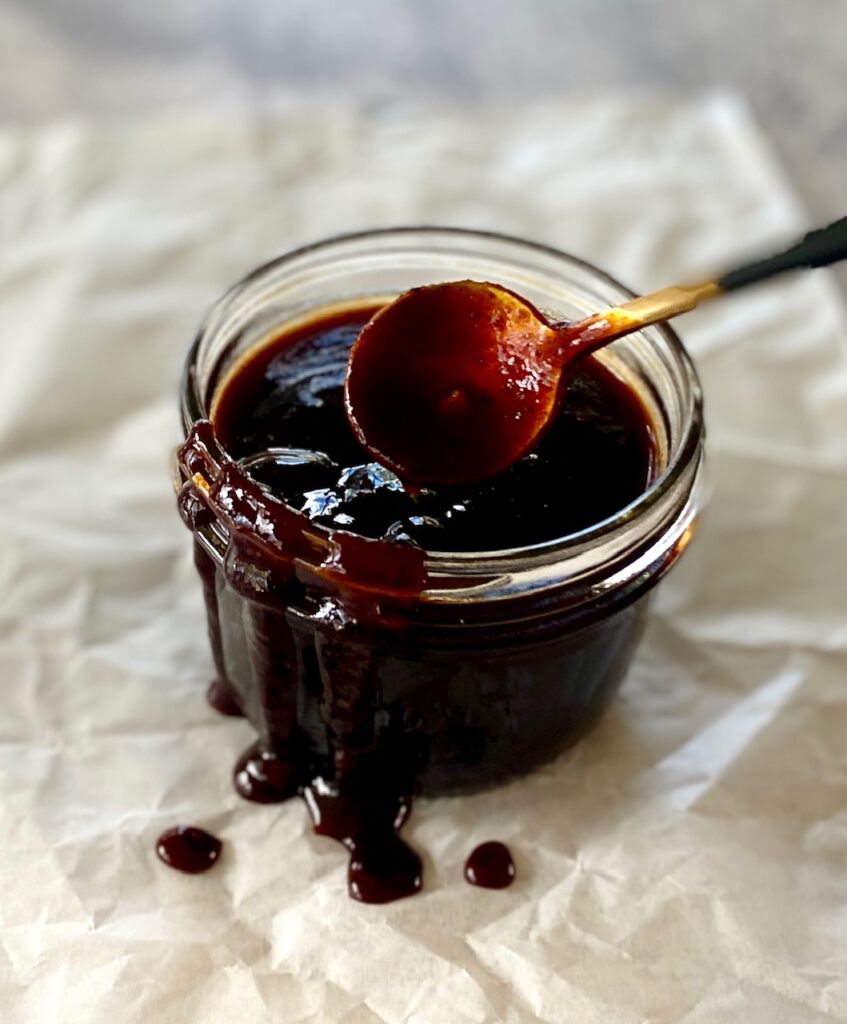
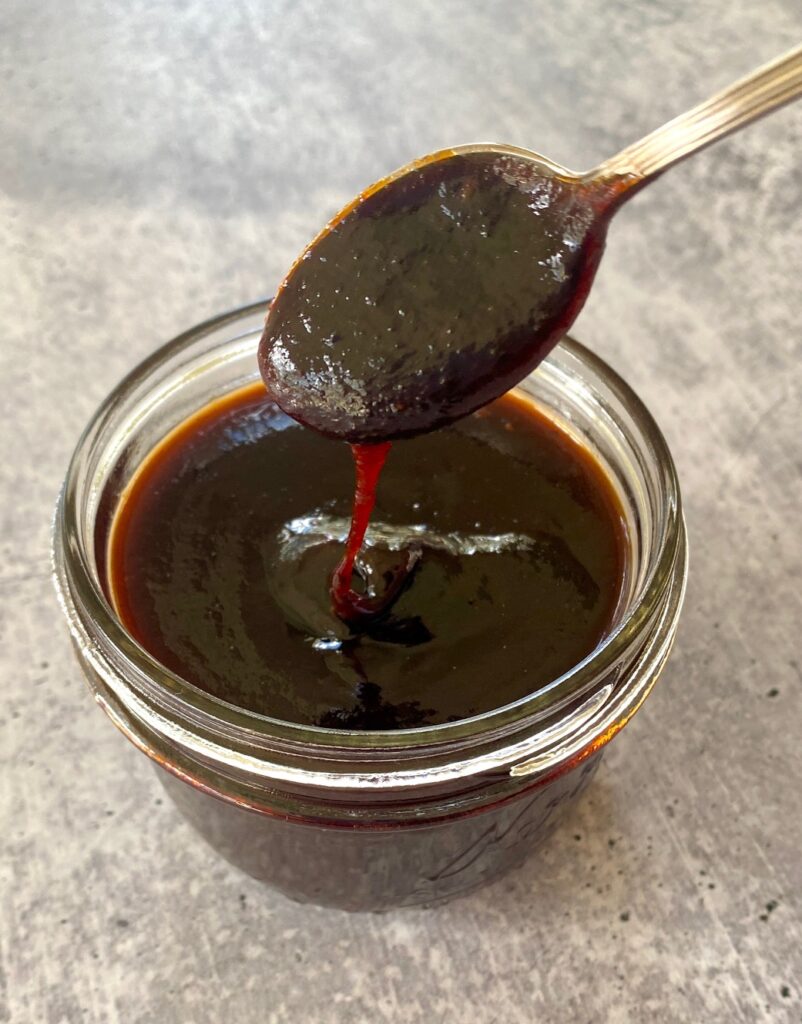
- Remove from the heat, whisk again, and use right away, or let the sauce cool if using later.
- Brush it on everything!
- Makes about 2 cups of sauce.
Make Ahead and Storage
- This sauce can be made ahead and stored in the refrigerator for about 2 weeks or in the freezer for 3 months. Thaw frozen sauce in refrigerator before using. (The next time you make a batch of pulled pork or pulled chicken it’s ready to go!)
- Once the sauce is cooled to room temperature put it in an airtight container or a tightly sealed glass mason jar
- This homemade barbeque sauce recipe can be rewarmed over low heat before using it.

You can “water bath can” your own homemade BBQ sauce
- Water bath canning is a simple process that can extend the life of your BBQ sauce for future use. It also makes a wonderful homemade gift idea.
- Notes for canning BBQ sauce: Place jars in hot water. Heat to medium-high, place the lid over the canning pot and bring water to a rolling boil. Process pint jars for 20 minutes, adjusting for altitude. Refer to the full instructions on our step-by-step process for Water Bath Canning.
- Sauce can be stored in a cool, dark space for up to 6 months.
Variations and substitution ideas
- Use maple syrup instead of molasses
- Love a sweet sauce? Skip the hot sauce or cayenne
- Instead of Worcestershire sauce use soy sauce or coconut aminos
- If you use light brown sugar the sauce will still be delicious but a bit lighter in flavor
- For a smoky BBQ sauce add liquid smoke or blackstrap molasses
Best ways to use this easy BBQ sauce
Like all great recipes, this Kansas City-style sauce has many great uses!
- Perfect on any kind of beef or pork ribs
- Great on BBQ Chicken Pizza
- Makes a delicious dipping sauce for french fries or chicken wings
- Slather it on a pork tenderloin, pork chops, or chicken
Chef’s Tip on BBQ Brushes: Use separate brushes for your barbecue needs because they tend to retain some of the smokey flavor. (You don’t want your pastries or garlic bread to taste like BBQ!). We like a wooden handled brush with natural bristles or a silicone brush.
Other great sauces and rubs for meats
- This zesty Dry Rub for Ribs is a great first layer of flavor that pairs well with this sauce
- Teriyaki Sauce is a reader favorite and is also ready in just 15 minutes
- Pork and chicken always taste better with Sweet Chili Sauce
- Chimichurri Sauce is an easy, fresh, herb-flavored sauce that works with chicken and steak
- Classic Italian Gremolata Sauce is made with fresh lemon zest, parsley, and minced garlic. It’s a great topping for vegetables, steak, and seafood.
Homemade BBQ Sauce
Ingredients
- 1 cup ketchup
- ⅓ cup molasses
- ¼ cup dark brown sugar
- 4 Tablespoons apple cider vinegar
- 2 Tablespoons Worcestershire sauce
- 1 Tablespoon chili powder
- 2 teaspoons smoked paprika
- 1 teaspoon garlic, minced
- 1 teaspoon onion powder
- ½ teaspoon salt
- ½ teaspoon black pepper, freshly ground
- 1 pinch cayenne pepper, optional
- 1 teaspoon liquid smoke, optional
Instructions
- In a medium saucepan stir together all of the ingredients: ketchup, molasses, dark brown sugar, cider vinegar, Worcestershire sauce, chili powder, minced garlic, paprika, onion powder, salt, pepper, and if using, liquid smoke and cayenne/hot sauce.
- Heat over medium heat and bring to a simmer. Cover and let cook for 5 minutes on a low simmer, stir, cover again and, cook another 7-8 minutes, or until thickened.
- Remove from heat, stir, and use immediately.If not using right away, cool the BBQ Sauce to room temperature, pour it into a sealed glass container, and store it for up to 2 weeks in the refrigerator.
Notes
- This recipe makes about 2 cups of BBQ Sauce
- Want it spicier? Add a little more cayenne
Nutrition
Building the perfect cheese board is a lot of fun because no two really ever really need to be the same. This is a great time to get creative!
We will walk you through the building blocks and help you create a party showpiece that is simple yet elegant.
This is an easy and stress-free appetizer to assemble and you just need a small amount of each for a beautiful platter. Having a variety of colors and textures is the key.
There is no ‘best’ way to create the perfect cheese board but here are a few different ideas and the building blocks you need:
Jump to Recipe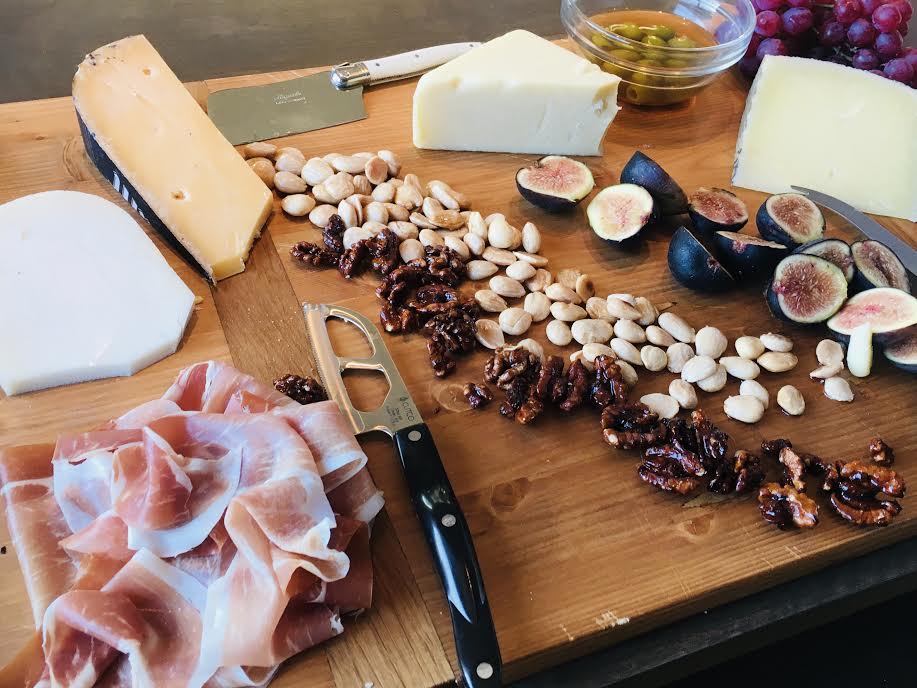
Building blocks of a great cheese tray:
These are the basics and we’ll get more specific below.
- The Platter – Get creative based on the size of your party. We love a wooden board because guests are comfortable cutting on it, but any beautiful flat surface will do!
- Small knives – Use a sharp knife for hard cheeses and another knife for soft cheeses
- Cheeses – The star of the show! Variety is the key but you only need small pieces
- Meats – Optional if you want a heartier board. 2 or 3 varieties are the perfect amount
- Spreads – Put these in small bowls to give the platter some height – be sure to add a small spreading knife or spoon
- Crackers and Bread – There are so many choices so, again, look for texture and variety
- Fruits and Nuts – Adds color and ties it all together
Ready to get started creating the perfect Cheese Board for your next party?

What is needed for a cheese board:
Grab this list and head to any grocery to find your favorites.
Here is what we suggest you include. Be sure to adjust based on party size:
- 1-2 hard varieties of cheese – choices include: cheddar, gouda, small bits of Parmesan, Manchego, and Swiss. Buy a block and cut some in slices and some in chunks for great visual variety
- 1-2 soft cheeses – goat cheese, Boursin, brie, Camembert, fontina
- 1 pungent cheese – such as Blue or gorgonzola
- 2-3 meats – cured thinly sliced favorites include: genoa salami, prosciutto, and speck
- Fresh or dried fruits – green or red grapes, any type of berries, apples, pears, cherries, nectarines, figs
- A few handfuls of nuts – we like pistachios, Marcona almonds, candied pecans, and cashews
- Olives – it’s fun to get some green and some dark olives for color contrast
- Crackers and Bread – it’s great to have 2-4 types on the board. We like rosemary crackers, parmesan crackers, and crunchy pita crackers. Sliced sourdough or French baguette work perfectly
- Savory and/or sweet spreads – Black Olive paste, Cherry tomato paste, fig jam, black cherry jam, honey, or oven dried tomatoes packed in olive oil are great options
- Artichoke Hearts – Optional. Choose small quartered hearts packed in olive oil
Want to learn more about cheeses? We love this guide.

One of the great things about building a perfect cheese board is that it’s easy if you have most of the staples on hand and just need to fill in a few pieces.
Many upscale groceries sell small wedges of cheese which allows for a good variety on your cheese platter. Keep a few varieties of crackers, nuts, and olives on hand in the pantry and refrigerator for a fast last minute party appetizer.

Helpful Hints
- To make it easier for your guests, precut some hard cheeses and cut the brie into wedges. This makes it simple for guests to grab a slice off of the board.
- The cheese platter can be made in advance, with the exception of the crackers, bread, and nuts, wrapped in foil or saran wrap and refrigerated.
- Before serving add the crackers, breads, and nuts. (If added and refrigerated ahead of time they will get soft, stale and soggy)
- Cheese tastes better at room temperature, so remember to bring your cheese out of the refrigerator about 30-minutes ahead of serving.
- Aim for 3-5 cheese for a party platter

How to Make a Cheese Board
Equipment
- 1 large platter
Ingredients
- 8 ounces Hard cheeses, sliced gouda, cheddar, manchego, parmesan
- 8 ounces soft cheeses, brie, fontina, Boursin, goat
- 4 ounces pungent cheeses, blue or gorgonzola
- 2-3 ounces nuts cashews, pistachios, pecans, Marcona almonds
- 2 ounces olives
- 3-4 ounces meats, thinly sliced prosciutto, salami, speck
- 1 ounces dried fruit cherries, cranberries
- 1 handful berries or cherries
- 3 ounces spreads fig jam, olive paste, oven dried tomatoes in oil
- 2 packages Crackers any variety
- 2 ounces sliced sourdough or French baguette
- Fresh fruit figs, nectarines grapes
Instructions
- Start with a clean dry platter or board
- Add any small bowls to the board and fill with spreads and olives
- Place hard cheese slices or chunks in rows or bunches on the board
- Add soft and pungent cheeses to fill in
- Add fruits, both fresh and dried, to fill in spaces
- Sprinkle the nuts around to fill in the remaining spaces
- Add crackers and bread around the outside edges of the platter
- Include and spoon or knives for spreading
Notes
- To make it easier for your guests, precut some hard cheeses and cut the brie into wedges.
- Add any additional crackers or bread in a small bowl on the side.
- Calorie count is approximate and based on 12 – 16 servings
Nutrition
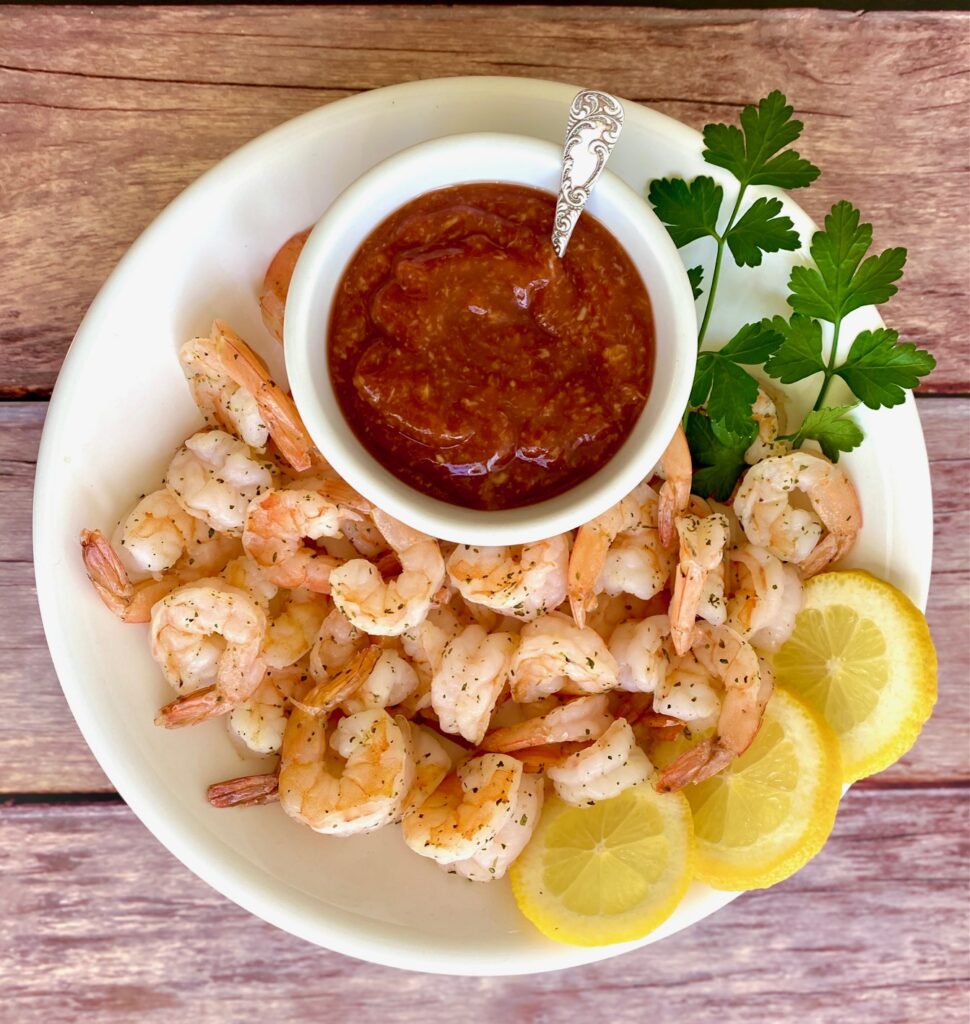
When you make shrimp cocktail it’s the little things that count. This is an easy recipe to master, with just a few ingredients, so every step makes a difference.
This classic appetizer is a favorite for a reason. It’s easy, it’s delicious, and it’s also low in calories (yea!). Add a zesty cocktail sauce to serve alongside these plump shrimp and watch them disappear!
Below you will find tips on:
- The right size and type of shrimp for a shrimp cocktail
- How to perfectly cook shrimp
- How to make a classic, balanced, and zesty seafood cocktail sauce

Ingredients needed
There are 2 parts to this homemade shrimp cocktail recipe – the shrimp (and its poaching liquid) and the zesty shrimp cocktail sauce
Shrimp:
- Shrimp – large raw shrimp with the tails on. Use 16/20’s, 21/25’s, or 26/30’s for best results. See below for more info on sizing. We prefer 21/25’s which are also called Jumbo Shrimp. Smaller shrimp are not recommended.
- Lemons – both for cooking the shrimp, making the cocktail sauce and for garnish
- Bay Leaf – when used in poaching Bay leaves add a subtle herb-like flavor
- Salt and Black Peppercorns – peppercorns are full of flavor but easy to strain out later
- Old Bay Seasoning – or something similar to give the shrimp added flavor
- Parsley – optional garnish. We prefer flat-leaf parsley

Seafood Cocktail Sauce:
See our full post and instructions on making this shrimp cocktail sauce, which couldn’t be easier. Here are the ingredients:
- Ketchup – the base of the sauce
- Worcestershire Sauce – gives great added flavor
- Lemon Juice – adds a bright flavor
- Horseradish and Hot Sauce – Adds the heat and allows you to make this sauce as mild or spicy as you would like

How to Make restaurant-quality Shrimp Cocktail
Make the Homemade Shrimp Cocktail Sauce:
- Prepare the cocktail sauce by whisking all of the ingredients together. Set aside if using right away or refrigerate for up to 7 days.
- If you don’t have time to make your own cocktail sauce be sure to buy a high quality version at the grocery store.
Preparing the Shrimp:
- Remove the shrimp shells but leave the tails on (makes a great handle for dipping!)
- Devein shrimp, if needed, and rinse. (see below for tips on deveining shrimp)
Cooking the Shrimp:
- Fill a large pot 3/4 full with water.
- Cut a lemon in half and squeeze the juice into the water. (Save the other half for garnish) Add the squeezed lemon half to the water.
- Add Bay leaf, salt, black peppercorns, and Old Bay seasoning. This is called a “court bouillon”.
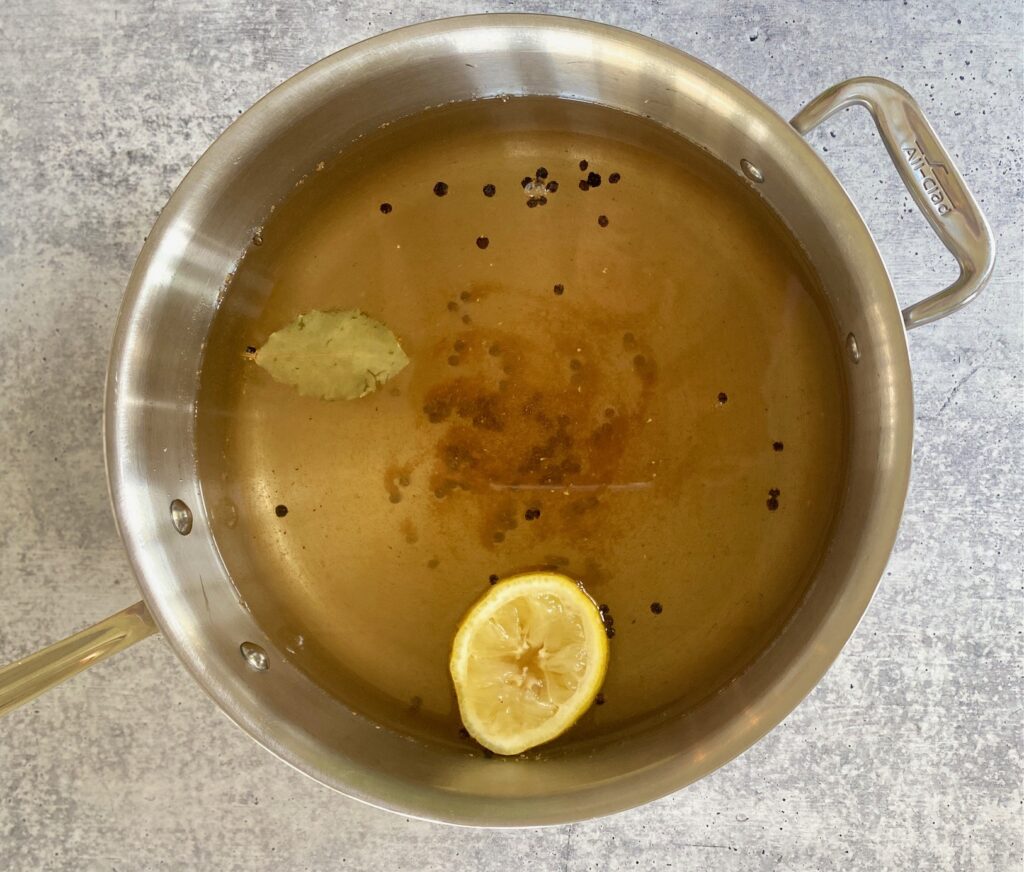
- Bring mixture to a boil and then reduce to a simmer and cook for 15 minutes to infuse the water.
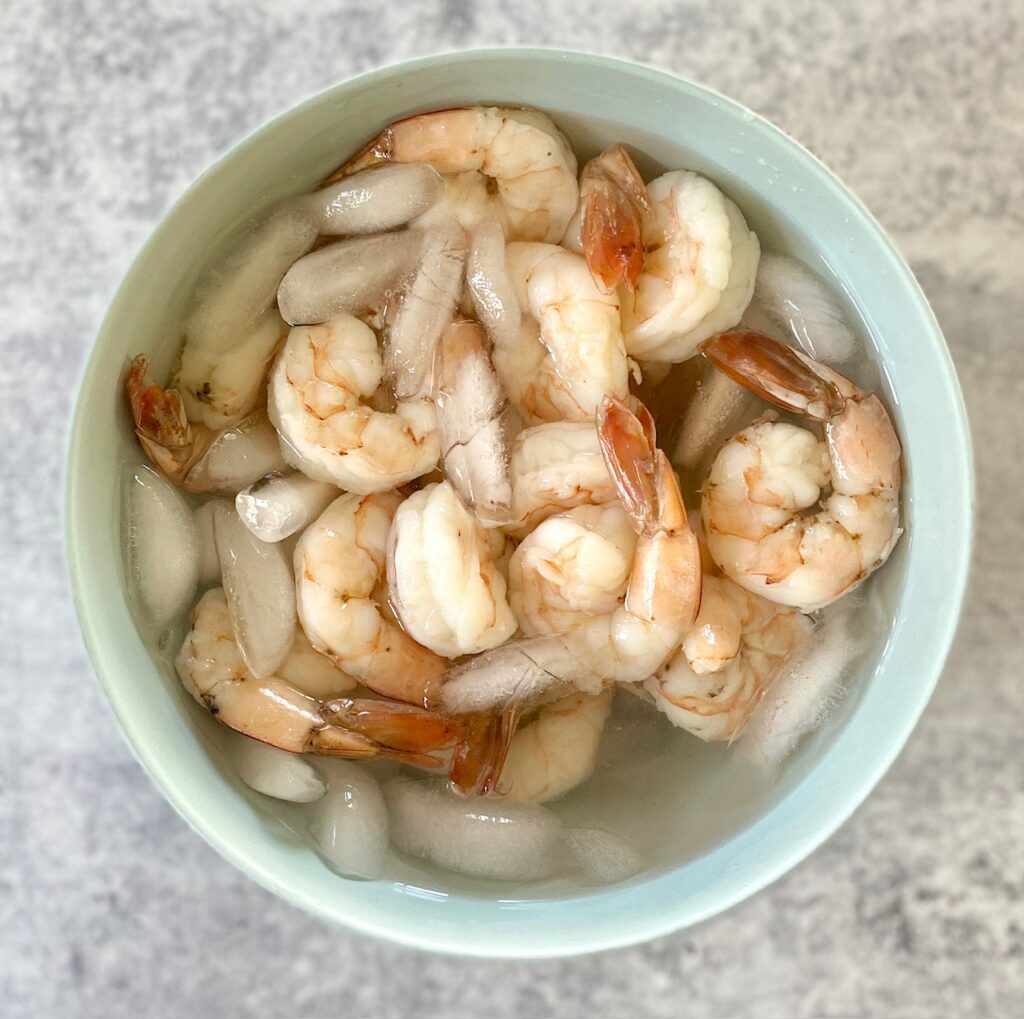
- Prepare a bowl of ice water by filling a medium bowl with 2 cups of ice and filling halfway up with cold water. Be sure to do this before cooking the shrimp.
- Remove the pan from the heat and drop in the cleaned shrimp.
- Cook, stirring occasionally, until the shrimp begin to curl (see time chart below) and they have turned pink. Jumbo shrimp is perfectly cooked in 2 minutes.
- Once cooked, strain the shrimp, or remove them with a slotted spoon, and then quickly add them to the ice bath to cool them and stop the cooking.
- Once cooled strain again and pat the shrimp dry.
- If not serving right away store the cooked shrimp in the refrigerator for up to 24 hours

2 Ways to Serve Classic Shrimp Cocktail
- 1. INDIVIDUAL SERVINGS:
Fill a small dish or martini glass with a few Tablespoons of cocktail sauce. Hang 3-5 pieces of prepared shrimp over the edge, then add a sprig of parsley or a wedge of lemon (or both) for garnish. A sprinkling of lemon zest is also pretty.

- 2. PLATTER
Add prepared cocktail sauce to a small bowl and place on a platter. Scatter the prepared shrimp around the bowl of sauce and garnish with fresh lemon wedges and parsley.
What do the numbers on shrimp mean?
- Shrimp sold in the U.S. are labeled with numbers that tell you approximately how many shrimp are in a pound.
- For example, 21/25 means there will be 21-25 pieces per pound.
- Shrimp often has names, but that is not as accurate, so using the number system is best.
How long to poach shrimp
Here’s a timing guide for raw shrimp, but as always, use your eyes to tell you when they are done. Shrimp cook quickly so be sure to have the ice bath ready. These are the 3 best sizes for a classic shrimp cocktail.
- Size 16/20 – poach for 3.5-4 minutes
- Size 21/25 – poach for 2 minutes
- Size 26/30 – poach for 1.5 minutes
NOTE: If using frozen shrimp add approximately 1 minute to the cooking time.
Make-Ahead and Storage Tips
- The shrimp can be poached and chilled 24 hours ahead of serving
- Seafood cocktail sauce can be prepared up to 7 days ahead of time and stored in an airtight container in the refrigerator

Can I Use Frozen Shrimp?
YES! Either thaw overnight in the refrigerator and cook as directed above, or cook frozen but add about 1 minute to the cooking time.
How to Devein Shrimp
- Hold the shrimp between your thumb and forefinger with the rounded side (back of the shrimp) upward.
- Place the pointed end of a wooden skewer, or tip of a knife, between the second and third segments of the shrimp, about 1/8-inch down from the top.
- Gently push the skewer, or knife tip, through the skin and then lift up to remove the vein.
- Discard and repeat with each shrimp. Rinse the deveined shrimp before using them.
What pairs with Shrimp Cocktail?
- Shrimp cocktail pairs well with nearly any type of salad such as our Arugula Beet Salad with Goat Cheese, Strawberry Spinach Salad, or Fresh Citrus Salad
- Serve with a bowl of Honey Roasted Cashews, or Candied Pecans
- Don’t forget a cool classic cocktail: Lemon Drop Martini, Moscow Mule, or French Martini
- Serve alongside Mini Caprese Skewers

How to Make Shrimp Cocktail
Ingredients
Shrimp:
- 1 pound raw shrimp, extra large (21-25 or 16-20 count) peeled, deveinded, tails on
- ½ lemon
- 1 Bay leaf
- 1 Tablespoon black peppercorns
- 1 teaspoon Old Bay seasoning, optional
- 1 pinch salt
- 4 sprigs flat leaf parsley
Shrimp Cocktail Sauce
- 1 cup ketchup
- 1 Tablespoon Worcestershire sauce
- 3 Tablespoons fresh lemon juice
- 3 Tablespoons prepared horseradish (more or less depending on personal taste)
- 1 Dash hot sauce
Instructions
Cocktail Sauce:
- Prepare the cocktail sauce by combining all ingredients and set aside. This sauce can be made ahead of time and refrigerated for up to 7 days
Prep the Shrimp:
- Remove shells from the shrimp, but leave tails on. Rinse and then devein the shrimp, if needed.
How to devein shrimp:
- To devein the shrimp before cooking, hold the shrimp between your thumb and forefinger with the rounded side of the shrimp upward. Place the pointed end of a wooden skewer, or tip of a knife, between the second and third segments of the shrimp, about 1/8-inch down from the top. Gently push the skewer or knife tip through the shell and then lift up to remove the vein. Discard and repeat with each shrimp.
Cook the shrimp:
- Fill a large pot 3/4 full with water. Cut the lemon in half and squeeze in the juice and then add the lemon half to the water. Cut remaining half into wedges for serving.Add the Bay leaf, peppercorns, Old Bay, and salt.Bring to a boil, reduce to a simmer, and let cook for 15 minutes to infuse the water with flavor.
- Prepare an ice bath for the shrimp: In a large bowl add 2 cups of ice cubes and then fill halfway up with water.
- Remove pan from the heat and drop in the cleaned shrimp. Cook, stirring occasionally, until they curl and turn pink. (See the cooking chart below)Note: different size shrimp will cook at various times. Here is a guide, but watch them and use your best judgment. Size 26/30's – poach for 1½ minutesSize 21/25's – poach for 2 minutesSize 16 /20's – poach for 3 ½- 4 minutes
- Once cooked, strain the shrimp, and then add them to the prepared ice bath. Leave shrimp in the ice bath for a few minutes to stop the cooking and let them cool completely. Strain again and pat dry.
2 ways to serve Shrimp Cocktail
- 1. INDIVIDUAL– Fill a small serving dish or martini glass with cocktail sauce. Hang 3-5 shrimp over the edge, add a wedge of lemon or parsley, and serve.2. PLATTER – Add prepared cocktail sauce to a small dish or ramekin and place on a platter. Scatter cooked shrimp around the dish of sauce. Garnish with lemon wedges and parsley.
Notes
- Making your own cocktail sauce is the way to go! For full instructions visit our post on Seafood Cocktail Sauce.
- If using frozen shrimp be sure to thaw it overnight in the refrigerator, or in a cool water bath for at least 30 minutes before poaching. If cooking from frozen add one minute to the cooking time.
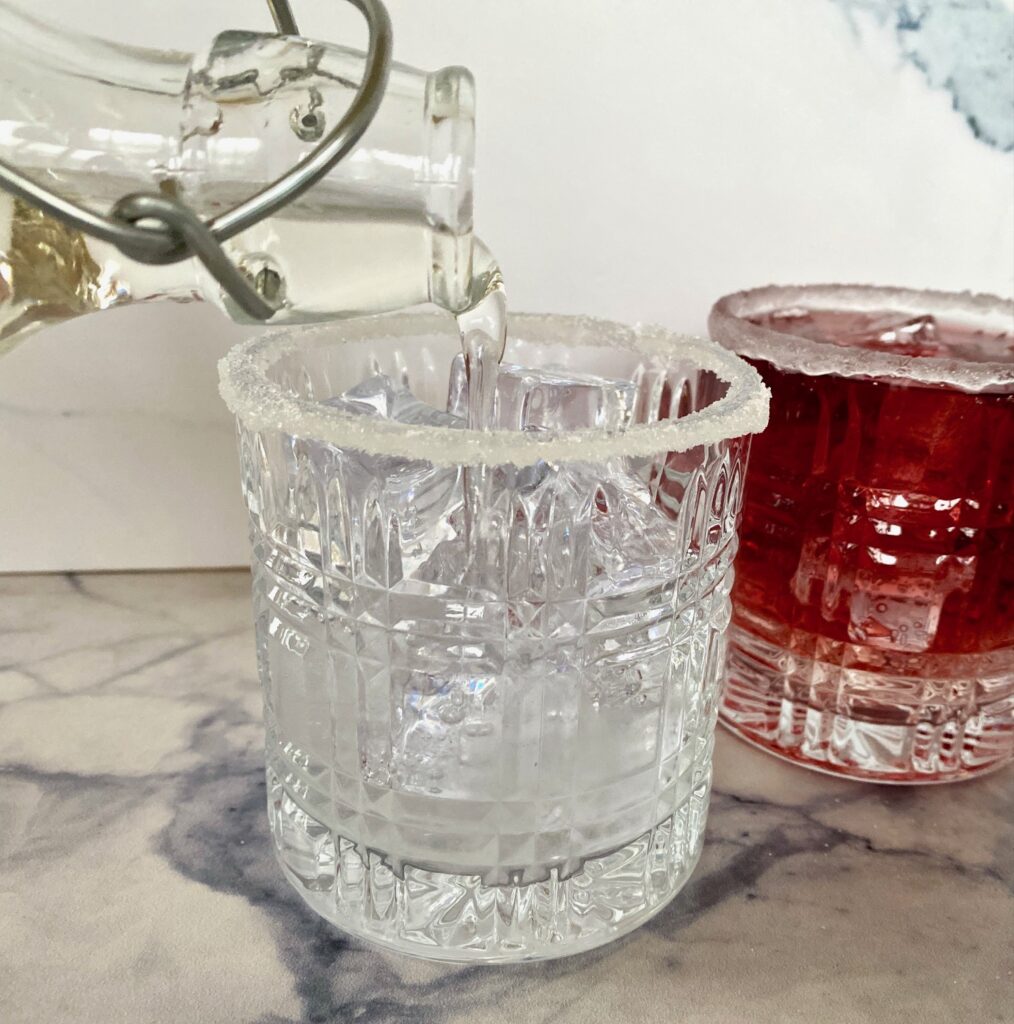
- Looking for similar serving glasses? Try these from Amazon: https://amzn.to/4oNR7ci
Nutrition
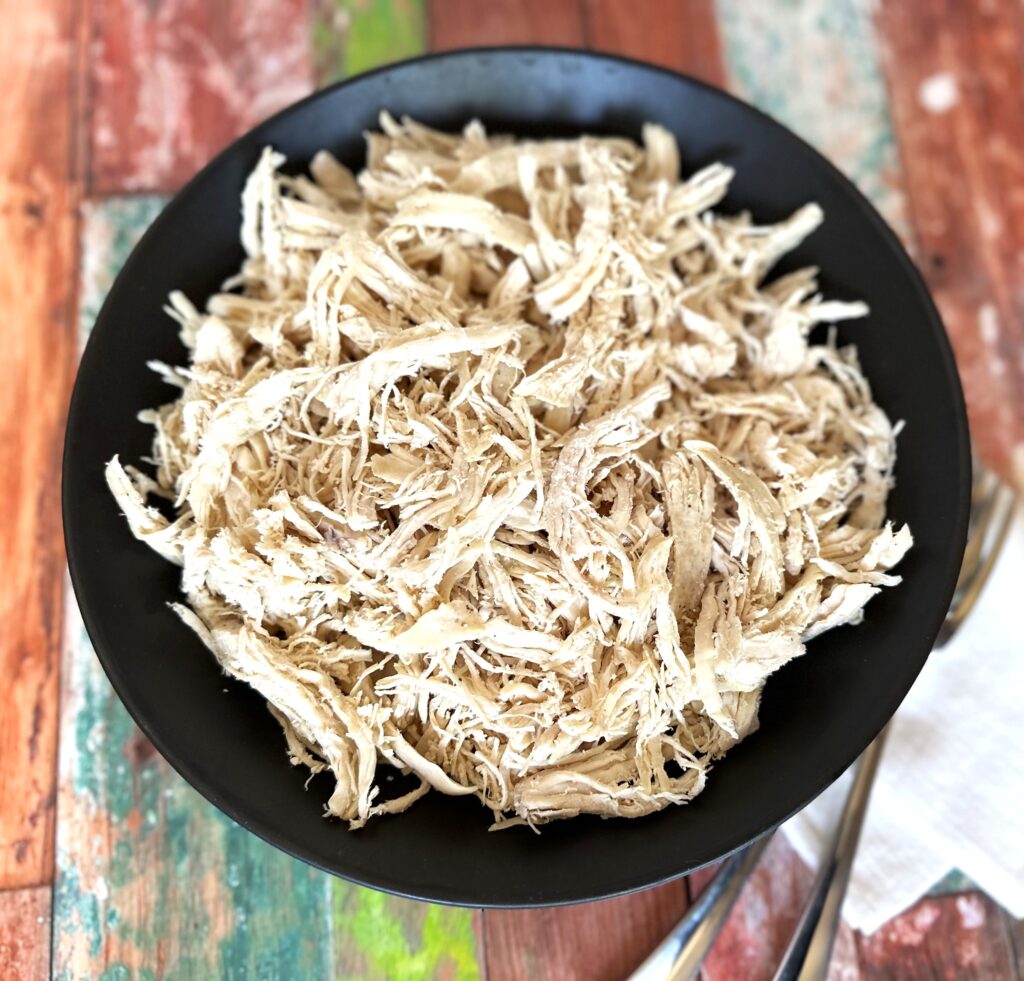
Learning how to make tender shredded chicken could not be easier! Below you’ll find our simple step-by-step instructions for making the best shredded chicken.
Shredded or pulled chicken can be used in a variety of delicious ways from salads to tacos to enchiladas, pasta dishes and much more.
Ready to get started? Just click on our ” Jump to Recipe” button below to go straight to the recipe card. For tips, processes, and substitutions keep reading. This post may contain affiliate links. Please see our affiliate disclosure for details. We only recommend products to you that we love ♥️ and use.
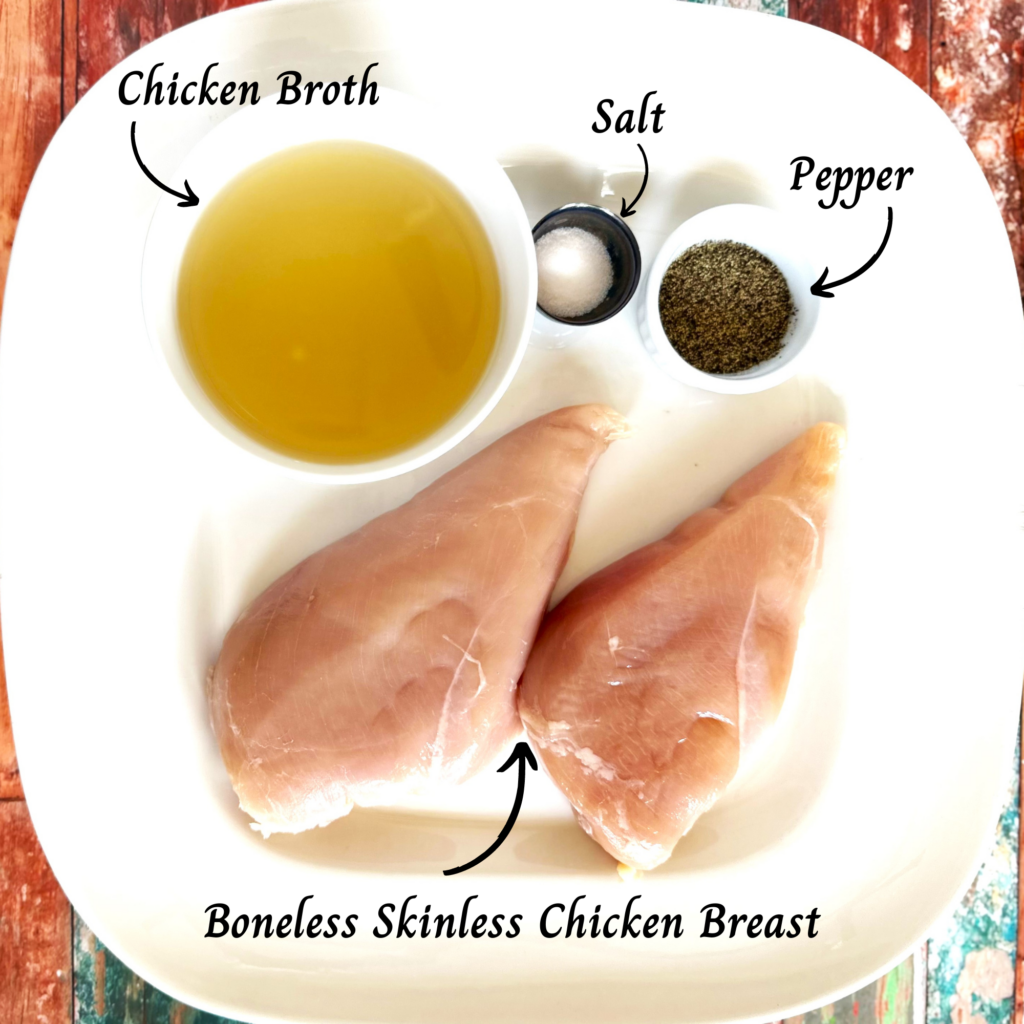
Jump to RecipeIngredients needed for this easy recipe:
- Fresh Chicken Breast – Boneless skinless chicken breasts are the best choice for best results. You can also use skinless chicken thighs, we prefer skinless and boneless chicken thighs.
- Chicken Broth or Chicken stock – This keeps the tender chicken super moist and infuses extra flavor
- Salt or Sea salt – Just a pinch makes a big flavor difference in the end results
- Pepper – We used black pepper but you could use white pepper if the recipe you’re making the cheese for is a purely white dish
- Olive Oil – For sautéing the chicken
What is the easiest way to make shredded chicken?
The process of making shredded or pulled chicken is quite simple and straightforward. Once you find out how easy it is you’ll never need to buy store-bought rotisserie chicken again.
Our tried and true method is to give the chicken breasts a light sauté and then gently poach them
Follow the step-by-step guide below and you will have delicious chicken that you can use in a variety of recipes in no time. Note: This method does not include any added herbs or flavoring so it can be used for any dish.
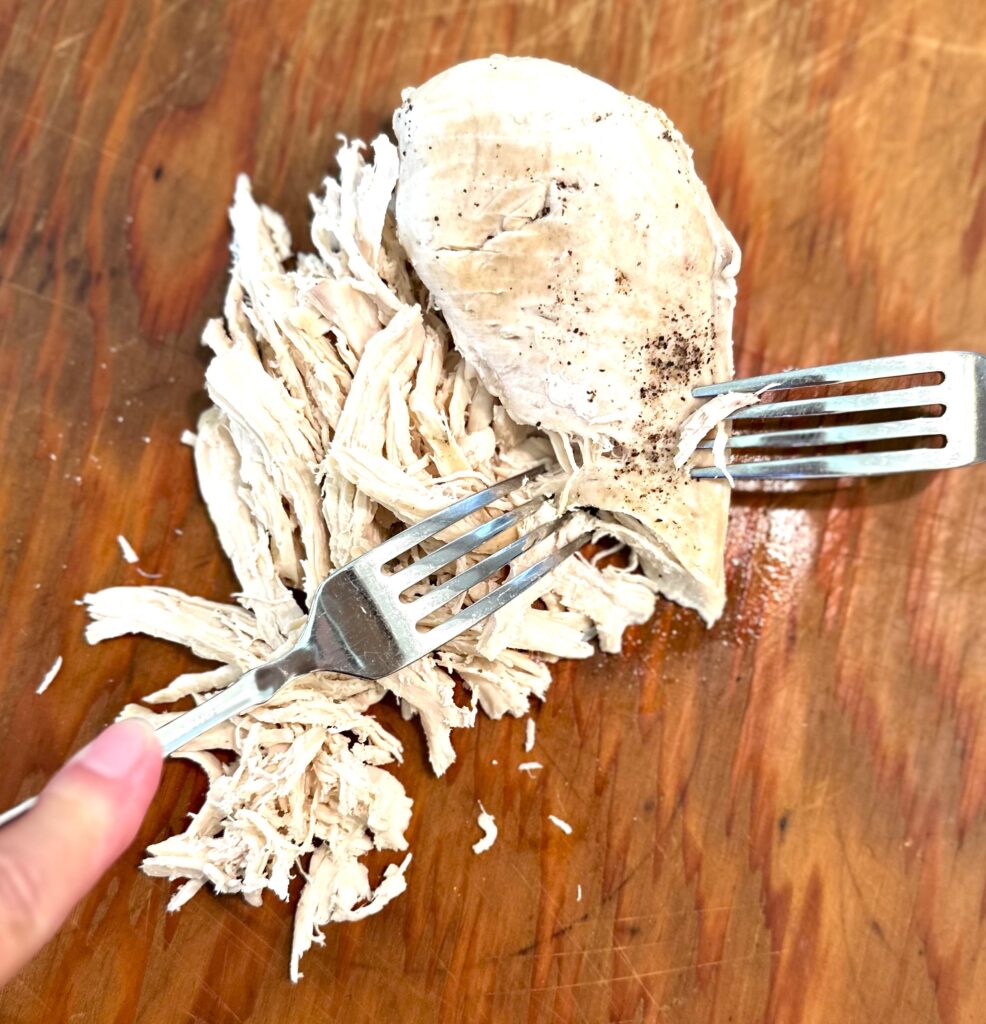
Step-by-step: How to make shredded chicken
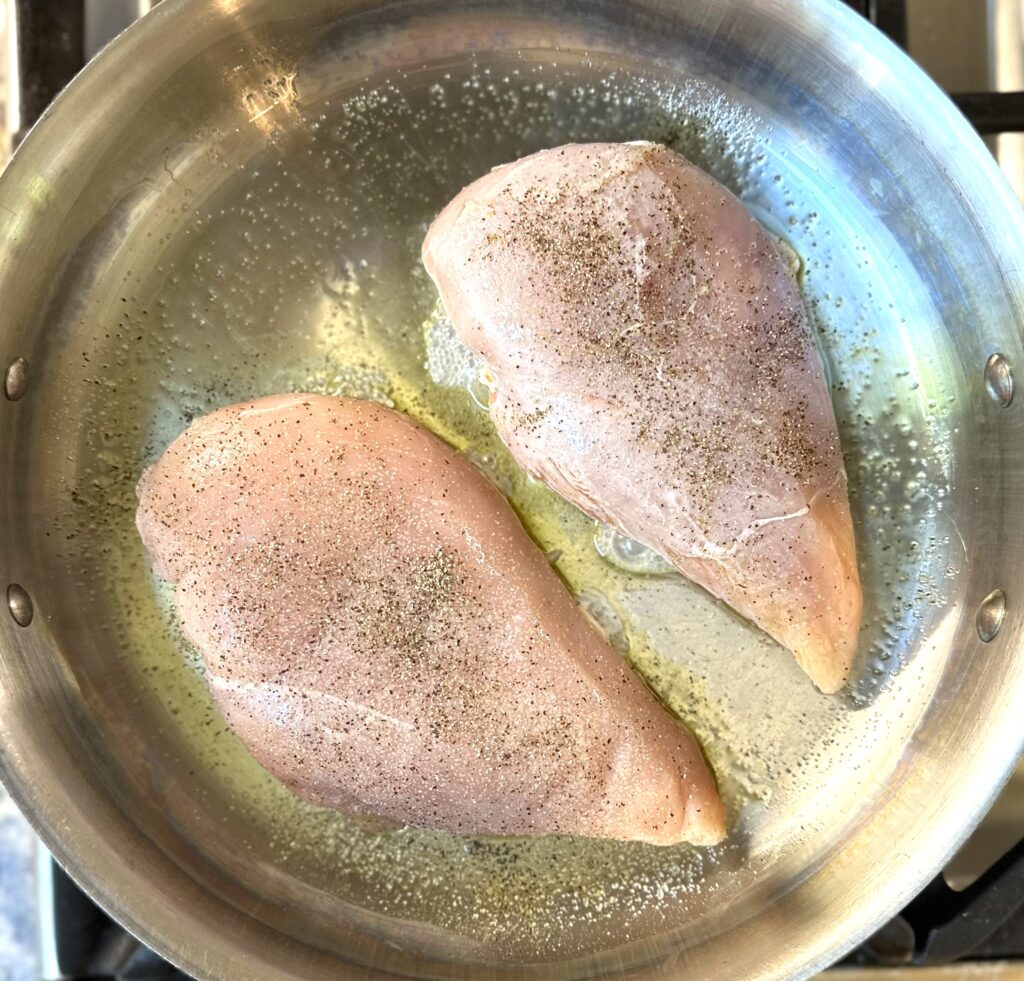
Our lightly sautéed and poaching method makes for a flavorful moist finished chicken breast that is easy to shred.
- Heat one Tablespoon of olive oil into a high-rimmed sauté pan over medium heat.
- Add chicken breasts. Sprinkle the top with salt and pepper.
- Sauté for about 2 minutes on each side until they are very lightly browned. Sautéing the breasts adds flavor, but be careful not to overcook the beast meat the goal is to keep the outer skin moist.
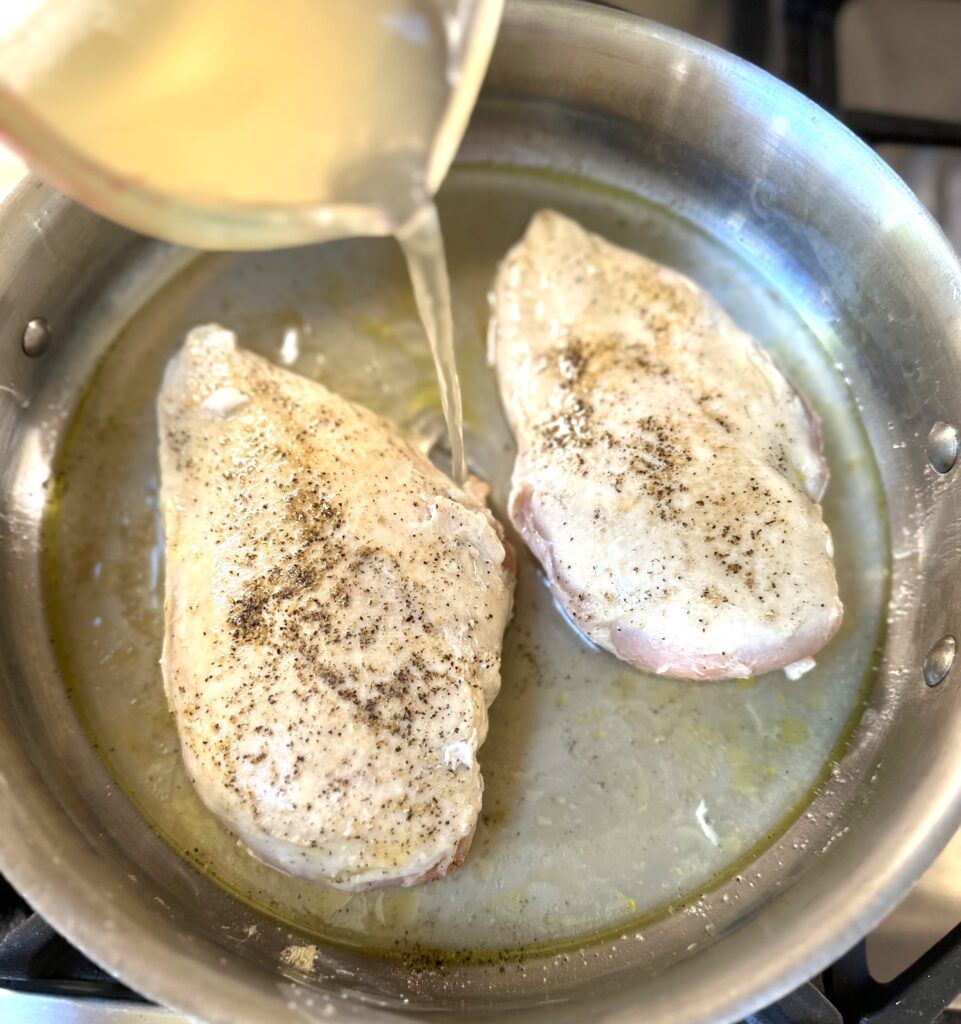
- Slowly pour in room-temperature chicken broth. Cover the chicken with a lid and poach.
- Bring liquid to a simmer (but do not boil).
- Reduce heat to medium-low, cover the pan with a lid, and poach chicken until the internal temperature of the chicken reaches 165˚F.
- Timing will vary depending on the size and thickness of your chicken breast meat. Poaching can take anywhere from 5 to 10 minutes for each side.
- We flip the breasts mid-way through the cooking to make sure they are evenly poached. If possible use a meat thermometer to ensure the meat is thoroughly cooked.
- Remove breasts from the pan and shred them using one of the methods below.
Can you save the cooking liquid?
- YES! Strain the cooking liquid and reserve it in case you want to add some moisture back into the chicken later. If not using right away, cool and refrigerate or freeze.
What is the easiest way to shred chicken?
There are 3 basic ways to easily shred chicken. All of these methods work well but if you are using bone-in chicken then use method #1
- Use Two Forks – Place chicken on a cutting board, while the meat is still warm, use 2 forks to separate the chicken along the grain and continue pulling at the chicken until shredded. It’s easiest if you use one fork to anchor the chicken and the other one to pull. The fork method is our favorite method because you have a lot of control over the size of your pieces. Want to get really fancy? Try a pair of meat shredder claws which makes this fast work!
- Hand Mixer or Stand Mixer – Place chicken pieces into the bowl. On the a low speed place the blades directly onto the chicken and mix for about 15 seconds, or until the chicken is shredded. (If using a stand mixer – we like Kitchen Aid – use the paddle attachment blade and be sure the tilt-head is locked down to avoid the blade bouncing up). This is a great method if you have a large amount of chicken to shred because it’s a fast and easy way and results in nice bite-size pieces.
- Food Processor or Blender – This method is similar to the mixer method but works even faster so be sure to simply use the pulse option until you get desired shredded size.
OPTION 1: 2 Forks
OPTION 2: Mixer method

What’s the difference between pulled chicken and shredded chicken?
Both of these terms – shredded and pulled – are correct and they can be used interchangeably. The chicken meat is cooked until tender then “shredded” or “pulled” along the grain of the meat until you get the size of shreds desired. The size of the final shred can vary based on how you will be using it in your chicken recipe.
This versatile method to cook chicken is the basis for many popular chicken dishes. Try it for tacos, nachos, salads, enchiladas, burritos, casseroles, sandwiches, soups, and even pizza.
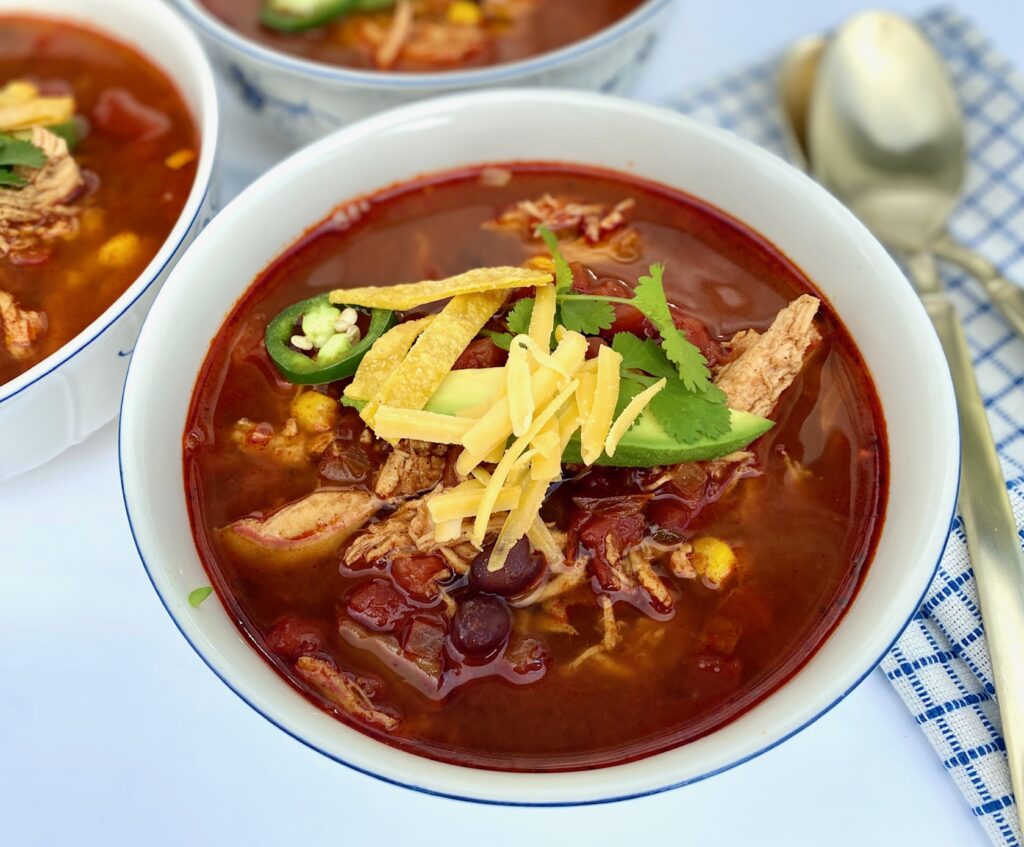
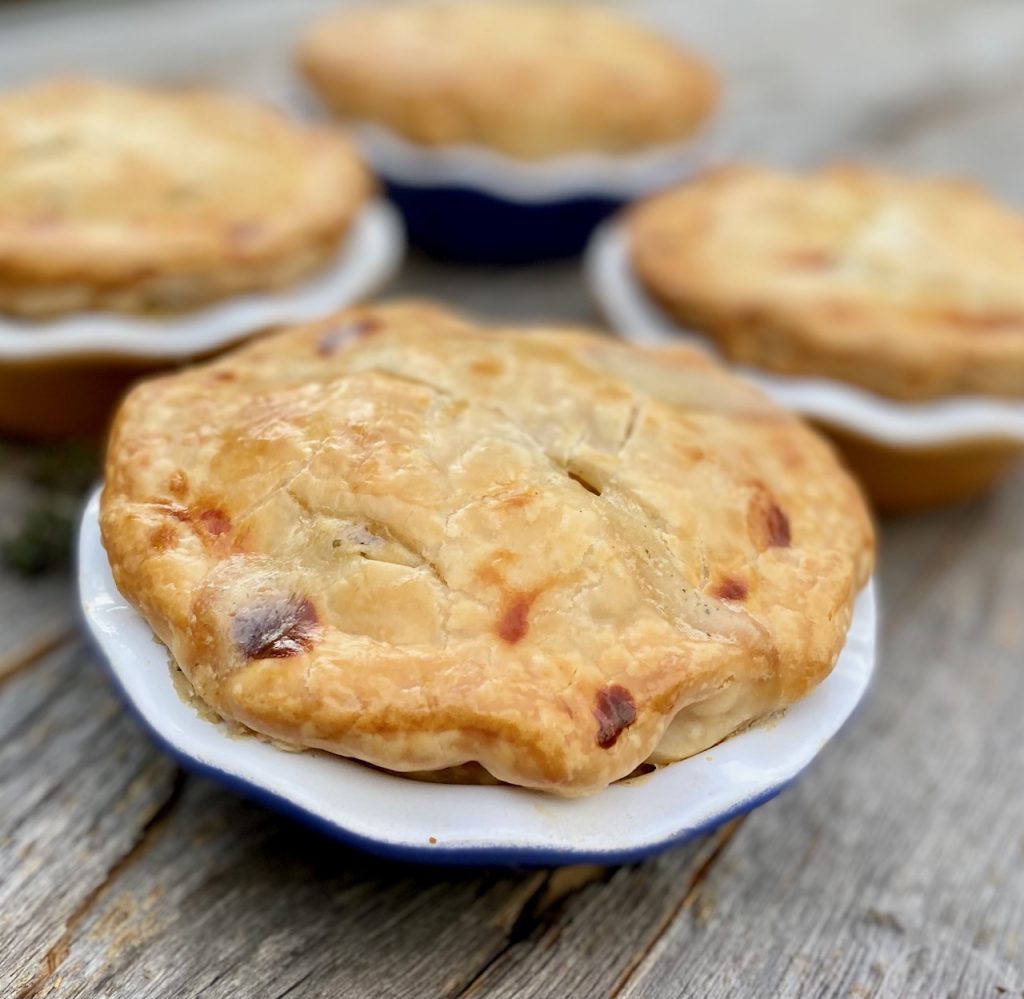
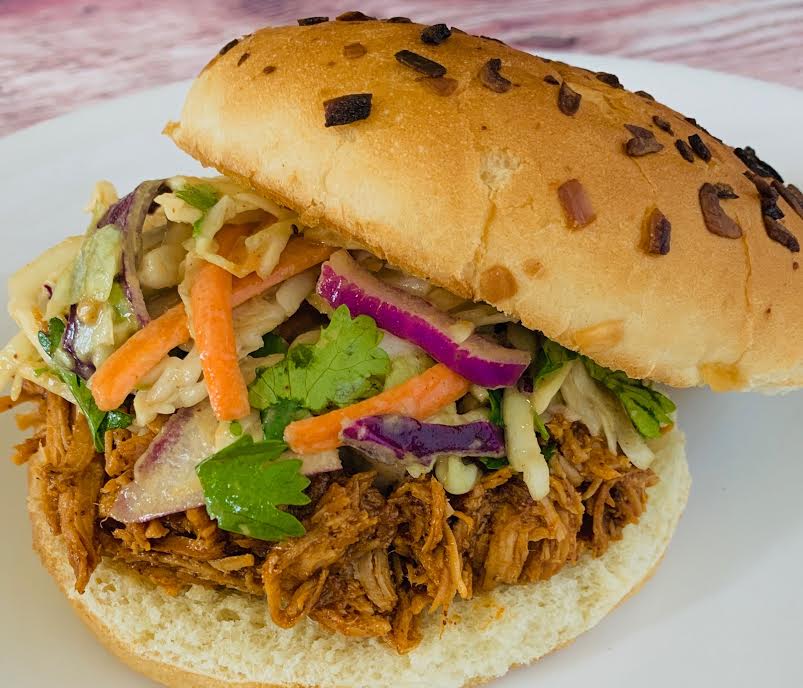
Recipes with Shredded Chicken:
The uses for this style of chicken are endless but here are a few of our favorite recipes that incorporate shredded chicken:
- Chicken Tortilla Soup – cooking the chicken ahead of time is a great way to save time on this recipe
- Greek Lemon Chicken Soup – want to do it all in the instant pot? Try this instead.
- Chicken Pot Pie – the perfect way to use this method!
- Slower Cooker Pulled Chicken Sandwiches – this is an all-in-one method so great if you need to “set it and forget it”

Other ideas for using pulled chicken:
This recipe is the basic method but you can easily add seasonings to ramp up the flavor once you have it shredded.
- We LOVE adding our Homemade Taco Seasonings Blend to this chicken for any type of taco or nacho recipe
- Drizzle in some Sweet Chili Sauce and add it to your favorite Asian-style salad or on top of Asian Coleslaw
- Flavor it up with our Easy Pesto Sauce and add on top of your favorite pasta!
FAQ’s:
How much will this recipe make?
- 1 pound of cooked, boneless chicken breasts will make about 2 ½ cups of shredded chicken.
Can I make shredded chicken in a slow cooker?
Yes! This is a great way to make it and a real timesaver for meal prep. Keep in mind you won’t have the browned bits on the surface like you do with the traditional sauté/poach method.
- Simply add the chicken, chicken broth, salt, and pepper to the slow cooker, cover, and cook
- It takes about 3 hours on high or 5 hours on low to fully cook the chicken.
- Each crockpot or slow cooker will vary so use your best judgment.
- After cooking just shred as instructed above.
How to store:
This chicken is perfect for make-ahead meal planning, so consider making a big batch. When reheating you may want to add a touch of water or broth.
- Refrigerator – Cool and store tightly sealed in an airtight container or ziplock bag for up to 3-4 days.
- Freezer – Let cool completely, shred, seal, and freeze for up to 3 months (seasoned or unseasoned).

How to Make Shredded Chicken
Ingredients
- 1 pound Chicken breasts, boneless, skinless
- 4 cups Chicken broth, room temperature
- 1 dash Salt
- 1 dash Pepper
- 1 Tablespoon Olive oil
Instructions
- Heat one Tablespoon of olive oil into a high-rimmed sauté pan over medium heat.
- Add chicken breasts. Sprinkle the top with salt and pepper.
- Sauté for about 2 minutes on each side until they are very lightly browned. Sautéing the breasts adds flavor, but be careful not to overcook them because the goal is to keep the outer skin moist.
- Slowly pour in room-temperature chicken broth. The chicken should be covered with liquid.
- Bring liquid to a simmer (but do not boil).
- Reduce heat to medium-low, cover the pan with a lid, and poach chicken until the interior temperature reaches 165˚F.
- Timing will vary depending on the size and thickness of your chicken breasts. Poaching can take anywhere from 5 to 10 minutes for each side.
- We flip the breasts mid-way through the cooking to make sure they are evenly poached. If possible use a meat thermometer to ensure the meat is thoroughly cooked.
- Remove breasts from the pan and shred while warm, using one of the following methods:1. Use Two Forks – While the meat is still warm, use 2 forks to separate the chicken along the grain and continue pulling at the chicken until shredded. It’s easiest if you use one fork to anchor the chicken and the other one to pull. This is our favorite method because you have a lot of control over the size of your pieces.2. Hand Mixer or Stand Mixer – Place chicken pieces into the bowl. On the lowest speed place the blades directly onto the chicken and mix for about 15 seconds, or until the chicken is shredded. (If using a stand mixer – we like Kitchen Aid – use the paddle blade and be sure the tilt-head is locked down to avoid the blade bouncing up). This is a great method if you have a large amount of chicken to shred because it’s fast and easy!3. Food Processor or Blender – This method is similar to the mixer method but works even faster so be sure to simply use the pulse option until you get desired shredded size.
Notes
-
- Refrigerator – Cool and store tightly sealed for up to 3 days
-
- Freezer – Let cool completely, seal, and freeze for up to 3 months (seasoned or unseasoned)
- SLOW COOKER/ CROCKPOT Instructions:
- To make chicken in a slow cooker or crockpot simply omit the sauté step and add everything to the slow cooker. Cover and cook for about 5 hours on low or 3 hours on high setting.
Nutrition
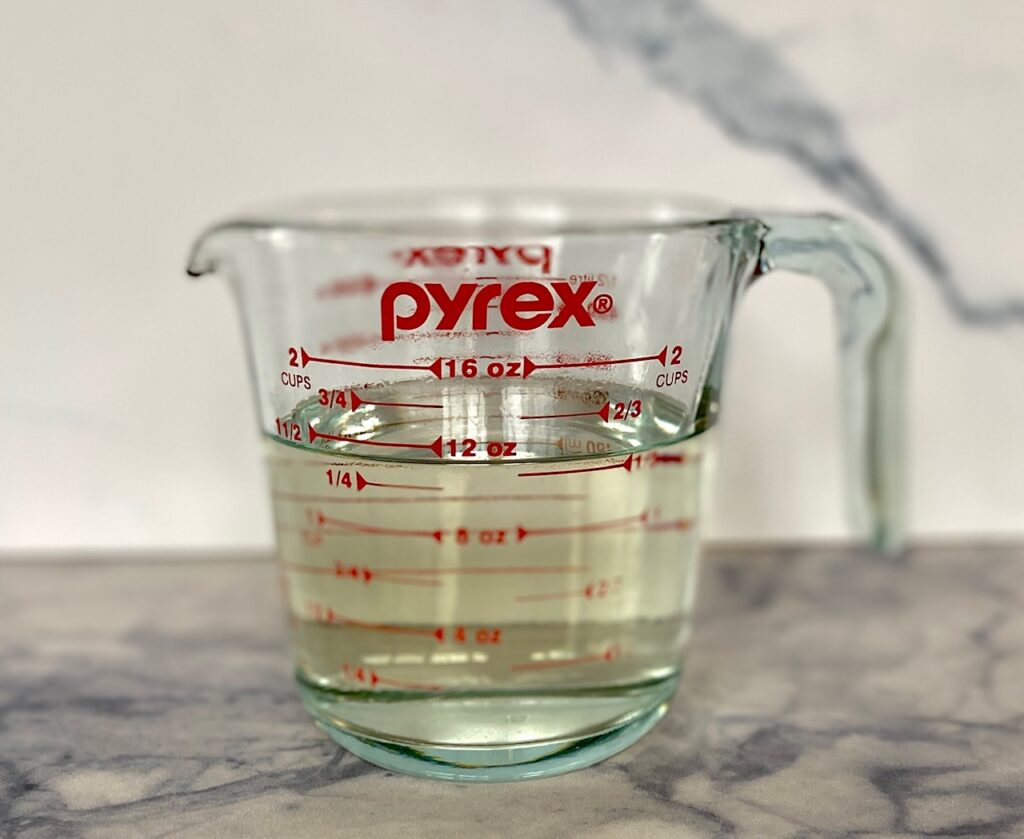
It’s a snap to make with just 2 ingredients – sugar and water!
Making homemade simple syrup could not be easier and it is much faster (and more economical) than running to the market for a pre-made bottle. It takes just 10 quick minutes to make a batch!
This post may contain affiliate links. Please see our affiliate disclosure for more details. We only recommend products we love and use.
What is Simple Syrup?
Simple syrup really is just that – SIMPLE. If you can boil water you can make it!
It’s made by cooking equal parts sugar and water until the sugar is dissolved and the mixture is slightly thickened. It’s used as a sweetener in cooking and baking, but most commonly used as an ingredient in cocktails or iced coffees, lemonades, and tea.
We’ve used it in many of our cocktail recipes, such as the always popular Lemon Drop Martini and the Dirty Shirley. The possibilities for flavoring (infusing) with fruit, herbs, and spices are endless.
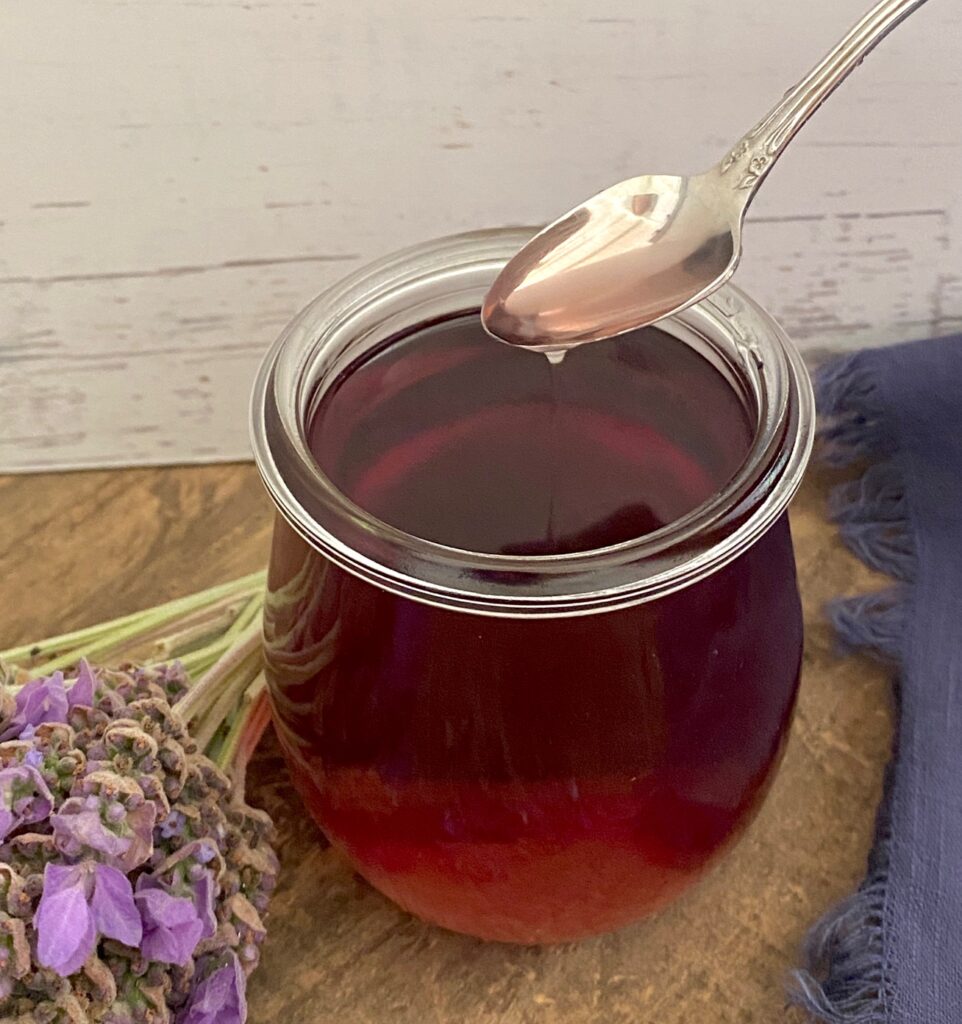
Below we will share some ideas for infusing with flavor, including Lavender Simple Syrup and Pumpkin Spice Syrup.
Ingredients needed:
This recipe is actually more of a method.
So, what is the formula for simple syrup? It’s 1:1 and you only need water and sugar.
Simple Syrup Ratio:
- One part water
- One part granulated sugar
The ratio of sugar to water is always equal, so the recipe can easily be cut in half, doubled, or tripled, depending on what you need.
Note: 1 cup sugar + 1 cup water will yield 1½ cups once cooked.
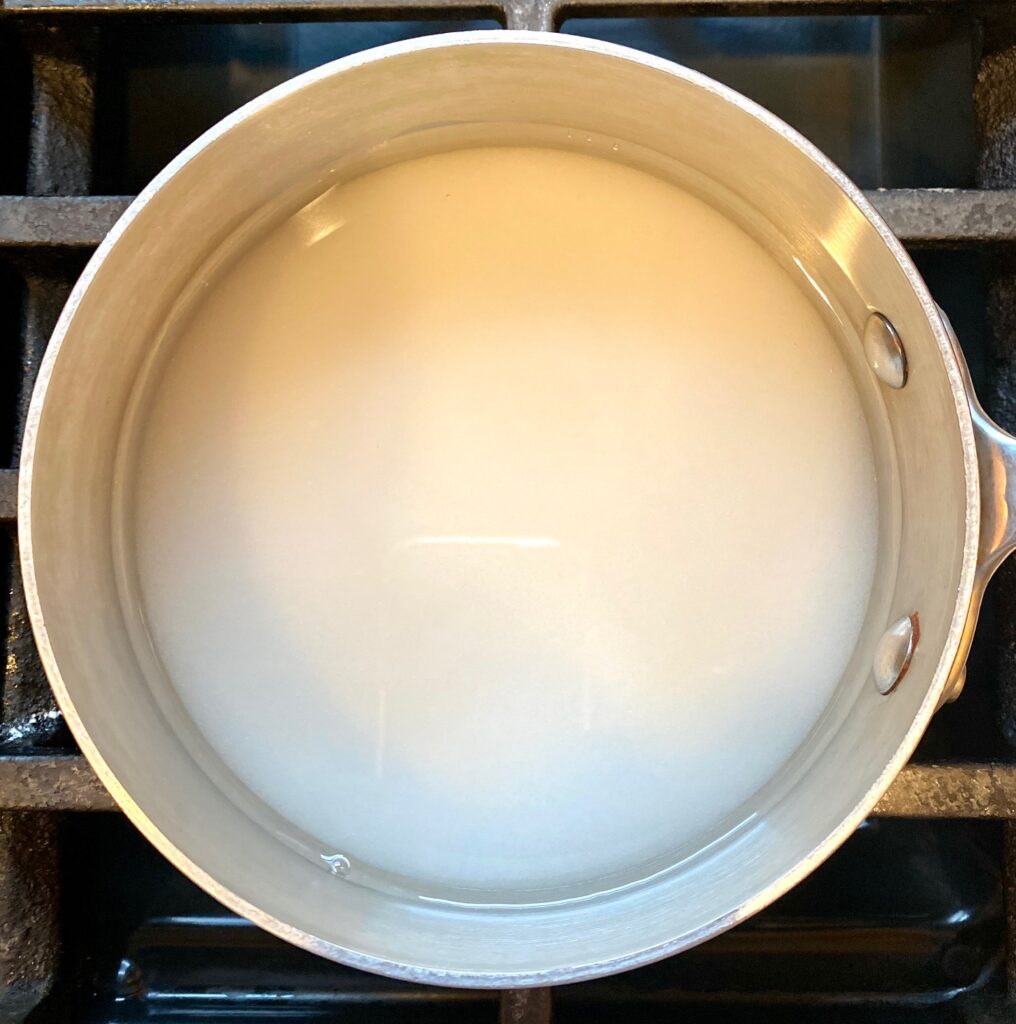
How to make a Simple Syrup
For the best results use a heavy-bottomed pan because it will conduct heat more evenly during cooking.
- In a small saucepan add equal parts water and sugar, and give it a quick stir to combine
- Cook mixture over medium heat, stirring gently until the sugar dissolves completely. NOTE: It’s not essential that the water boils as long as the sugar dissolves completely
- Remove the pan from the heat and let the mixture cool to room temperature.
- The results should be fairly thin and easy to pour (much thinner than maple syrup).
- If you want a thicker consistency just continue to cook until you achieve your desired thickness. (see below for “rich” simple syrup).
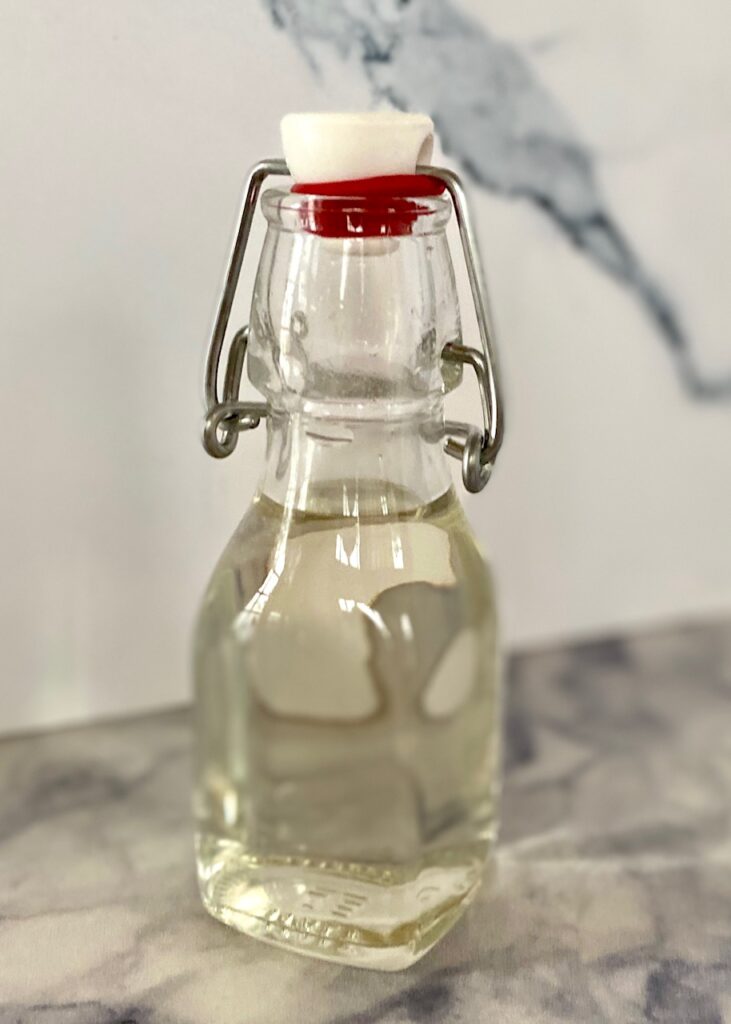
- Pour into a glass jar or container, with a lid, and seal it.
- Refrigerate until ready to use.
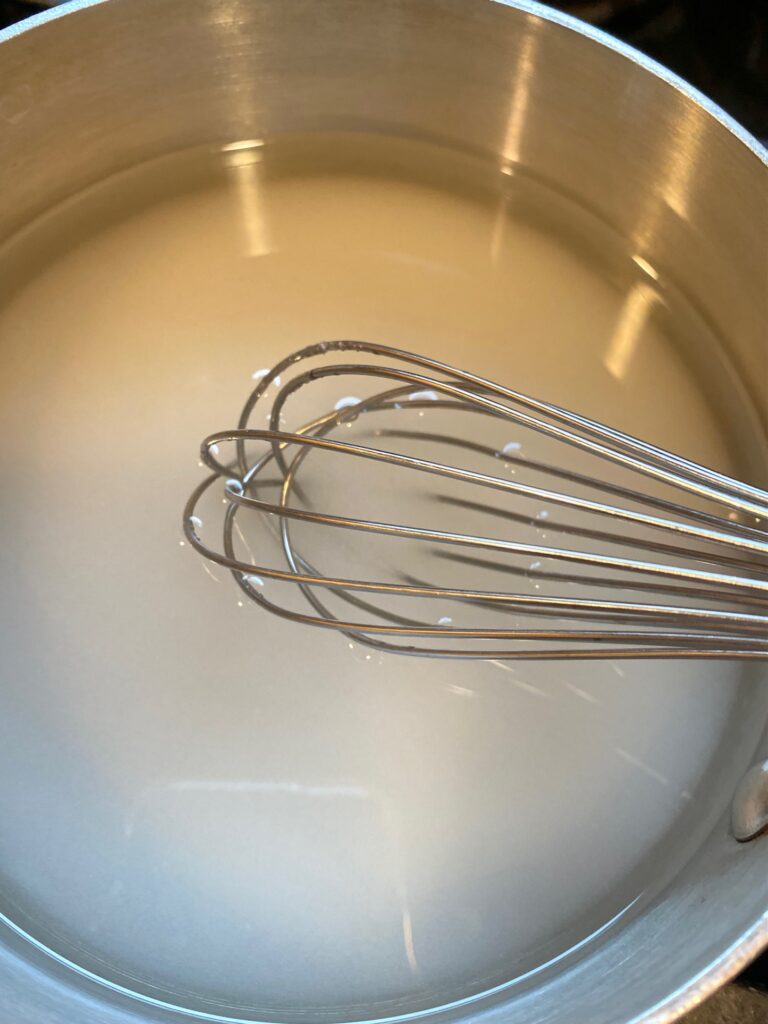

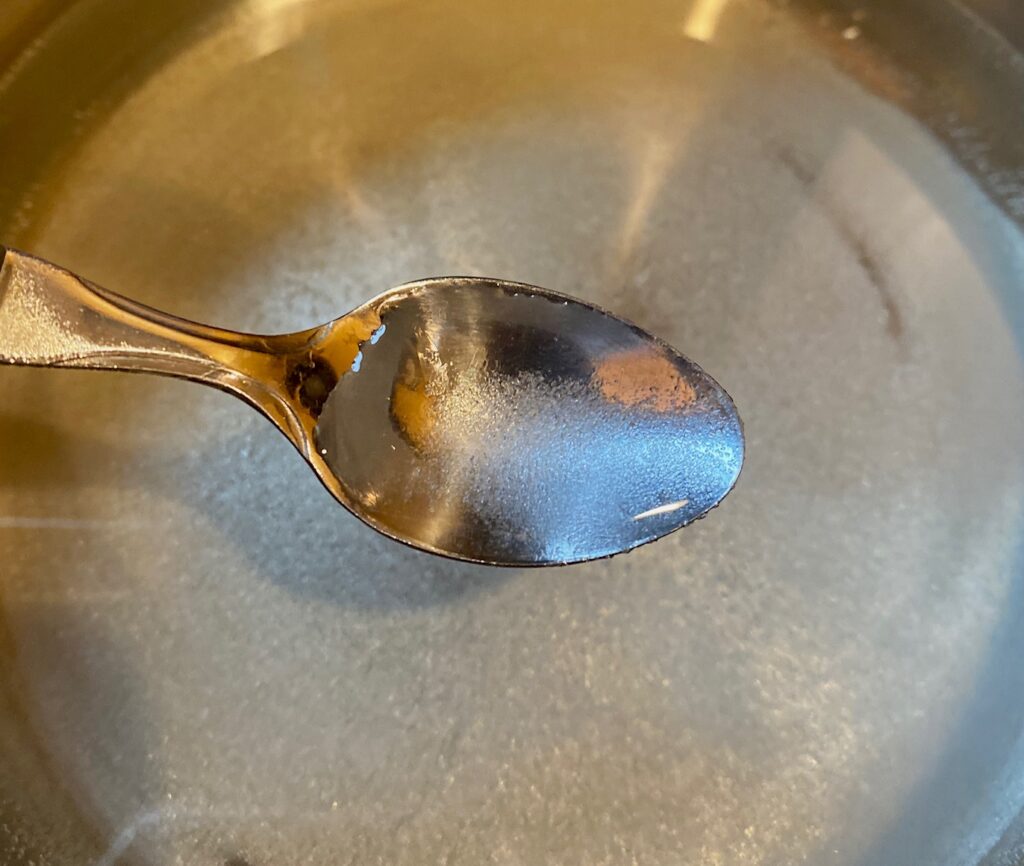
How do you know when it’s done?
In order to test if all of the sugar is completely dissolved carefully scoop up a small amount of the hot mixture with a spoon. There should be no sugar crystals in the liquid. If you see some remaining sugar you’ll need to boil a little longer until all the sugar dissolves.

How long does simple syrup last?
Once cooled and refrigerated the mixture will last in the refrigerator for about 3 weeks. However, just like anything else, use your best judgment, and if it becomes cloudy it’s time to toss it and make a fresh batch.
How to make simple syrup for cocktails
Simple syrup is fantastic when flavored or infused. Any herb, seasoning, spice, or fruit will work. The basic method doesn’t change and you will use the same 1:1 ratio of sugar to water.
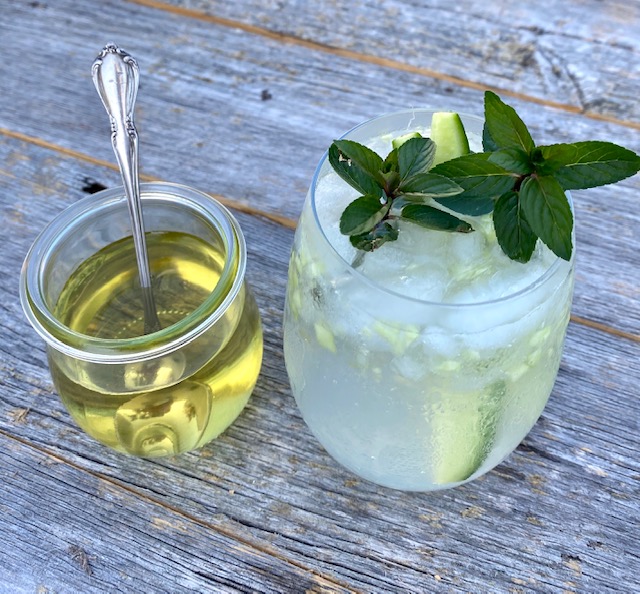
Some popular infused simple syrup flavors:
- Rosemary, mint, basil, lavender, rose petal
- Vanilla bean or extract, cinnamon stick, ginger root, pumpkin spice, or espresso powder
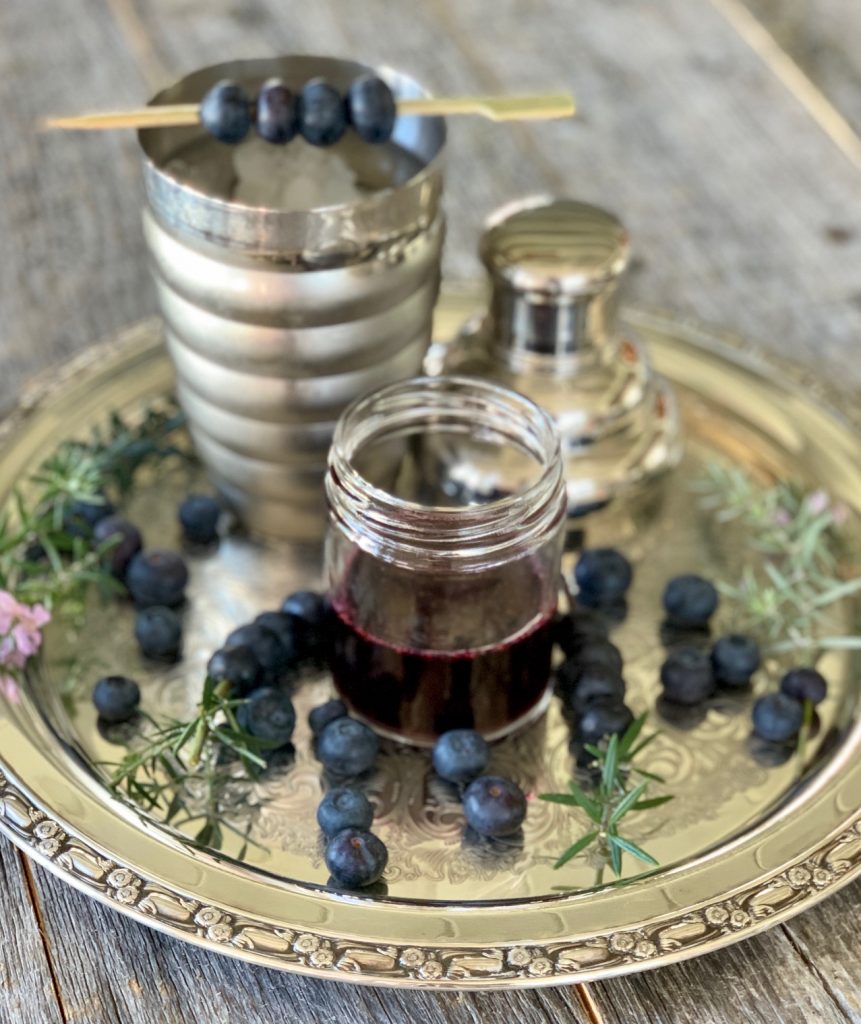
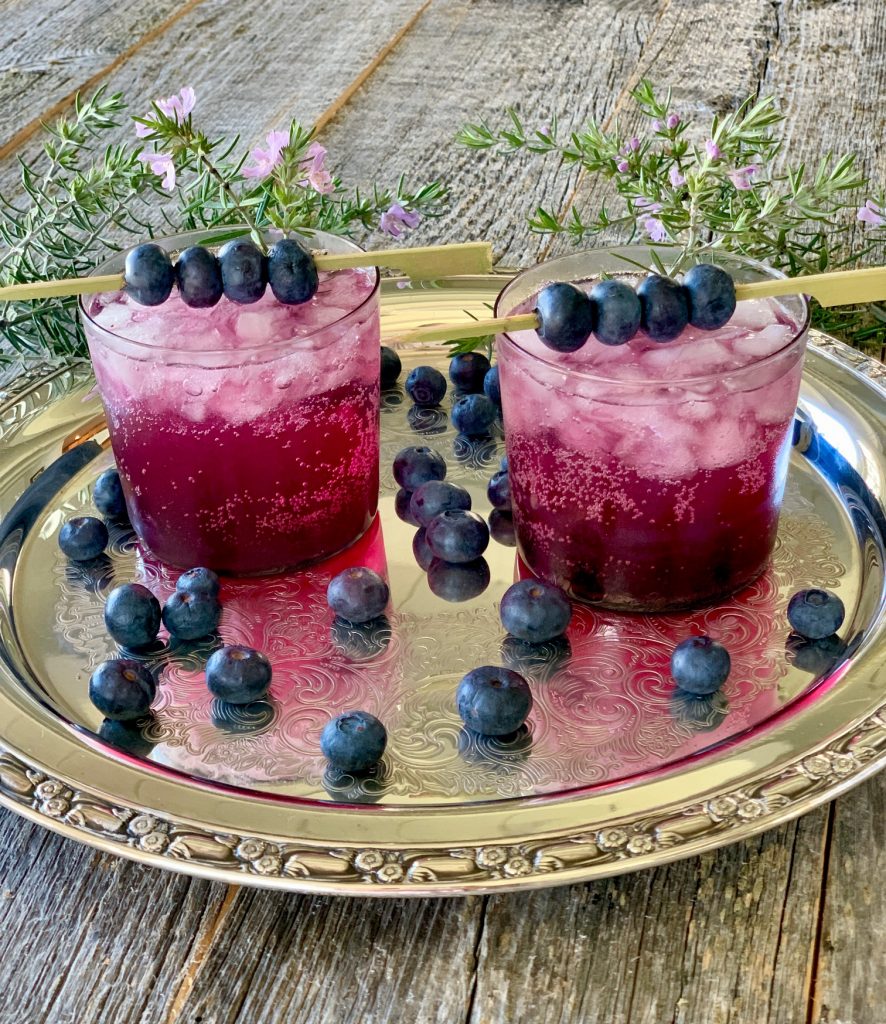
- Blueberry, raspberry, cherry, blackberry, cranberry
- Lemon, orange, grapefruit
Depending on the desired flavor strength there are 2 ways to add the flavor:
- Add the additional flavoring at the end of cooking, and let the ingredients steep off the heat, for a lighter flavor.
- Add it while cooking and cook a bit longer for a stronger flavor (and color).
Once flavored, strain to remove the flavoring ingredients, if needed, before chilling.
Our easy recipe for how to make lavender simple syrup, or mint simple syrup, are both delicious examples of strained herb simple syrup.
Fruit-infused simple syrup flavors:
Fruit works perfectly for imparting sweet or tart fresh flavor into your syrup. When using fruit you may need to double-strain to remove all the fruit before storing it in a jar. A great example of this can be found in our Blueberry Vodka Cocktail or in the base of our Cranberry Orange Liqueur.
What is “rich” simple syrup?
Rich simple syrup is a 2:1 ratio of sugar to water.
The finished product is much thicker and will usually keep up to 6 months in the refrigerator before becoming cloudy. Many bartenders and home cocktail aficionados prefer the “rich” version because it gives cocktails a bigger mouth feel. You will likely need to simmer a little bit longer with this ratio.
Using simple syrup in baked goods
Brushing cake layers with simple syrup is a great way to ensure they stay moist.
- Simply brush a thin layer to glaze the cake tops, let sit for about 10 minutes, and then continue frosting, as usual.
Can you use other sugars?
Yes! The same ratio applies (1:1)
- Use brown sugar or demerara sugar. Both types work perfectly for whiskey-based cocktails, such as an Old Fashioned or a whiskey sour. These liquid sugars will add a caramel note to coffee drinks. We used brown sugar in our Pumpkin Spice Syrup. Baked goods with cinnamon flavor or cardamom will only taste better with this version.
- Using Honey instead of white sugar tastes great with teas and lemonades.
- Coconut Sugar – coconut sugar is a plant-based low glycemic sugar option.

How to Make Simple Syrup
Ingredients
- 1 cup water
- 1 cup granulated sugar
Instructions
- In a small saucepan add the sugar and water. Stir to combine.
- Cook over medium heat, stirring occasionally, and heat until all of the sugar is dissolved.
- Remove from heat and let cool completely.
- Pour into a glass jar and seal tightly with a lid.
- Syrup will keep, refrigerated, for about 3 weeks.
Notes
- This recipe can be doubled or tripled.
- The ratio is always 1:1 (equal parts sugar to water).
- Store in the refrigerator for up to 3 weeks.
- If the syrup gets cloudy it’s time to discard it.
Nutrition
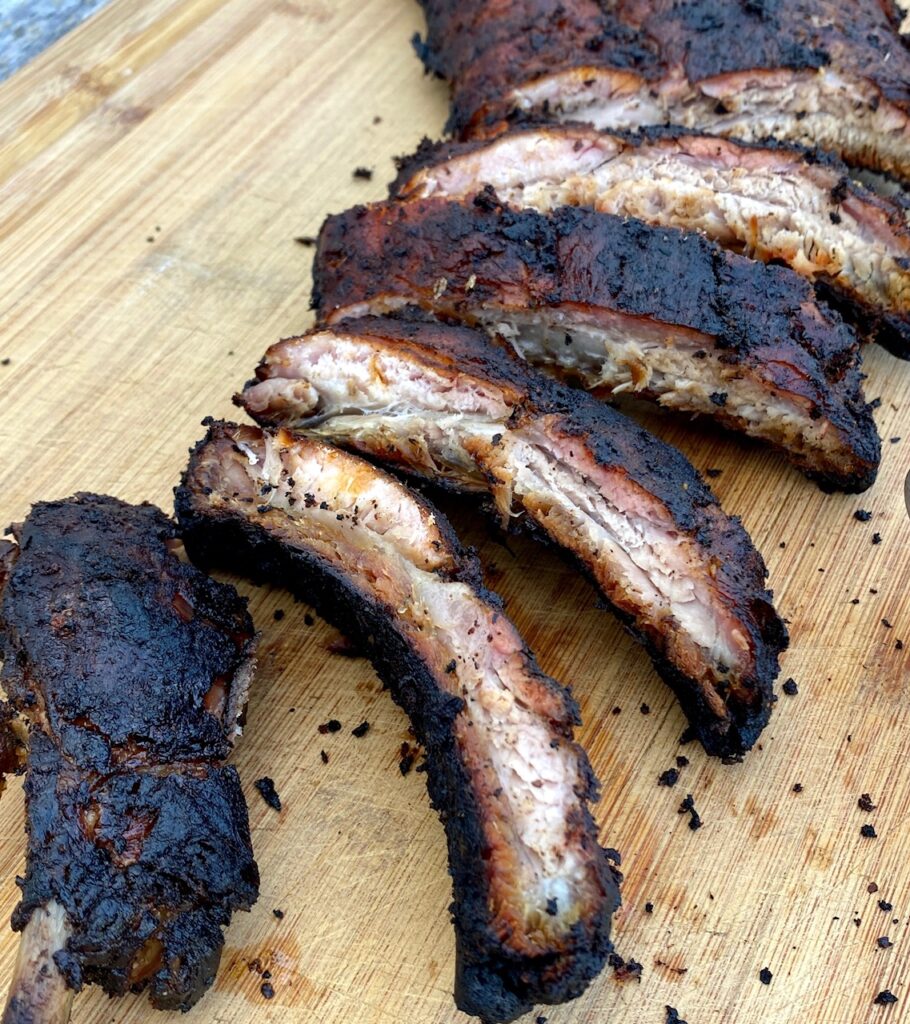
The key to perfect ribs is to season liberally and cook them slowly!
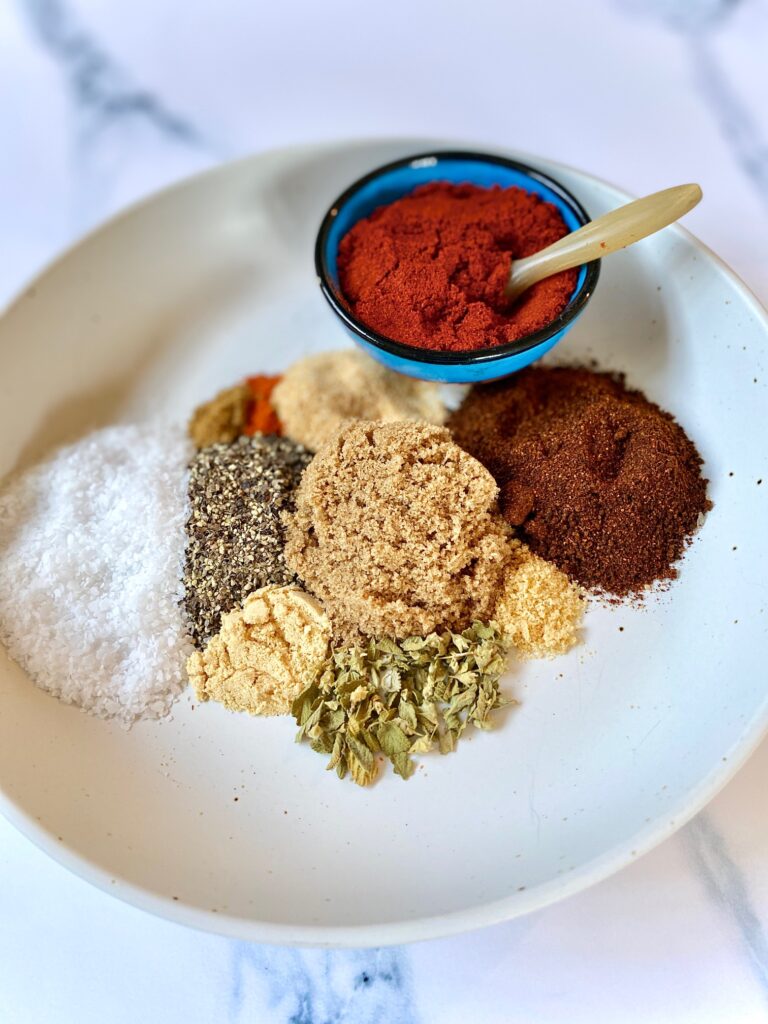
Our Dry Rub for Ribs which we use to season these ribs is easy to make and is a collection of basic pantry spices that can be used for any type of dry rub ribs
We will walk you through the simple, but important, steps to creating succulent, flavorful, and nearly falling-off-the-bone ribs
This is a weekend project for slow smoked ribs, so if you need a quicker method head over to our easy Oven Baked Ribs which are basically hands-off and loaded with flavor too!
Grab your BBQ apron and let’s get cooking!
This post contains affiliate links. Please see our affiliate disclosure for more details.

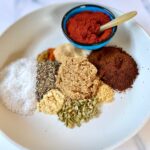
Ingredients needed:
(See the recipe card below for the exact quantities of ingredients)
Spice Rub ingredients for dry rub smoked ribs
- Paprika, Chili Powder, and Cayenne – these spices bring some heat
- Brown Sugar – we prefer dark brown for added sweetness
- Black Pepper and Kosher Salt – or use table or sea salt
- Garlic Powder and Onion Powder – essential for most meat rubs
- Dried Oregano – or use dried Italian seasonings
- Dry Mustard – for a light touch of spicy
- Ground Cumin – helps balance the heat and sweetness

Ingredients for the Ribs:
- Pork Ribs – 4 slabs, we recommend Baby backs or St. Louis style ribs
- Kosher Salt – or sea/table salt, but large flake is best
- Black Pepper – for a hit of spiciness
- Beer (or water) – we like the flavor beer imparts but you can also just use water
- Rosemary sprigs – optional but imparts a great herby flavor
- Mop Sauce – 1/2 cup rib rub + 16 ounces blended liquid (i.e. beer, brewed coffee, apple cider or juice, apple cider vinegar)

Step 1: Prepping the Ribs:
Preparing the ribs is an easy but important step:
- Wash the ribs and pat them dry
- Remove the membrane. This is optional in smoked ribs. The membrane helps hold the ribs together when cooking but can make them harder to cut later. Here’s how to do it: Gently slide a paring knife under the membrane itself, but not into the meat, to loosen the membrane sheet. Using your fingers, pull the membrane away from the bones. It should come off in a sheet. If it is difficult to remove, try sliding the knife under to loosen it again and use a paper towel to hold the membrane, and pull. (Here is an expert video from Weber to show you how it’s done)
- Season liberally with salt and pepper

Step 2: Steaming Ribs:
- To the bottom of a large roasting pan add the beer (or water) and a fresh rosemary sprig (optional). Use enough water to fill the bottom of the pan, but the water should not be touching the ribs
- Add a cooking rack to the pan, spray with nonstick spray, and then place the ribs on top of the rack in a single layer (with 4 racks you will likely need to repeat the process twice since most pans will only accommodate 2 racks – or use 2 pans)
- Lay a few sprigs of rosemary on top of the ribs
- Seal the ribs tightly with aluminum foil and steam over medium heat for about 30 minutes, flip the ribs, reseal the foil, and steam additional 30 minutes
- If needed reduce the temperature as the water should be steaming but NOT boiling
- While the ribs are steaming mix the dry rib rub spice mix in a small bowl
Step 3: Dry Rubbing Ribs:
- Remove from the heat, uncover, and allow the ribs to come to room temperature
- Rub the ribs with the prepared seasoning rub mix and liberally coat the ribs all over
- Place on a baking sheet and rest in the refrigerator, uncovered, for 8 hours or overnight

Step 4: Preparing Grill or Smoker:
Instructions below include 2 methods for smoking ribs:
- Smoking ribs on a charcoal grill
- Cooking on a traditional smoker
Remove the ribs from the refrigerator and allow them to come to room temperature while you prepare your smoker or charcoal grill (30-45 minutes ahead of time)
Prepare the Mop Sauce
Using a charcoal grill for smoking ribs
- This method, called the Indirect Method, uses lump charcoal, not pre-formed charcoal briquets. Consult the owner’s manual for your specific grill, if needed, since all grills are different
- Preheat the chunks until white hot (we suggest using a charcoal chimney starter)
- Arrange hot coals evenly on either side of the charcoal grate
- Place a drip pan in the center of the charcoal grate between the coals. Adding water to the pan helps prevent flare-ups and provides additional moisture to the ribs while cooking and is highly recommended
- Next, add one layer of hardwood pieces (these are different than the charcoal chunks) on top of the hot charcoal. We recommend hickory or oak. Don’t use wood chips because they burn out too quickly. Heat the wood for 5 minutes with the lid on
- The internal grill temperature should be 225-240˚F and the smoke should be light grey
- Place the cooking grate over the coals and lay the ribs meat side up on the cooking grate, centered over the drip pan.
- Place the lid on the grill
- Check and replenish the hardwood pieces as needed. Replenishing helps maintain a constant temperature and provides a steady stream of light grey to white smoke

Preparing a smoker for cooking ribs
- Every smoker is different so prepare each model as recommended by the manufacturer for the indirect cooking method. Use a combination of charcoal and hardwood. We recommend hickory or oak pieces for the best flavor
- Preheat the smoker to between 225˚- 240˚ F. Add a steamer pan inside the smoker for more moist ribs
- Replenish with hardwood as needed to maintain temperature and smoke production
- Lay the ribs meat side up, in a single layer, on the smoker grate and close the lid
Step 5: How to Smoke Ribs
- The following instructions are for both a charcoal grill and a traditional smoker
- Once ribs are on the smoker or grill, check them every 30-45 minutes and flip and rotate them to ensure even cooking
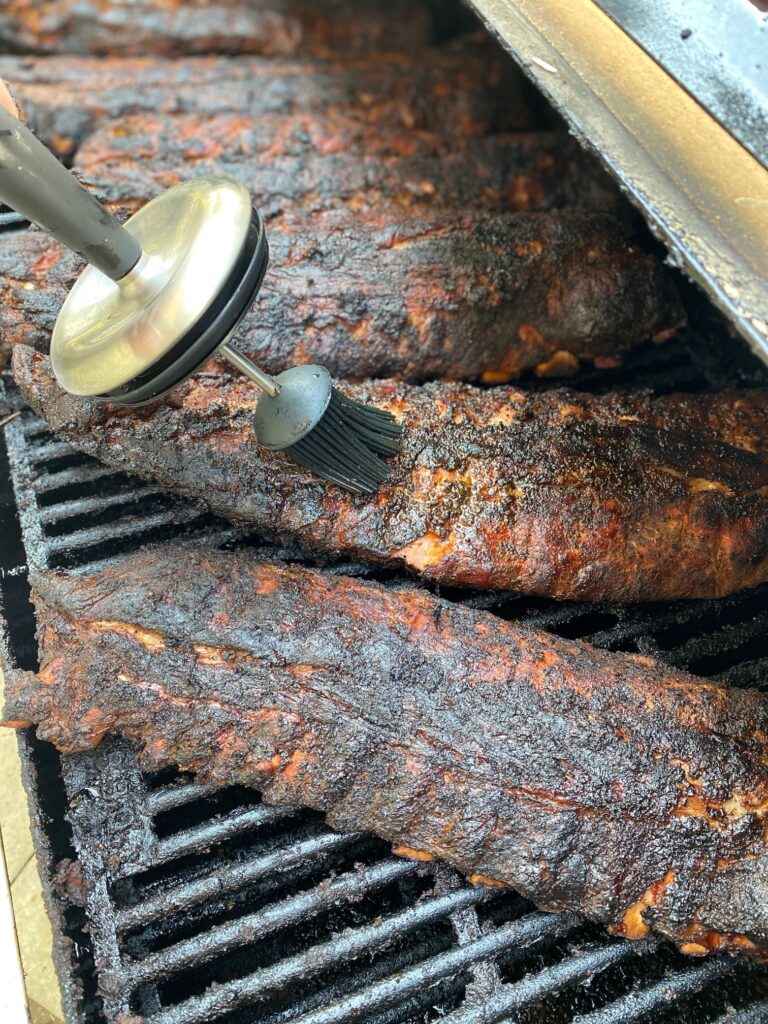
- If mopping, apply the mop sauce every time you flip the ribs (see below for more about mop sauce)
- Ribs are finished cooking when they reach an internal temperature of 195˚- 200˚F. This normally takes about 5-6 hours, depending on your individual grill or smoker. The best way to check is by using a digital meat thermometer.
- Remove rib racks from the smoker and let rest for 15 minutes. If adding BBQ sauce brush it on now while the ribs are still hot
- Cut slabs into individual pieces for serving
Optional Mop Sauce:
What is Mop Sauce? Mop sauce is a thin spice-flavored liquid used to moisturize low slow-cooking meats. It adds flavor and helps develop a light crust (sometimes called a “bark”) on the ribs.
We use a silicone mop brush (like the one pictured above) because it can withstand higher heat and is super easy to clean, however, any kitchen brush will work.
There are many choices when preparing a mop but you will want about 2 cups of total liquid for this recipe. The moisture from a mop sauce can also help attract smoke to the ribs during cooking.
Here’s our favorite mop rub combination for smoked ribs
- 1/2 cup of our dry rib rub
- 16 ounces liquid – we use half brewed coffee and half beer. You can also use apple cider or juice, or choose half apple cider vinegar and half water. Any combination of these liquids will work so feel free to get creative and use what you have on hand
Tips:
- Be sure ribs are at room temperature before smoking to ensure even cooking
- Using a meat thermometer to check the internal temperature of the ribs is the safest way to make sure they are ready
- Ribs with membrane left on will be easier to grill but a bit harder to cut when finished
- We suggest brushing BBQ sauce on after cooking so that it doesn’t burn, but if you want a caramelized BBQ taste then brush the sauce on about 5 minutes before the end of cooking
How long does it take to smoke ribs at 225˚F?
Ribs will be fully cooked in about 5-6 hours. They need to reach an internal temperature of 195˚- 200˚F
Why do you cook ribs low and slow?
Low and slow works best for ribs (and any other tougher cut of meat) because it gives the meat plenty of time to break down and become more tender without losing all of its moisture in the process. Ribs come out tough when you cook them on high heat too quickly.
Storage Tips
Refrigerator: Cooked ribs can be stored sealed in the refrigerator for up to 3 days and gently reheated in the oven
Freezer: Cooked, cooled, and tightly sealed ribs can be frozen for up to 3 months. You can gently reheat them in the oven from a frozen state. Ribs freeze beautifully and make a great quick dinner.
Our favorite side dishes for ribs
- Since the BBQ is hot try Grilled Caesar Salad for a fun twist on a classic or easy Grilled Corn on the Cob
- Baked Beans, Green Beans Almondine, and Oven Roasted Potatoes are perfect pairings
- Looking for a light salad? This Citrus Salad is a great contrast to rich smoked ribs
If you like these, try these:
- Oven Baked Ribs – these ribs are simple, hands off, and “fall off the bone” in about 2-3 hours
- Carne Asada is a quick BBQ meal with flank or skirt steak
- Try the king of steaks: The Tomahawk Steak


Smoked Ribs
Equipment
- 1 Smoker (or charcoal grill)
- 1 Roasting pan (or sheet pan)
Ingredients
Ribs:
- 4 slabs Pork ribs (St Louis or baby back ribs)
- ½ cup kosher salt
- ¼ cup black pepper, ground
- 24 ounces beer, optional for steaming
- 3 Fresh rosemary sprigs
Ingredients for rib rub mix:
- ½ cup paprika
- ⅓ cup chili powder
- ¼ cup dark brown sugar
- ¼ cup black pepper, ground
- ¼ cup kosher salt
- 3 Tablespoons garlic powder
- 1 Tablespoon dried oregano
- 1 teaspoon dry mustard
- ½ teaspoon cumin
- ½ teaspoon onion powder
- 1 pinch cayenne
Optional Mop Sauce:
- ½ cup rib rub mixture (or a salt, pepper and paprika combination)
- 16 ounces liquids – including vinegar, apple juice, water, coffee, beer, apple cider
Instructions
For the rib rub mixture:
- Blend all of the rub ingredients together in a medium bowl and set aside
Prepping the Ribs – Step 1
- Remove the racks of ribs from the packaging, rinse, and pat dry.If desired, pull the thin membrane off the back of the ribs. (This is optional but easy to do and makes the ribs easier to cut and eat. It usually pulls off in one big sheet).
Steaming the Ribs – Step 2
- Once the ribs have been seasoned place them on an oiled rack and into a roasting pan. Add the beer and enough water to fill bottom of pan, but water should not be touching the ribs. Lay the rosemary sprigs over the top of the ribs, and tuck one below in the beer-water mixture. Cover tightly with foil and steam on medium heat for 30 minutes. Flip the ribs over, reseal foil, and steam for an additional 30 minutes.
Dry Rubbing the Ribs – Step 3
- Remove from the heat, uncover, and allow the ribs to come to room temperature.Rub the ribs with the prepared seasoning rub mix and liberally coat the ribs.Place on a baking sheet and rest in the refrigerator, uncovered, for 8 hours or overnight.
- After resting: Remove the ribs from the refrigerator and allow them to come to room temperature while you prepare your smoker or charcoal grill. This will take about 30-45 minutes.Prepare the mop sauce and set aside
Preparing Grill or Smoker – Step 4
- Prepare your grill or smoker for the "Indirect Method" of cooking with lump charcoal and hard wood pieces (such as oak or hickory) and a drip pan with water.Every grill/smoker is different so please refer to your manual and the post above for more details. Internal temperature of the grill or smoker should be between 225° – 240° F.
- Be sure to replenish the hardwood as needed to maintain the temperature and smoke level.
- Place the cooking grate over the coals (grill only) and lay the ribs meat side up on the cooking grate, centered over the drip pan. Close the lid.
Smoking Ribs – Step 5
- Check the ribs every 30-45 minutes, flip over, rotate, and mop them each time.Cook until ribs reach an internal temperature of 195°-200° F. (typically 5-6 hours)
- Remove rib racks and allow ribs to rest for 15 minutes. Cut into individual ribs.If adding BBQ sauce brush on while the ribs are still hot.
Notes
- Be sure ribs are at room temperature before smoking to ensure even cooking
- Using a meat thermometer to check the internal temperature of the ribs is the easiest way to make sure they are fully cooked
- Always check the manufacturer’s directions for your individual BBQ or smoker because each model is different
Nutrition
The best part of ribs is that big hit of flavor you get with every finger-licking bite!
Our classic recipe for dry rub for ribs is the key to supercharged flavor. Using a handful of pantry staple spices you can transform every rack of ribs, including pork ribs, spare ribs, and beef ribs!
We use this spice mixture in all of our baby back ribs recipes. Our Oven Baked Ribs, flavorful Smoked Ribs, and Slow Cooker Ribs start as dry rub ribs and use this flavorful rib seasoning.
This post may contain affiliate links. Please see our affiliate disclosure for more details.
Ingredients needed for homemade Rib Rub
When we say easy, we aren’t kidding! This super flavorful spice blend has the perfect balance and comes together in about 5 minutes!
Below is the list of the handful of seasonings needed to make your own dry rub, and some thoughts on why we chose each of them. Be sure to use fresh spices for the best results!
(The exact measurements are listed in the recipe card below)
- Paprika – Use the best quality sweet paprika from Hungary, if possible. You can also substitute smoked paprika if you want added wood-fired smoky flavor
- Chili Powder – Chili powder is a mixture of herbs and spices but is mainly made up of a combination of dried chile varieties. Any type will work!
- Dark Brown Sugar – We love the deep flavor of dark brown sugar, due to the presence of molasses. Light brown can be substituted if that is all you have on hand. If you are paleo-friendly use coconut sugar instead
- Black Pepper – Freshly ground pepper gives this rub a kick!
- Kosher Salt – This type of salt has wider, coarser crystals and no additives. The larger size allows it to salt food more gently. If you don’t have kosher salt the best substitute is coarse sea salt. If you use regular table salt cut back the amount used by half
- Garlic Powder – Garlic salt can be a substitute, but if using cut back on the kosher salt
- Dried Oregano – You could also use dried rosemary
- Dry Mustard Powder – Made with ground mustard seeds, also called ground mustard, this powder adds a distinct tangy flavor. Dry mustard is quite acidic which helps tenderize meat
- Cumin – This popular spice adds earthy warm flavors and enhances any dish. Be sure to use ground cumin, rather than cumin seed
- Onion Powder – Onion salt can be used as a substitute but cut back on the kosher salt if you use onion salt instead of onion powder
- Cayenne Pepper – We use a generous pinch but if you want an extra punchy flavor use 2 pinches – or none at all if you don’t like as much heat!
How to Make Homemade Rib Rub
- Measure each ingredient into a small bowl and whisk together with a fork to make sure it is well-blended
- This makes 2 cups of rub and enough rib rub for 6+ racks of ribs (about 12 ribs per rack)
- Use the rub mix right away, or make it ahead of time, and store it in sealed mason jars or a spice jar to keep it fresh for future use

How to apply Dry Rib Rub
- Always rinse racks of ribs and then pat them dry with a paper towel so you begin with dry ribs
- Apply the dry rub liberally on all sides, including the back of the ribs, and the ends of the rib rack. The best way to make sure every part is covered is to massage the rub in with your hands
- Allow the rub to sit on the ribs for the absolute best flavor. We recommend a minimum of 30 minutes resting time at room temperature, but ideally, up to 12 hours in the refrigerator
- You will need about 1/3 cup of spice rub for each rack
- Cook as directed using your preferred method and follow up with our 10-minute Homemade Barbecue Sauce or your favorite sticky BBQ sauce
- This recipe is enough for 6 racks so if you are only making two racks adjust accordingly, or save the remainder in an airtight container for your next batch of barbecue ribs
Using homemade dry rub on meats
This spice blend is the perfect combo for ribs but will also work with any cut of pork. Try it on pork loin, pork tenderloin, pork chops, or pork shoulder. It also tastes great on chicken, wings, and beef ribs.
This blend is easy and inexpensive, with no secret ingredients, so make extra to keep on hand. Sprinkle it on french fries, sweet potatoes, or baby potatoes too.
How to Store Dry Rub
- Store this rub mixture in an airtight container in your spice cabinet or a cool dry place. Label (and date) it so you have it ready anytime. We like to use these 6 oz spice jars and this recipe is enough for about 3 jars
- Spice blends will keep for about 6 months before they start to lose their potency, but they are best used within 3 months
- Be sure to use fresh spices. The best way to check to see if your spices are still flavorful is to rub a little between your fingers and see if they are still aromatic
- This recipe can easily be doubled or tripled or can be cut in half
Sides to Serve with Ribs
- Grilled Corn on the Cob with Sweet Chili Sauce
- Easy Grilled Caesar Salad
- Baked Beans
- Black Bean and Corn Salad
- Asian Coleslaw with Peanut Dressing
Our favorite drinks to serve with ribs
- White Sangria – great for a group!
- Dirty Shirley Cocktails – cherries are always a match with BBQ ribs
- Watermelon Vodka Cocktails – a perfect summer match!
We love to make our own rubs, sauces, and seasonings so jump on over for more ideas

Dry Rub for Ribs
Ingredients
- ½ cup paprika
- ⅓ cup chili powder
- ¼ cup dark brown sugar
- ¼ cup black pepper, ground
- ¼ cup kosher salt
- 3 Tablespoons garlic powder
- 1 Tablespoon dried oregano
- 1 teaspoon dry mustard powder
- ½ teaspoon ground cumin
- ½ teaspoon onion powder
- 1 pinch cayenne
Instructions
- Combine all ingredients in a bowl and blend well
- Use immediately or store in an airtight container
Notes
- The yield is about 2 cups of dry rub
- This recipe is enough to generously coat 6+ racks of ribs
- Store for up to 6 months
Nutrition
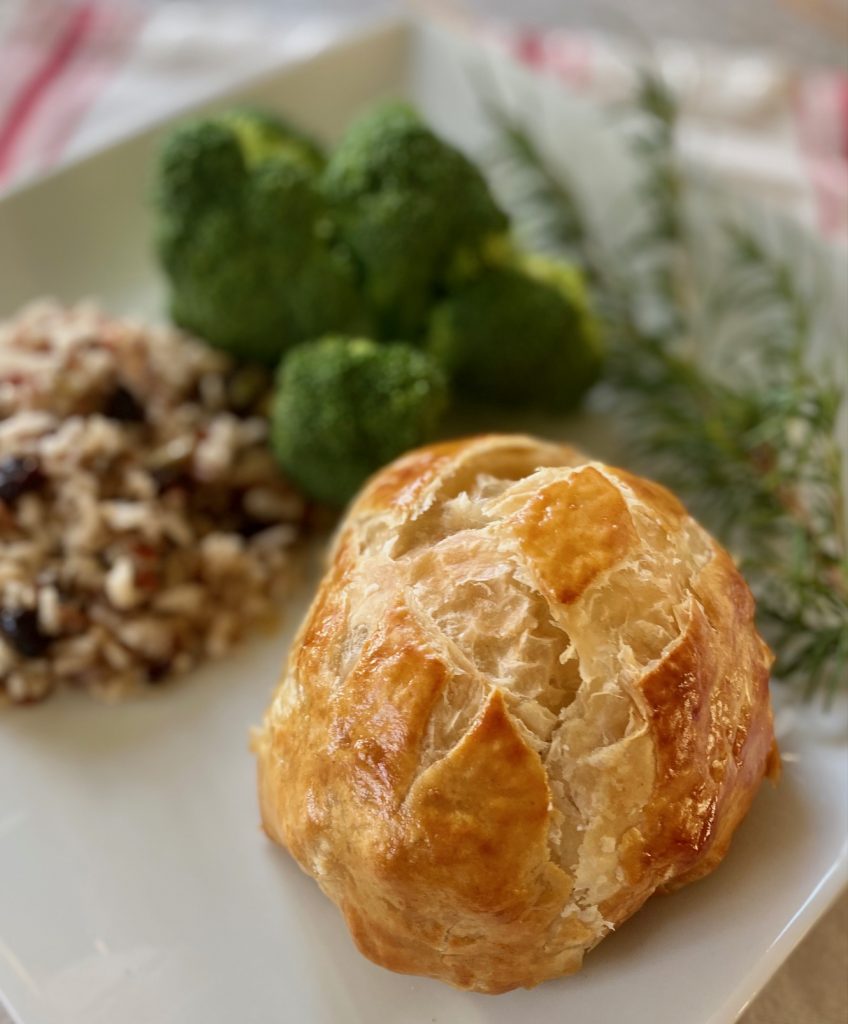
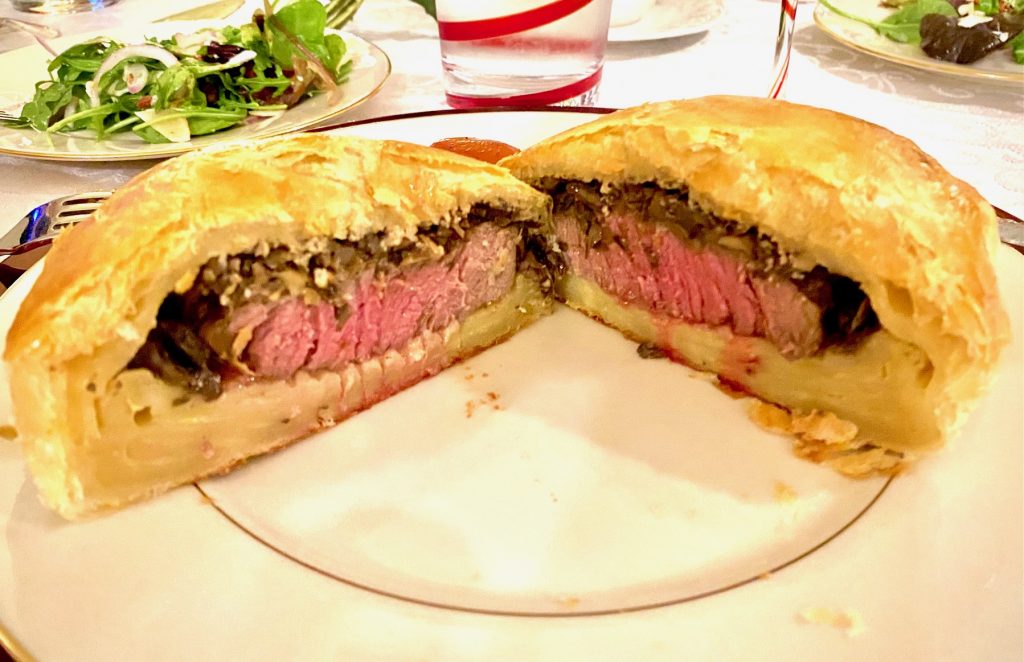
These Beef Wellingtons are layered with flavor and are ideal for special occasions and holiday dinners
They are super luxurious!
What are Beef Wellingtons?
Beef Wellington is a tender filet mignon steak wrapped in delicate puff pastry. It is allegedly named after Arthur Wellesley, the first Duke of Wellington.
The Wellingtons have a filling of filet mignon, seasoned mushrooms (called duxelles), pâté, and Dijon mustard which all add to the decadent flavor.
There are multiple steps but they are all simple. We make it easy with step-by-step instructions below. If you’ve never made them before we highly recommend reading through this entire post for details about each step.
Ingredients for Individual Beef Wellington recipe
- Butter – unsalted
- Shallots – we love the flavor of shallots, which are part of the same family as the onion but softer
- Garlic
- Rosemary or Thyme – fresh if available
- Dry Sherry or Red Wine – either will work for deglazing the pan, or you could use beef broth
- Mushrooms – we use regular button mushrooms
- Filet Mignons – the star of the show! Be sure they are trimmed of fat
- Pâté – see more about pâté below
- Puff Pastry – Easy to find and our choice for a light fluffy pastry shell
- Olive Oil

What cut of meat is best for Beef Wellington?
- Individual Beef Wellingtons are made using prime beef filet mignons, cut about 2 inches thick and weighing 4-6 ounces each.
- All of the excess fat and silverskin should be trimmed away before cooking.
How to make Individual Beef Wellingtons
Prep:
- If your puff pastry is frozen thaw it in the refrigerator for 4 hours or at room temperature for about 30 minutes. You want to work with cold puff pastry because it’s easier to roll out and stretch.
- Chop the shallots, garlic, and rosemary or thyme in a food processor and set aside.
- Chop the mushrooms, in a food processor, into a fine crumble, similar to the consistency of bread crumbs. Don’t over-process into a paste. Set aside.

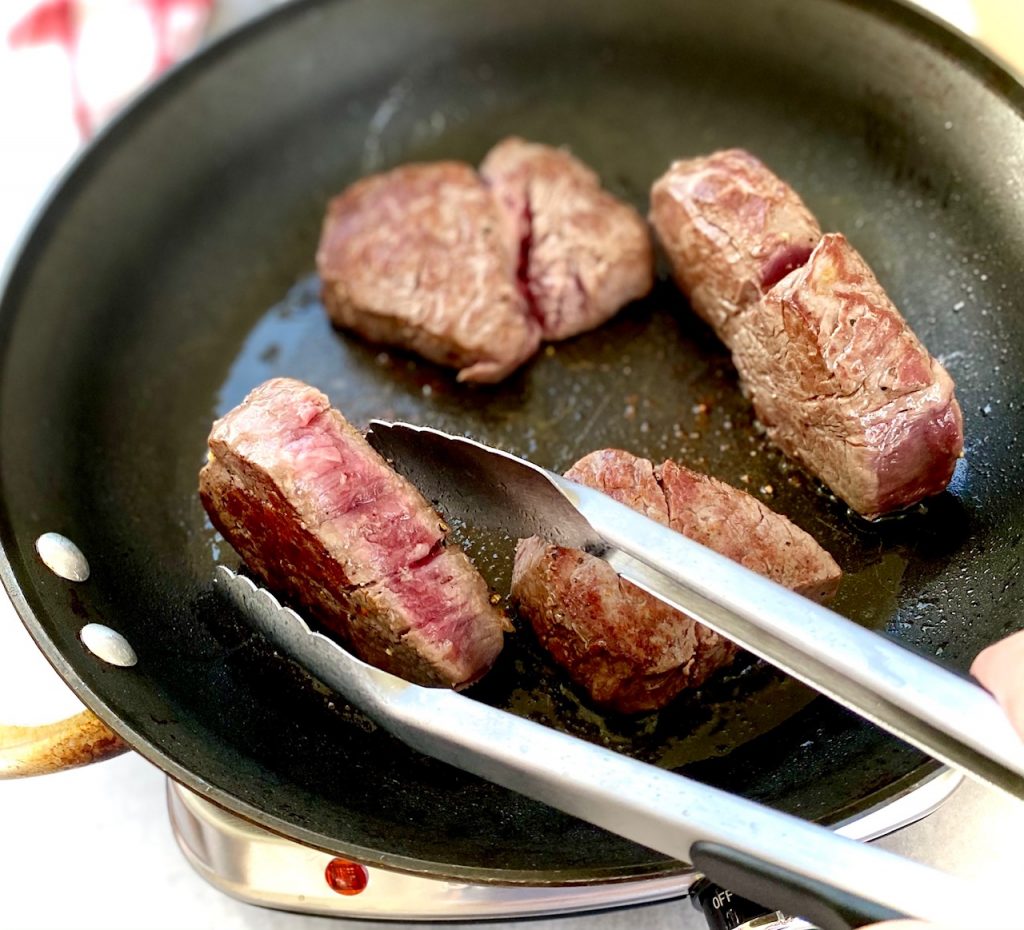
Searing the meat:
- Trim the filets of any fat, rinse, and pat dry. Salt and pepper generously.
- Heat oil until shimmering in a heavy-bottomed pan.
- Sear the meat on both sides and then sear the sides.
- Remove from heat and brush the meat with Dijon mustard. Set aside.

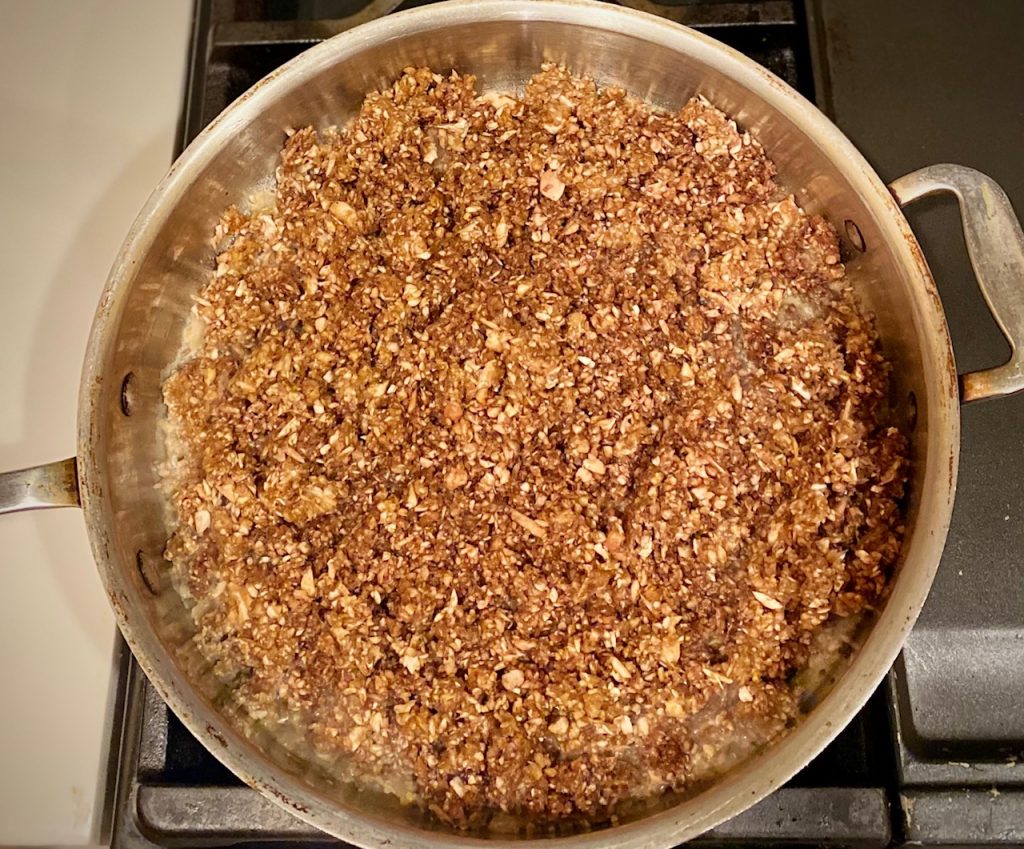
Cook the mushroom filling:
- Add butter to the pan that the steaks were cooked in and saute the shallots, garlic, and rosemary or thyme.
- Scrape the bottom of the pan to loosen the steak bits. Add the sherry and cook until the liquid is evaporated.
- Add the mushrooms, salt, and pepper and cook until all the liquid has evaporated and the mushrooms are dry. This will take about 25-30 minutes.
- Remove from the heat, and refrigerate to cool down.
Assembling Individual Beef Wellingtons
- Prepare the egg wash by whisking together the egg and milk.
- Preheat the oven to 400°F.
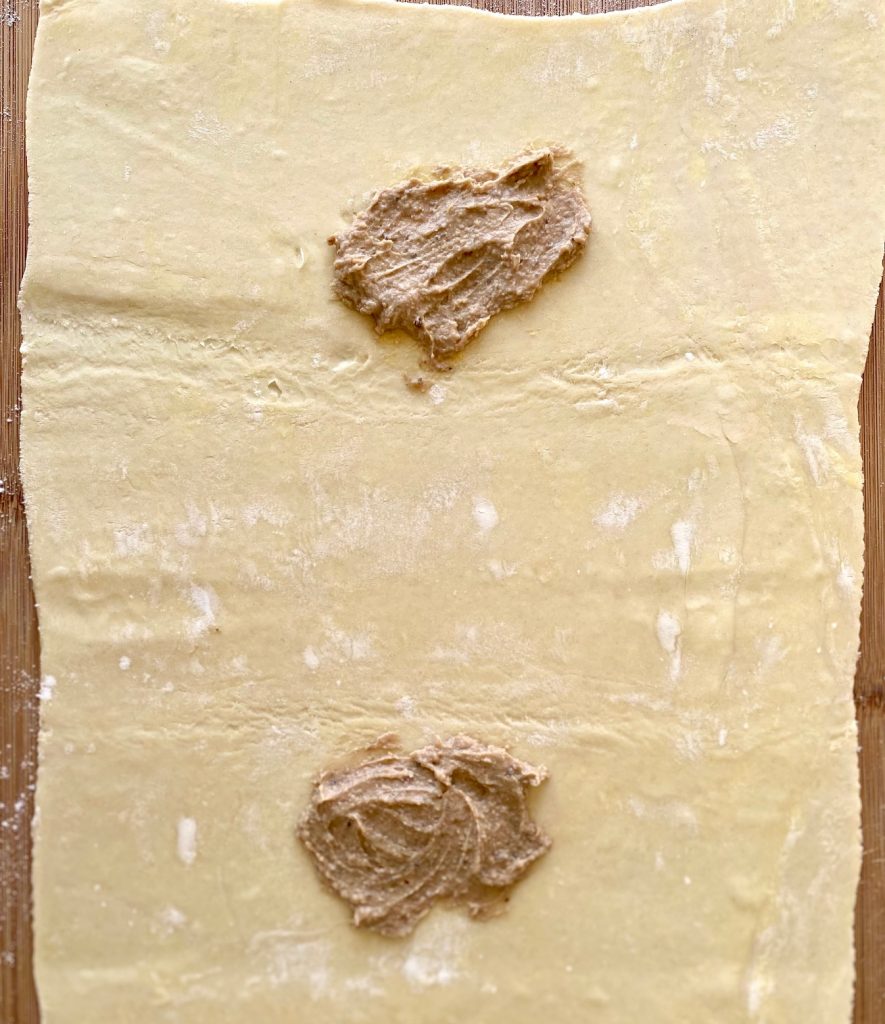
- Lightly flour a cutting board or countertop for rolling out the puff pastry.
- Roll out one cold sheet of rectangle puff pastry at a time, making it square-shaped (Each piece of puff pastry will make 2 individual beef Wellingtons).

- Place 2 Tablespoons of pâté in the middle of each half of the pastry.
- Top with 4 Tablespoons of the mushroom mixture. Place the Dijon-coated filet on top of the mushrooms.
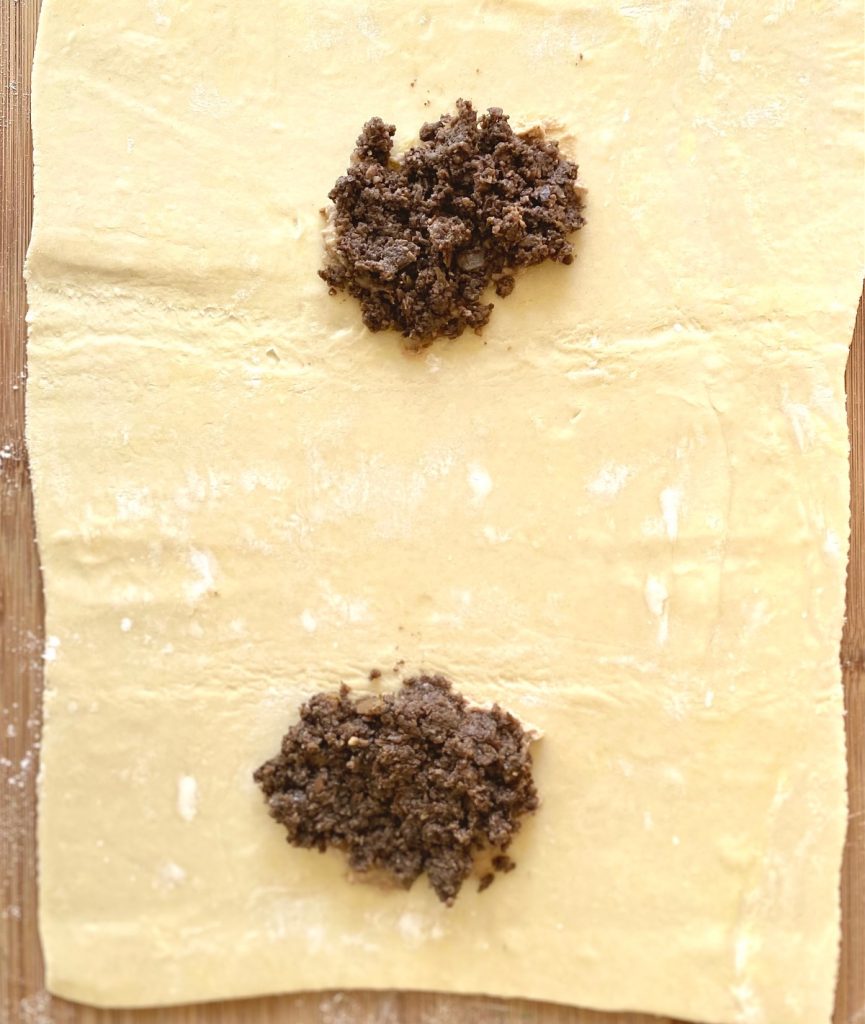
- Cut the puff pastry into two equal pieces – one for each Wellington.
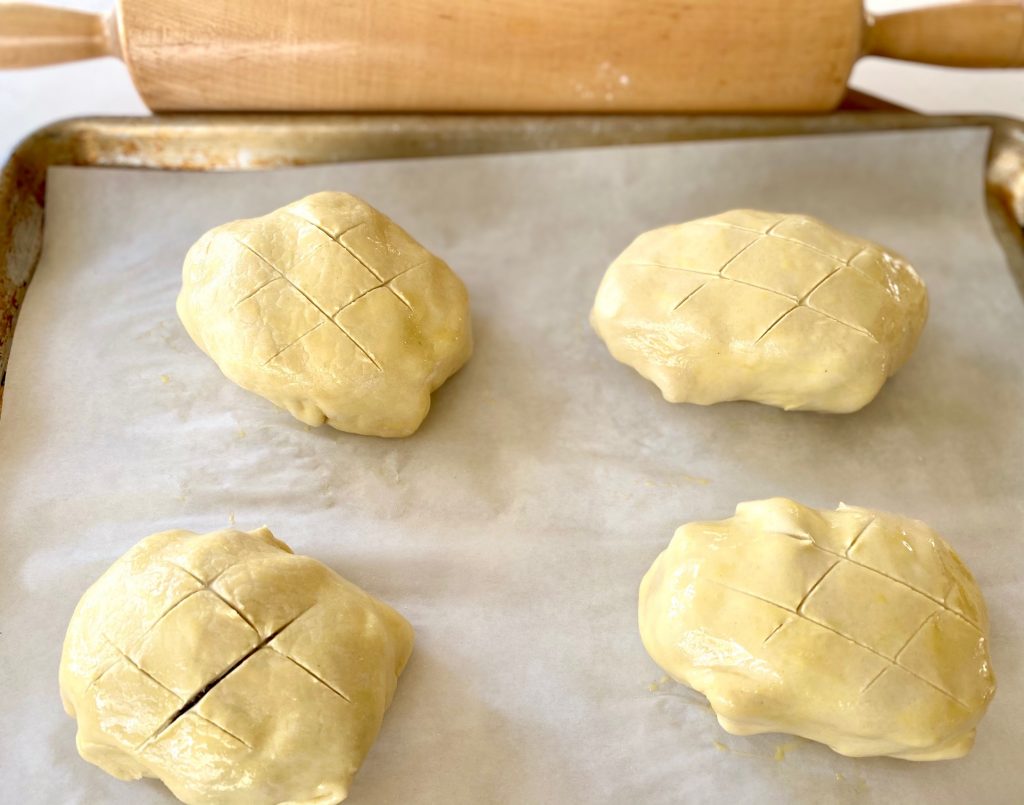
- Brush the edges of the puff pastry with egg wash. Pull the pastry up around the filet and overlap to cover. Brush again with the egg wash to seal the edges.
- Repeat with the other piece of puff pastry to make a total of 4 individual Beef Wellingtons.
Cooking:
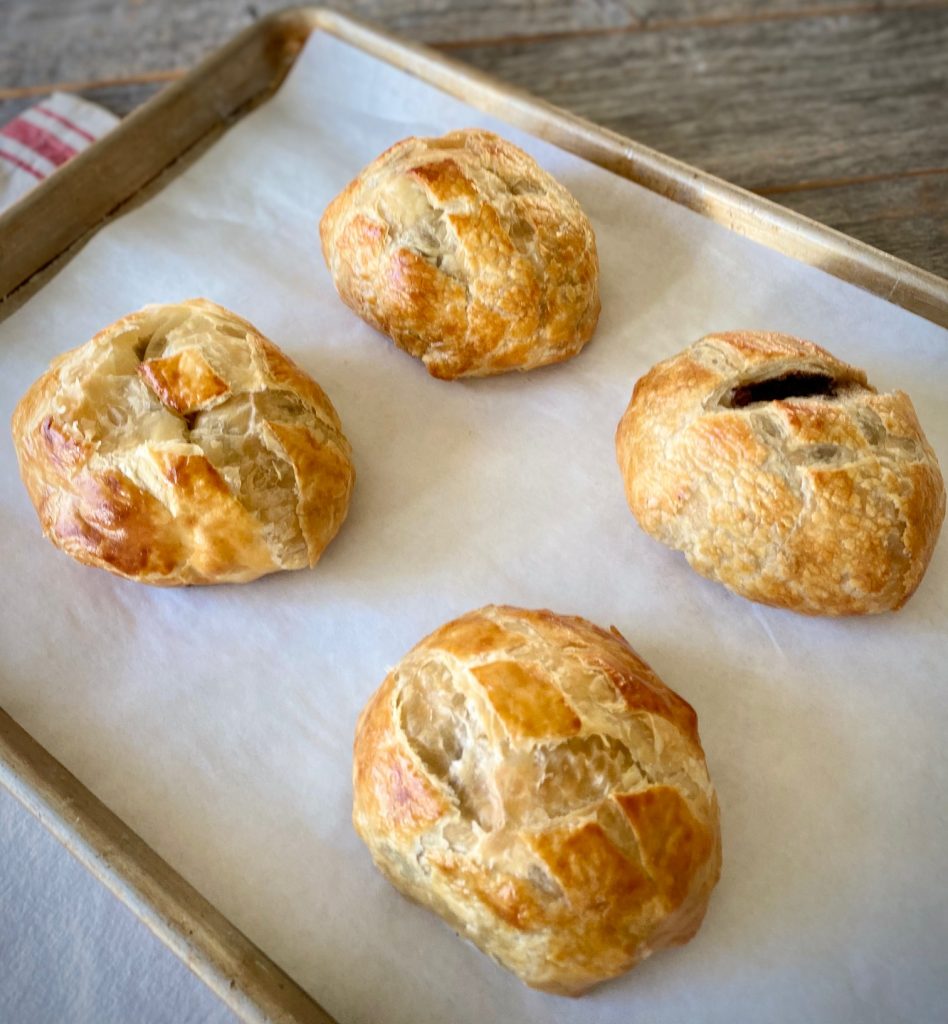
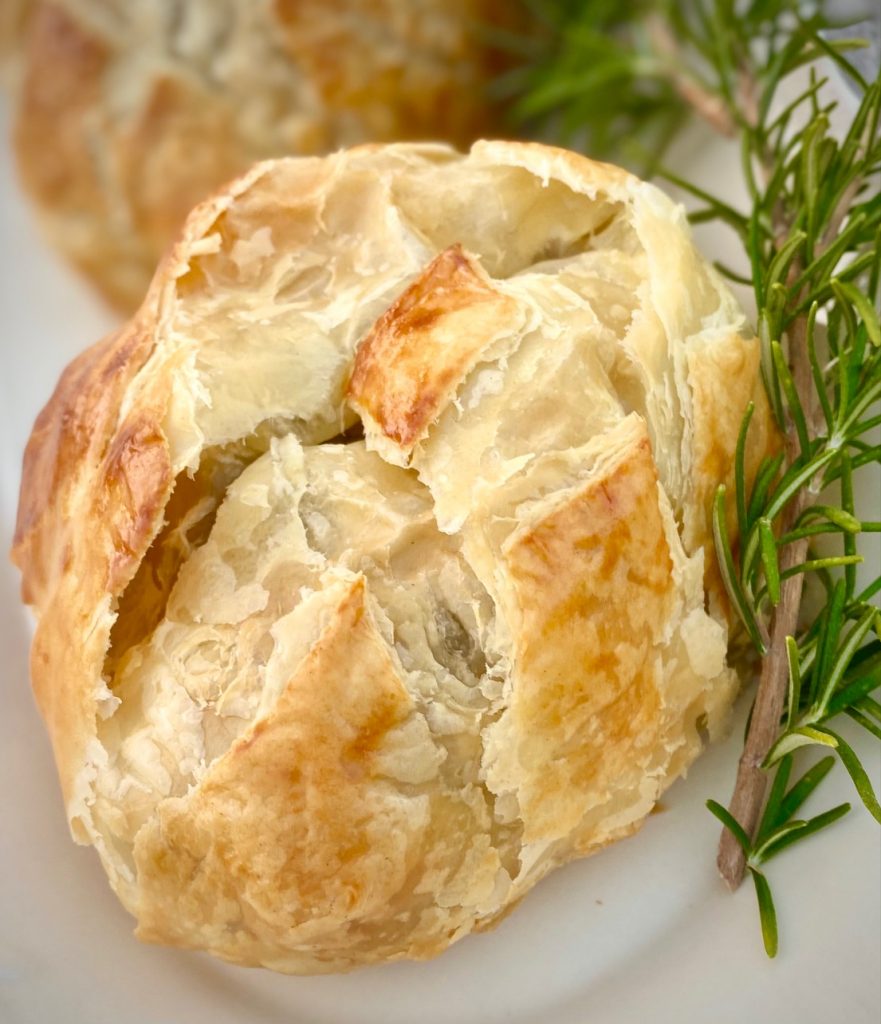
- Place on the baking sheet seam side down. Lightly score the pastry with the tip of a sharp knife on the top of each beef Wellington. This will allow steam to escape during baking.

- Bake in preheated oven for 20-30 minutes depending on if you want medium-rare or medium meat. The pastry should be golden brown all over.
- Let rest on the sheet pan for 10 minutes before serving.
About Pâté and Beef Wellington variations
- We like our Beef Wellingtons made the traditional way with mushrooms and pâté, but if you don’t care for pâté you can omit it.
- Prosciutto is a popular addition to beef Wellington. If you decide to add prosciutto it will be the first layer on the puff pastry (before the pâté or mushrooms).
Tips for working with puff pastry
- Before using frozen puff pastry it needs to be thawed out in the refrigerator for about 4 hours, or 30 minutes at room temperature.
- Separate the wrapped layers but do not unfold until thawed out and ready to use.
- The pastry will dry out fairly quickly so don’t unwrap until ready to use or keep it covered with plastic wrap.
- Always keep puff pastry cold for the best results.
What to serve with Beef Wellington
Beef Wellington is a rich dish so it is best served with lighter sides. Our favorite is Rice Pilaf or Green Beans Almondine.
In winter months pair it with our citrus-based Tricolore Salad with Oranges and in the summer try it with our Strawberry Spinach Salad.
Can Beef Wellingtons be prepared in advance?
Yes! This is a perfect make-ahead dish. Nearly all of the components can be prepared ahead of time.
- The mushrooms take the longest to prepare so those are ideal to make ahead and then keep in the refrigerator for up to 2 days.
- You can prepare the entire recipe, chill, and then freeze the Wellingtons. Wrap them individually and freeze them for up to 3 months.
- When ready to bake, remove and leave at room temperature for 15-20 minutes, brush with egg wash, and bake but add about 10 minutes to the cooking time.
Suggestions for Wine Pairings
When pairing wines with Beef Wellington a medium to full-bodied dry red wine will stand up well to the richness of the pâté and mushroom duxelles. Here are some of our favorites to give you an idea of what pairs well.
Your weekday wine:
- 2016 Duckhorn Cabernet Sauvignon, Napa Valley
- 2014 Chateau St. Estepe de Montrose, France
Your weekend wines:
- 2018 Caymus Cabernet Sauvignon, Napa Valley
- 2017 Duckhorn Merlot, Napa Valley
Special Occasion Wines:
- 2016 Silver Oak Cabernet Sauvignon, Alexander Valley
- 2016 Groth Vineyards, Cabernet Sauvignon, Oakville

Individual Beef Wellington Recipe
Ingredients
- 2 puff pastry sheets
Mushroom Filling:
- 3 tablespoon shallots, minced
- 1 tablespoon garlic, minced
- 2 tablespoon fresh rosemary or thyme, minced (or 2 tsp dried)
- 20 ounces mushrooms, minced
- 2-8 tablespoon butter, or olive oil
- ½ cup dry sherry (or red wine)
- 2 teaspoon salt
- 1 teaspoon black pepper, freshly ground
Filling for Wellingtons:
- 1 tablespoon olive oil
- 4 4-ounce fillet mignons, about 2" thick
- 1 teaspoon salt
- ½ teaspoon black pepper, freshly ground
- 4 teaspoons Dijon mustard
- 8 tablespoons pâté
For Sealing Puff Pastry:
- 1 egg
- 2 Tablespoons milk, cream, or water
Instructions
- Thaw the puff pastry if frozen. Keep covered, refrigerated, until ready to use to avoid it drying out.Place oven rack to the middle position. Preheat oven to 400°F.
- Finely mince shallots, garlic, and rosemary in a food processor and set aside. Finely mince mushrooms in the food processor until they are the texture of bread crumbs, but not a paste.
Searing the meat:
- Trim the filets of any excess fat. Pat dry and season with salt and pepper.
- In a large skillet, heat 1 tablespoon olive oil, over medium heat, until shimmering. Sear the fillets for 2-3 minutes on each side. Sear the sides lightly, as well. All surfaces should be seared. Remove fillets from the pan and immediately brush warm fillets with Dijon mustard. Set aside on a plate.
Cooking Mushroom Filling:
- Add the butter to the pan that the meat was seared in, at medium heat, and saute the shallot, garlic, and rosemary mixture for 2 minutes, scraping the bottom of the pan to loosen the steak bits. Add the sherry and cook until liquid is evaporated.
- Add mushrooms, salt, and pepper. Cook about 25-30 minutes or until the liquid has evaporated.
- Remove from heat and cool the mixture in the refrigerator.
Assembling the Beef Wellingtons:
- Make the egg wash by whisking the egg and milk together in a small bowl.
- Lightly flour a cutting board and roll out a cold sheet of rectangle puff pastry to make it square-shaped. Each piece of puff pastry will make 2 individual beef Wellingtons.
- Place 2 tablespoon of pâté in the middle of each half. Top with 3-4 tablespoons of the mushroom mixture. Then place the Dijon coated fillet on top of the mushrooms.
- Cut the puff pastry into two equal pieces – one for each Wellington. Brush the edges of the puff pastry with the egg wash. Pull the pastry up around the filet and overlap to cover. Brush again with the egg wash to seal the edges.Repeat with the other piece of puff pastry to make a total of 4 individual beef Wellingtons.
- Line a sheet pan with parchment paper or aluminum foil. Place the beef Wellingtons seam side down on the sheet pan. Lightly score the top of each Wellington with a knife in a cross hatch pattern, but don't cut all the way through the dough. Brush with the egg wash lightly.
- Bake in the preheated oven until the pastry is golden brown. Cook for about 20 minutes for medium-rare meat (internal temp of 125°) and up to 30 minutes for medium meat (internal temp of130-135°).
- Let the Wellingtons rest on the pan for at least 10-minutes before serving.
Make Ahead Instructions:
- You can prepare the entire recipe, chill, and then freeze the Wellingtons. Wrap them individually and freeze up to 3-months. When ready to bake, remove and leave at room temperature for 15-20 minutes, brush with egg wash, and bake. Add about 10 minutes to the cooking time.
Notes
- Mushrooms can be made ahead up to 24 hours in advance. Refrigerate until ready to use.
- You can prepare the entire recipe, chill, and then freeze the Wellingtons. Wrap them individually and freeze for up to 3-months. When ready to bake, remove and leave at room temperature for 15-20 minutes, brush with egg wash, and bake. Add about 10 minutes to the cooking time.
Nutrition
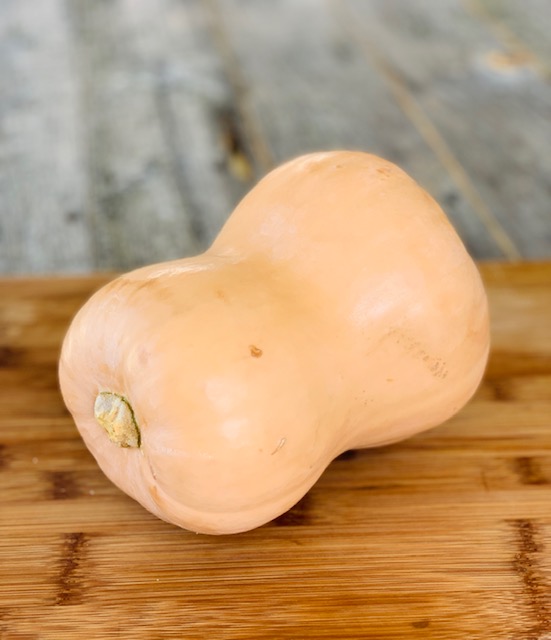
Butternut squash is super versatile and can be used in many different ways. You can buy it pre-cut in the store but it will be fresher if you cut it yourself.
It’s more economical to prepare it yourself. Plus, it’s easy!
Ready to get started? Just click the “jump to recipe” button or keep reading for more tips and ideas. This post may contain affiliate links. Please see our affiliate disclosure for more details. We only recommend products we love and use.
Butternut squash is almost as popular as pumpkin during the Fall and Winter. It takes about 3 minutes to prep it and you are ready to go!
Equipment needed
- Large cutting board
- Large, heavy sharp knife
- A good peeler. I prefer a swivel peeler, but a good Y peeler works equally well.
How to cut a butternut squash
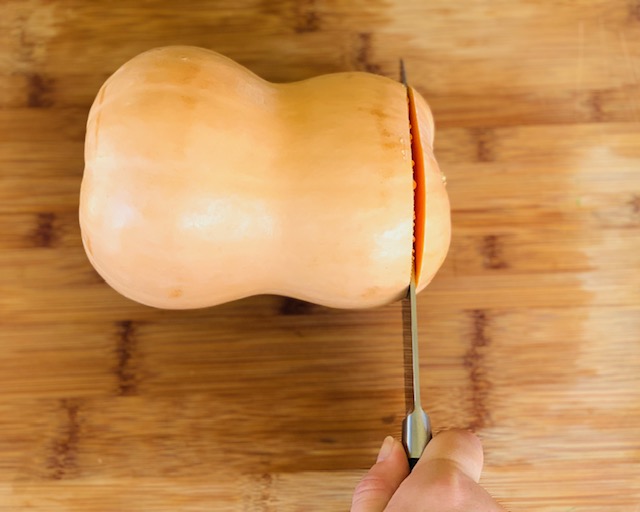
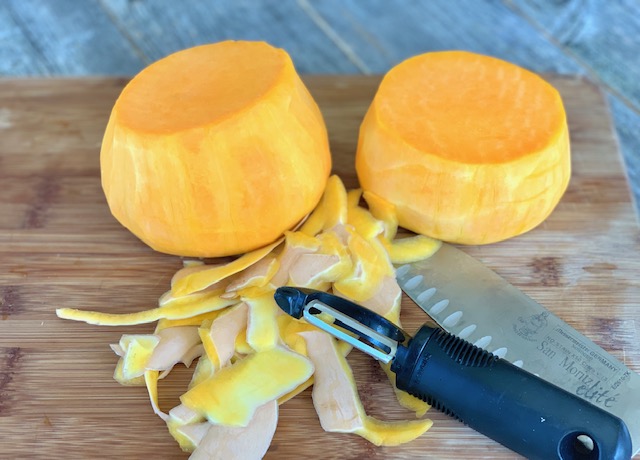
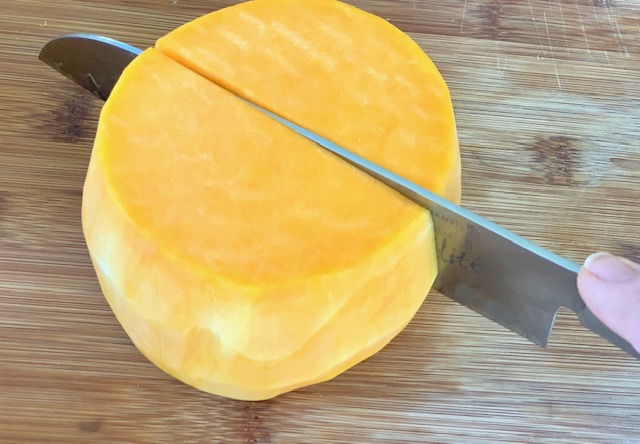
This guide will make sure you safely cut the squash. Here are steps:
- 1 and 2: Because the shape is odd, cut the stems off on both ends to begin
- 3 – Cut in two equal pieces and lay the squash flat on each end to safely cut and peel
- 4 and 5- Once the squash is peeled (step 4) you will slice it in half again (see step 5)
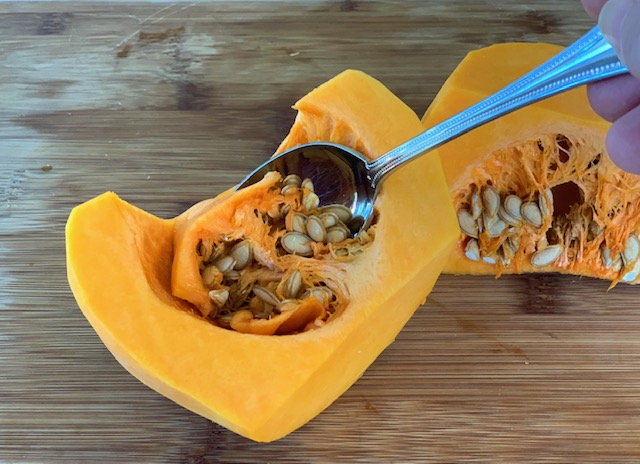
- 6 – Scoop out the seeds and discard them
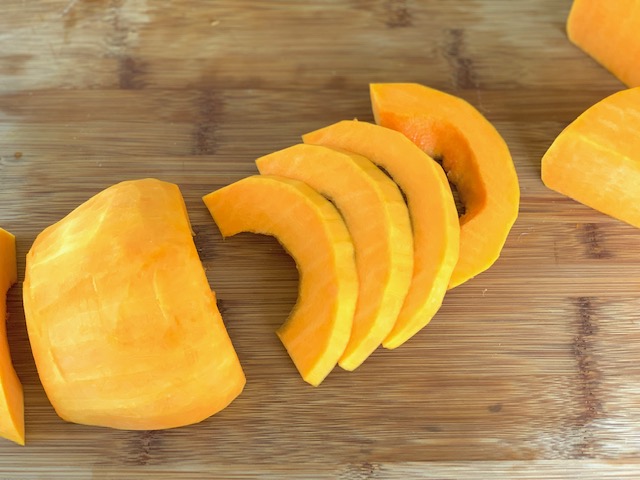
- 7 – Lay the squash quarter flat side down and cut into slices
- 8 – Cut the slices into cubes, if desired

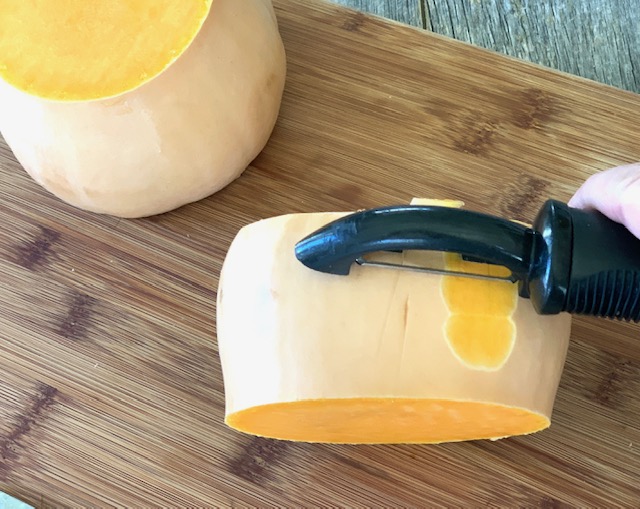

Does butternut squash have to be peeled before roasting?
The skin on butternut squash is very tough so it should be peeled before you can eat the squash. There are some who like to eat the skin once it is roasted but most prefer the squash peeled.
Can you prep and peel the squash ahead of time?
Yes! You can peel, prep, and cut the squash up to 3 days in advance. Once prepped just store in an airtight bag or container in the refrigerator.
Ideas for using butternut squash
There are so many fun recipes you can make once you have it peeled and cut. Use this method to prepare the squash for everything from soups to simple roasting. Adding to salads is an easy way to turn a simple side salad into a meal.
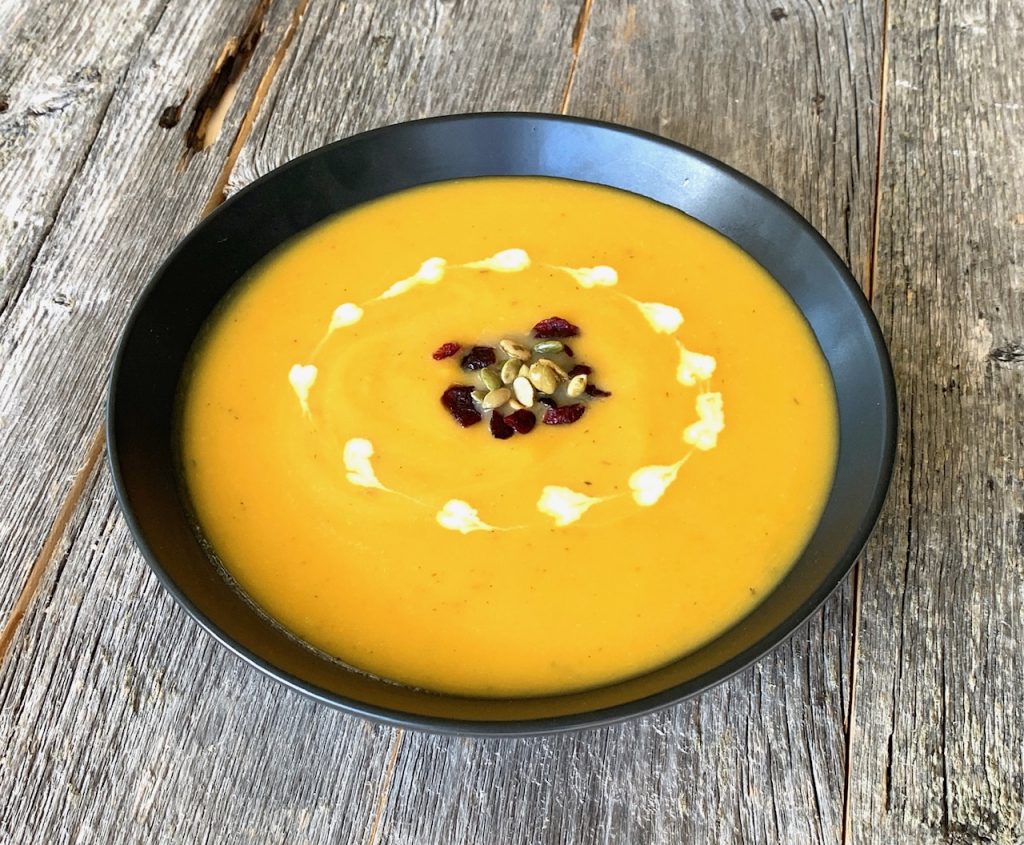
One of the most popular ways to use cubed squash is in Butternut Squash Soup. Ours is garnished with pumpkin seeds and dried cranberries and makes the perfect starter, light lunch, or dinner.
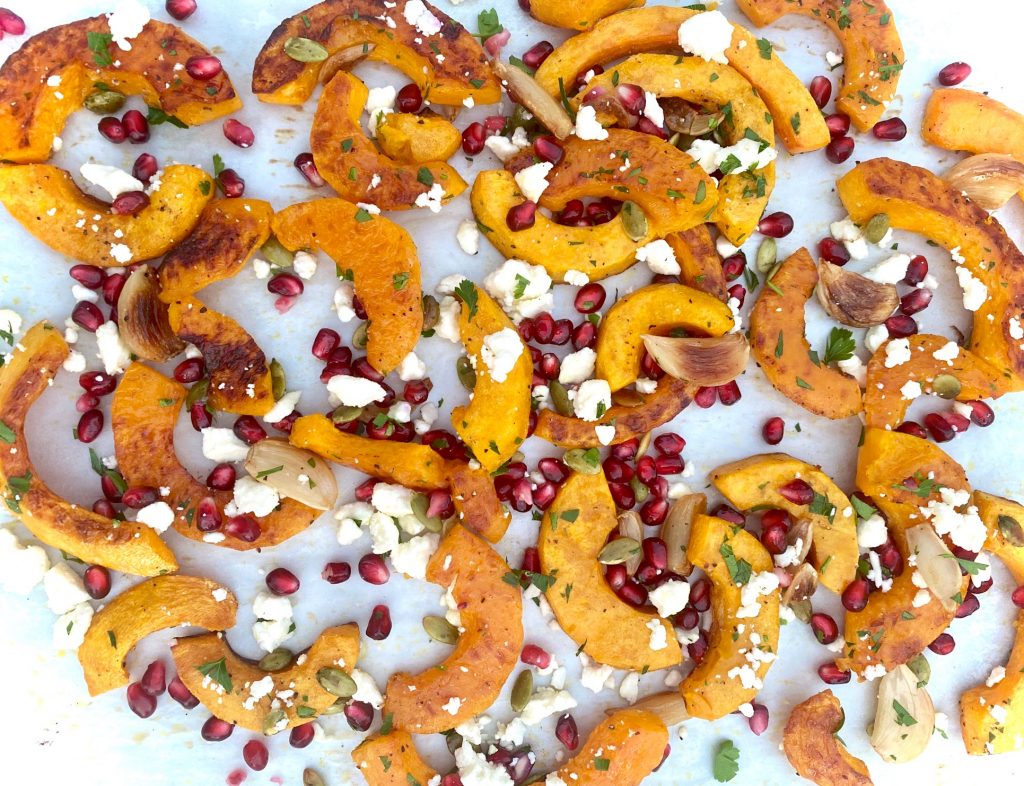
One of our favorite recipes for sliced squash is Roasted Butternut Squash with Pomegranate

How to Cut a Butternut Squash
Ingredients
- 1 butternut squash
Instructions
- Cut stem off butternut squash on both ends
- Cut in half & peel entire butternut squash
- Cut butternut squash in half again
- Remove seeds by scooping them out with a spoon. Discard seeds
- Lay the squash quarters flat side down and cut into slices
- If desired, then cut into cubes